Home
Subscribe:
Contact:
Subscribe to this blog by RSS Follow me on Twitter
Subscribe to this blog by RSS
Featured Posts

Dragon Soul Nerfs

Posted by Malevica on January - 20 - 2012

Blizzard has announced that from January 31st Dragon Soul normal and heroic will be hit with a 5% nerf across the board, which may or may not be followed by further nerfs. Reactions have been predictably strong.

What Blizzard Said

Let’s have some choice excerpts. You can read the full text on MMO-Champion and elsewhere.

Here’s a bit from the first announcement:

During the scheduled server maintenance on the week of January 31, the Dragon Soul raid will become enveloped by the “Power of the Aspects” spell, reducing the health and damage dealt of all enemies in the raid by 5%. This spell will grow progressively stronger over time to reduce the difficulty and make the encounters more accessible. The spell will affect both normal and Heroic difficulties, but it will not affect the Looking for Raid difficulty.

The spell can also be disabled by talking to Lord Afrasastrasz at the beginning of Dragon Soul, if a raid wishes to attempt the encounters without the aid of the Dragon Aspects.

So it’s a flat 5% nerf to health and damage done, no mention of removal of mechanics or mechanic changes à la Firelands. The scale is similar to the ICC progressive nerf/buff, and just like the ICC effect it can be turned off if you want to.

Later on, a follow-up post with clarification and, importantly, explanation was posted:

Believe it or not there are actually guilds and raiding groups that are attempting to progress through Normal and Heroic raids, but are hitting a wall, and have been hitting a wall. We have actually statistical date [sic.] we base our changes on, we know exactly how many people are clearing these raids each week, we know exactly how many people are able to down just a few bosses, and how many were only able to down a few bosses every week for weeks on end and then stopped raiding altogether.

The issue we’re constantly trying to combat is the one where people feel like they’re just out of options. One way this is an issue is the content is too easy, they blasted through it, have everything they could possibly want, and have nothing else to do. Ideally that’s a small subset of very hardcore players. For everyone else it’s a feeling of just being stuck with no possible way to progress. Very few players are willing to suit up, buff up, do all the necessary requirements to raid, jump in, and then do no better than they did last week for hours and hours, only to return next week and do the same.

[…]

If they don’t have to be like us, why do they have to have nerfs to get to our position in HM Raiding?
Because they want to and they pay the same amount for the game? I don’t know, man. How is it good for the game to have 1% of players parading around for months and months and a 99% sitting around with nothing to do because they’re sick and tired of wiping?

[…]
We plan to increase the spell by 5% about every month, but we’re not sure if we’ll need to. If we see a lot of people able to keep progressing and downing bosses, maybe 5% is all we need. It’s going to be watching completion numbers and seeing where that gets us. We’re not assuming we’ll need to go as far as we did with ICC. It’s not going to be automatic, our hand is on the dial.

The increase is not automatic or set in its frequency. We will be manually controlling when it increases, if at all. It will be completely based on how many people we see able to complete the raid, and our decision to increase it or not.

Needless to say, much has been made of these two announcements.

Reactions

Taking a quick, far from exhaustive look down my Google Reader and Twitter, I can see several really great points being made. Gina at Healbot.net looks at it in terms of how it affects raiding guilds, particularly when it comes to recruitment. She describes two scenarios:

Option A) Turn off the buff. Fall behind on progression because everyone and their mother is using the buff. Fall behind on server leaderboard. Does it matter that we clear it without the nerf? Not so much, leaderboards don’t show the difference unless you look at clear dates.
Option B)
Succumb to the buff, get totally demotivated (/sigh), and let it hang over your head that you cleared from 3+ on HC after the nerf and had to do it with the buff or fall farther behind.

Looked at this way it’s a real no-win situation.

Kurn made a similar point:

While yes, it can be turned off, I don’t know that many raiders will take advantage of that option. What looks better when recruiting — 2/8 HM (no buff) or 5/8 HM?

In my experience while it’s not the be all and end all, server ranking is a major determining factor in the rate of applications received by guilds, especially those not at the cutting edge; a large proportion of applicants will simply work their way down WoWProgress, and if you’re a fair way down that list it’s a lot more work to recruit without a really good selling point. Saying that you can easily turn the buff off assumes both that your entire team is of one mind on the subject (which might not be the case) and that your team is stable enough to not be affected by turnover and recruitment.
Guilds do not exist in a vacuum, and the decision about the buff is not solely determined by in-game factors.

Gina also sums her feelings up in a way I can definitely relate to:

I feel a sense of disapointment and I’m sorry for my raid team. Sorry I didn’t push us harder, faster, and get us more HC kills.

Nerfing current content reminds us that raids, at launch, are intended for a different audience than us. Once they’ve been through the content, it gets changed to be more suitable for hoi polloi. That’s not a good feeling. I want to raid the same content, albeit a bit later and with more gear, as everyone else.
What’s more it feels slightly patronising to me, as if the game is somehow taking pity on us and nerfing bosses so we don’t have to wipe too many times.

Another thought from Kurn:

I still wear my Hand of A’dal title because of what it took for us to kill Vashj and Kael and finish the Vials of Eternity quest.

Those were my favourite days of WoW; pushing hard to achieve something, even though I was months behind others, knowing that, apart from minor tweaks and slight adjustments, the encounters were basically the same as they had been when the server first guilds had done them. (Until the 3.0 nerf, anyhow.)

Raiders like us who take their in-game achievements seriously are bothered by when we kill bosses, pre- or post-nerf. A post-nerf kill, regardless of the size of the nerf, feels illegitimate, as if we’ve used a cheat code or killed the boss’s weaker sibling. Many guilds insist on tackling heroic modes because normal mode kills aren’t enough of a challenge and therefore don’t give enough of a psychological reward; as normal modes are to heroic modes, so post-nerf bosses are to pre-nerf bosses.

Juvenate of WTS Heals (@WTSHeals) on Twitter was one of several people who brought the LFR mode into the equation:

I always thought the ICC nerfs were so that people can see the content. We have raid finder now.

When LFR was announced, I was hopeful that LFR would allow people to “see content” without needing to nerf normal modes. Unfortunately, as Adam Holisky points out at WoWInsider:

The Raid Finder, while good, isn’t for everyone. Some people really hate pugging — so much so that they’d rather not play the game than have to pug. There are some people who are just interested in running content with their guild, and if their guild doesn’t want to run the Raid Finder, then it’s normal modes.

LFR might have fixed the difficulty problem, but it has its own problems relating to the format and to the social side of raiding. Perhaps if there existed a 10-man LFR difficulty mode that a casual or otherwise less-progressed 10-man guild could elect to tackle we’d have our third difficulty level, but at it stands LFR is an entirely separate animal and can’t just be considered an easier version of the raid that people can do if they can’t handle normal mode.

Note, I’m not arguing for the removal of LFR either. The match-making functionality and the ease and speed of grouping is a huge bonus for a vast number of people, and the game experience for many people has been dramatically improved by the feature. All I’m saying is that it didn’t achieve one of the things I, and others, had hoped it might.

Finally, in what I suspect might be a regrettable slip from whoever wrote that second Blue post, there was a noticeable change in the tone of the rationale this time around. In previous tiers the changes have been framed more towards “greater accessibility” and “allowing people to see the content”. While we’ve not always agreed with the decision, the intention has always appeared relatively noble. This time around though there was some extra language which very definitely pushed Kurn’s buttons, and I can certainly see why. Here are those lines again:

The issue we’re constantly trying to combat is the one where people feel like they’re just out of options. […] For [all but a small subset of very hardcore players] it’s a feeling of just being stuck with no possible way to progress. Very few players are willing to suit up, buff up, do all the necessary requirements to raid, jump in, and then do no better than they did last week for hours and hours, only to return next week and do the same.

[…]

If they don’t have to be like us, why do they have to have nerfs to get to our position in HM Raiding?
Because they want to and they pay the same amount for the game? I don’t know, man. How is it good for the game to have 1% of players parading around for months and months and a 99% sitting around with nothing to do because they’re sick and tired of wiping?

I wouldn’t go quite as far as Kurn did in her reaction to these comments, although she’s perfectly entitled to her opinion and as I’ve said I do understand her perspective. But it is very provocative to see Blizzard effectively saying that they’re not catering for you.

The (valid) point Blizzard is trying to make here is that insurmountable roadblocks cause players to leave the game and that’s bad for everyone. Thus, they argue, if people have reached their ceiling they’ll get bored unless the difficulty is tweaked to let them progress again (until they reach another ceiling, when the number goes up to 10%, etc.). Clearly the data they have suggests to them that a large enough number of guilds have reached their ceiling to start the tweaking.

The trouble is, one size doesn’t fit all. Some of us are not at our ceiling, so we’re seeing our experience altered, our rewards diminished, our playing field made less level, for the benefit of other people. As humans, that just isn’t going to sit right with us.

And that “they pay the same money, they should be able to do whatever they want to” line was really ill-advised, and I note with interest that it’s been edited out of the forum post.

Et Moi?

As much as I’m disappointed by the nerfs to current content it’s not the first time it’s happened while I’ve been raiding and the game’s still here, I’m still raiding, and I can’t see either of those things changing in the foreseeable future. I’m happy with my current guild, and I’m enjoying the Dragon Soul encounters. Even with the 5% nerf there will still be plenty of challenge to be had.

When I look over the list of issues most of them are external, they relate to how other people will perceive me, or how I perceive my achievements in comparison with other people. So the trick is to focus on the team, focus on the encounters in front of us, and worry a little less about rankings and progression.

Possibly Related Posts:

24 Comments

Heroic Warlord Zon’ozz

Posted by Malevica on January - 3 - 2012

NB: This guide will assume you’ve already read my normal Warlord Zon’ozz strategy, or otherwise know the details of the fight on normal mode.

Fight Summary

Moving from normal to heroic mode there are three big changes. The first is that Zon’ozz has an increased health pool but a very tight 6 minute berserk timer, so you need to bounce the ball more times to stack Void Diffusion higher on the boss so you can beat it. The second big difference is that during the Black Blood of Go’rath phase 8 tentacle adds will spawn around the room, and the damage dealt by the Black Blood of Go’rath is multiplied by the number of tentacles still alive. The third is that the Disrupting Shadows debuff he casts on 3 random players in your raid will deal AoE damage and and AoE knockback when dispelled, so you have to take great care with dispelling it.

Let’s go through the more straightforward two first, then we’ll come to the tentacles.

Void Diffusion

As a reminder, every time you bounce the Void of the Unmaking it gains a stack of Void Diffusion, causing it to do 20% more damage on the next bounce. It also gives Zon’ozz a stack of Focused Anger, increasing his physical damage by 20% and his attack speed by 5%. When the Void is allowed to hit Zon’ozz, he gains Void Diffusion instead, increasing all damage he takes by 5%, and his Focused Anger stacks reset. This also triggers the Black Blood phase, which we’ll deal with later.

The Void Diffusion debuff is the key to beating his berserk timer. The debuff lasts 2 minutes, so you are able to stack it up progressively over the course of the fight every time you let the Void hit him. However, in order to beat the berserk you’ll need quite a few stacks. A typical bounce strategy is to go with 7 each time, and 5 on the fourth round. After the fourth set of bounces, you ignore the Black Blood phase adds entirely, pop Bloodlust and hope to burn him down before he reaches Berserk or your healers run out of cooldowns/mana/will to live.

If your DPS is low, you might want to push an extra pair of bounces, either on the first or last sets. 7 bounces shouldn’t require cooldowns to survive (and you’ll need them later, so try and save them) but the damage will be pretty high by the end. 9 may require special treatment, perhaps a PW:B if you have one spare, or you can use tricks like having a Mage with Cauterise or a Shadow Priest with Dispersion solo one bounce.

Disrupting Shadows

On 10-man heroic Zon’ozz will cast this on 3 random players at a time. Before resistances it deals 35,000 Shadow damage per 2s, but the real danger it poses is that when it gets dispelled it deals 60,000 Shadow damage to, and knocks back, everyone within 10 yards.

Because of the significant AoE damage the dispel causes, usually no one should be dispelled before they’ve run out of their cluster. On the other hand, you don’t want too many people running out before the Void reaches your group either or the damage won’t be split widely enough and people are liable to die. So when the Void is on its way to your group, you need to heal the debuffed people through the damage, and only when you’ve split the Void damage should they run out and be dispelled. This will stretch healing, but is manageable; Disc priests can help a lot here with absorbs acting as an extra buffer.

Getting this right is one of the biggest challenges in the encounter. You need to watch the game space as well as your healthbars so you can see where people are and when they’re 10 yards away. It’s also worth coordinating who will do the dispelling so you don’t get two dispels at the same time or waste mana. We assign one healer to the ranged and one to the melee and they dispel their own clusters only.

Black Blood of Go’rath

On normal difficulty, Black Blood of Go’rath is just a raid-wide AoE, you group up and heal through it and get back to bouncing the Void again. On Heroic the Black Blood of Go’rath deals 3,795 Shadow damage per 2 sec for every one of the freshly-spawned 8 tentacle adds (one Claw, two Flails and five Eyes) still alive. What this means is that the AoE damage at the start of the fight is pretty intense, but becomes manageable once 2-3 of the tentacles have died.

The way to deal with this is to have everyone group up at the start of the phase, throw out heavy AoE healing along with a raid cooldown, and have your DPS quickly take out the nearest three tentacles. (I’ll describe our assignments in a moment). The timing is such that you will be able to use 3-minute cooldowns every other Black Blood phase, so plan accordingly; remember that if you’re going to go for a burn after the fourth round of bounces, you’ll need to save your best cooldowns for that phase, which might affect which you choose to start with.

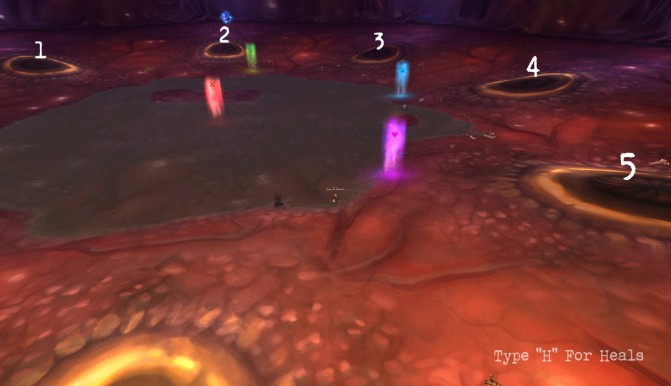
The tentacles spawn in predictable places, which makes planning for them easier:

Heroic Warlord Zon'ozz Positioning Diagram - Screenshot with Raid Markers

Heroic Warlord Zon'ozz Positioning Diagram. Boss position is the red cross; Black Blood phase group-up spot is the blue square; the green triangle and purple diamond are the two Flail spawn positions

We split the raid into three teams at this point:

  • Left: 2 ranged + 1 healer
  • Right: 2 ranged + 1 healer
  • Middle: 3 melee

Here’s how we handle this phase:

  1. Everyone groups up on the blue marker, right underneath the Claw. The claw needs to be tanked or it’ll do substantial raid-wide AoE Shadow damage and people have a bad habit of getting owned by this.
  2. Left group takes out the nearby Flail (spawns on the green triangle marker) while the Right group takes the right-hand nearby Eye (number 4) and the Middle group kills another nearby Eye (number 3). Except for the melee everyone should be stacked up at this point to help with the healing
  3. Once these first three tentacles are dead, the Left group heads out to deal with their two assigned Eyes (numbers 1 and 2), the Right group kills their Eye (number 5) and Flail (spawns on the purple diamond marker), and the Middle group switches to the boss, cleaving the Claw down at the same time.

After this phase ends the boss continues to be tanked on the Blue marker while the ranged position shifts to the centre of the room. This positioning then remains until the end of the fight.

Spec and Glyphs

The damage is quite high, so you don’t get the natural lulls you get elsewhere, but Smiting can be very useful for helping your team kill their tentacles in time, and you can build up Evangelism stacks during the early bounces in preparation for either the later few bounces or the beginning of the Black Blood phase.

In terms of Glyphs, it’s again all about the output. Prayer of Healing and Power Word Barrier are must-haves here, and I’d be inclined to take Penance for spot-healing; towards the end of each light phase Zon’ozz will be meleeing the tank pretty hard, and people may also be low from having Disrupting Shadoew dispelled.

Prayer of Mending is a very strong Major glyph here, because of the long periods of sustained raid damage.

Cooldown Usage

PW:B should be alternated with another raid cooldown at the start of each Black Blood phase to keep the raid alive until a couple of tentacles are down. Once everyone’s grouped up you can throw it down and it makes a big difference. I’d recommend saving Divine Hymn for the final burn phase, since you’ll only get one chance to use it and that’s when you’ll need a second cooldown up your sleeve.

Pain Suppression has two uses. First, you can use it to keep the tank alive when Zon’ozz is at >5 stacks of Focused Anger (or whenever else they need it). Especially if your assigned tank healer has to run out because they were unlucky enough to get Disrupting Shadows. The other use for it is if the ranged DPS are slow to return to the middle after killing their tentacles, you can save someone who will find themselves taking a larger share of the damage.

Life Grip can be used to get people to cluster points quickly, but shouldn’t be relied upon.

The Berserk timer on the fight is 7 minutes, so if you want a second Hymn of Hope you’ll have to use it very early in the fight, pretty much just after the pull. You could spam bubbles like crazy before the first bounce and then regen all that mana, but this might not pay off. The best time to pop this, if you’re only going once, is just after everyone’s got back in position after the Black Blood phase, but not when there’s a round of debuffs coming out. The damage is relatively low at this time.

You should be able to get a second Shadowfiend cast in though, so use it early and have it ready for near the end of the fight to allow you to spam like crazy.

Other Tips

Not too much besides what I’ve already touched on. The damage profile is more ramped than spiky, so if you can build up Evangelism before the high-damage portions you’ll be in a strong position. Clever, sparing use of PW:S as a buffer can be really helpful here too, because raid members will be taking some pretty large hits from time to time. In particular, bubbling the people with the debuff is a great way of buying time to allow them to run out and be dispelled safely.

The other thing of note is that Smite and Holy Fire are affected by Zon’ozz’s Void Diffusion buff. Especially in the nuke phase at the end you can get a lot of mileage out of Smite healing. At 45k per Smite your HPS will approximate that of PoH-spamming, plus Atonement stacks DA when it crits and is smart-targeting; not to mention you could also be pushing out 50k+ DPS at a time when, especially on early kills, you’ll be right up against the berserk timer.

Possibly Related Posts:

5 Comments

New Year, New Look!

Posted by Malevica on January - 1 - 2012

Type “H” For Heals has a shiny new look for 2012!

I started this blog back in 2009 and in those early days when I was really still only dabbling with the whole “blogging” thing I picked the Suffusion theme. It was free, it looked good, and it was pretty easily customisable. It’s served me well to this point, but as is often the way I began to feel a nagging desire for a change.

And this is the result. The apple hasn’t fallen too far from the tree – I still like dark, blue themes in general – but I think this one looks a bit more textured and modern than the old one.

The layout and graphics are based on the freely-available Firecrow theme, although I’ve spent a good deal of extra time rewriting the basic theme to better suit my needs. Some of that was fixing little quirks (on a dark theme, having the hover colour for links set to black is not smart…), but there were some more significant tweaks as well:

  • I added a second sidebar to the right-hand side so that I can keep more things visible above the fold.
  • I widened the theme in general, but stuck with a fixed width. I know that a fixed width doesn’t always play too nicely with small screens, although most small-screen devices have their own tricks for rendering wide pages these days. I just object, as someone with a desktop PC and 1680 pixels to play with, to viewing the web through an 600 pixel-wide window (I’m looking at you, WoW Insider…); at the same time, really wide text blocks still look slightly odd to me. I’ll accept that this is more or less a product of my own quirks, but then it is my blog, after all!
  • I moved the subscribe and contact buttons out of the sidebar and into the header, so they’re more prominent and don’t push sidebar content too far down.
  • I added sharing buttons at the bottom of each post. Oddly I ummed and ahhed over this one for quite a while. On the one hand having people think enough of a post I’ve written to want to share it on G+, Facebook, Twitter and their ilk is undoubtedly a good thing, and it’ll certainly help bring in more readers from different places; on the other hand there’s just something about putting in those buttons, even in miniature, that makes me feel like I’m being just a little bit… needy?
    Rationally though, they’re helpful to people and they don’t detract from the posts, so in the end up they went.
  • The new theme has a “Featured Posts” box; I’ve not had one before. Currently it’s set up simply to show the most recent 4 posts from my main on-topic categories, but I might experiment with setting specific posts to float to the top instead.
  • A consequence of this feature is that I’ve had to assign featured images to my posts. This is a good thing, because frankly I suck at using images in my posts, so anything that encourages me to use more of them can only be a good thing.
  • I removed the built-in WordPress nofollow attributes from external links on my posts. This way if you make a reasonable (non-spam) comment on a post, the link back to your blog counts for something with search engines as well as just people. As it should be.

Hope you like the new look!

P.S. Don’t be surprised to see further small changes as things settle in and I change my mind repeatedly about the little things, but also do yell if you spot something that looks a bit weird, because I might well have missed something.

Possibly Related Posts:

  • No Related Posts
2 Comments

About My Heroic Guides

Posted by Malevica on December - 15 - 2011

I’m doing the heroic guides in the same format as the normal mode guides, but instead of doing them all at once I’ll be pushing them out one at a time as we gain experience with the encounters. Keep checking the front page, this post and the Raid Guides menu above for additions, or you could always subscribe to see new posts the minute they’re published. </shameless-plug>

I would really appreciate comments on these guides if people have them. I typically wait until we’ve either killed it or we’ve nailed the strategy before posting, but there may still be things I’ve overlooked that need including, and commenters are really valuable for improving the guides for everyone.

Big List of Heroic Guides

MorchokUp!
Yorsahj the UnsleepingUp!
Warlord Zon’ozzUp!
Hagara the StormbinderSoon!
UltraxionSoon!
Warmaster BlackhornSoon!
Spine of DeathwingSoon!
Madness of DeathwingSoon!

Possibly Related Posts:

  • No Related Posts
5 Comments

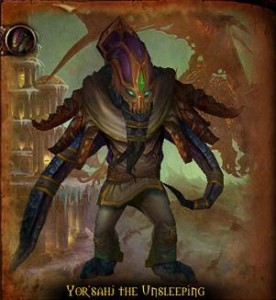
Heroic Yorsahj the Unsleeping

Posted by Malevica on December - 15 - 2011

NB: This guide will assume you’ve already read my normal Yorsahj strategy, or otherwise know the details of the fight on normal mode.

Fight Summary

The key difference between normal and heroic mode is that Yorsahj spawns four slimes instead of three, dramatically increasing the damage and meaning that you have some more difficult choices to make about which add to kill.

What this means in practice is that you’ll have to deal with the Purple debuff a lot more often, about half of the combinations will include a Purple, and your DPS will need to be much more on the ball to kill the double spawn of adds that comes from a Black/Yellow combination.

There’s also a trick to using the Blue Mana Void to your advantage, which I’ll talk about later.

First though, those combinations. There are in fact only 6 combinations that come up. I’ll list them all, along with a recommended kill target (underlined), and then talk about them all in detail.

These are listed in the order that the current version of DBM reads them out so you can use this as a quick reference if need be. I’ve left Black as white, for obvious reasons.

PurpleRedYellowBlack

PurpleGreenBlackBlue

GreenRedBlueBlack

GreenYellow – Black – Red

Blue – Black – PurpleYellow

BluePurpleGreenYellow

Combinations in detail

PurpleRedYellowBlack

This is just nasty. Kill the Yellow to keep the damage in check, and then go easy on the heals. You may blow one or two people up, but keep your head and plan ahead and this one is manageable.

If you have a surfeit of cooldowns, you could consider killing Purple, but you’ll need your cooldowns for a later combination so I’d recommend going with Yellow initially and learning to handle it.

The rest of the damage is pretty rough though, so blow those cooldowns and crank out the AoE heals.

PurpleGreenBlackBlue

By contrast, this is one of the easiest combinations to deal with. We kill the Black here to allow ourselves some solid distraction-free DPS time on the boss, but you could go with Green instead for a real healing chillout.

GreenRedBlue – Black

You have to pick between Red and Green and since you want to stack to kill Black adds, pick Green to kill. There’s a fair amount of raid damage out there, but there’s no Purple to worry about so go to town with the heals and you should be fine.

GreenYellow – Black – Red

This is another really rough one. Whichever way you slice it you’ll end up with 3 AoE damage abilities to deal with, so you’re going to need to pop some raid cooldowns and AoE heal your heart out to get through it. If there are no cooldowns available pop a Bloodlust instead, which will also help with the Black adds.

You’re pretty much forced to kill the Green so you can stand in to reduce the damage from the Red.

Blue – Black – PurpleYellow

An easy one. You need to kill the Yellow, because if you don’t the AoE it does will overwhelm you and you can’t heal enough because of the Purple, leaving you with just the damage from the adds to handle, which is manageable.

BluePurpleGreenYellow

Here you’re picking between Yellow and Green to kill, and as with the previous combination you should kill the Yellow for the same reason.

That leaves Green and Purple, which is healable.

Handling the Mana Void

The trouble with the Mana Void is that when you get your mana stolen you really need it back immediately to deal with the silly damage, and because four combinations include a Cobalt Blood you won’t have mana cooldowns available every time. You don’t have time to wait while the Mana Void is taken down from full HP, people will be dead by then.

So, when the first Mana Void spawns you should pop your raid mana cooldowns (Mana Tide, Hymn of Hope) and get by without killing the Mana Void at that time. Then either throw spare DPS on it or assign one person to it specifically while the next slimes are coming in; either way, get it down to around 10% then leave it alone.

Now, when the next Mana Void spawns and you have no mana and no cooldowns left, quickly kill off the old Mana Void for a free full mana bar. DPS the new Mana Void down to 10% again, rinse and repeat.

The advantage of this, despite being a bit more complicated, is that you’re always only a few seconds away from a replenished mana bar whenever you need it.

Deep Corruption

Here’s a full list of abilities that stack Deep Corruption.

Highlights for Discipline Priests:

  • Atonement – 1 stack
  • Binding Heal – 1 stack to the person you heal. NO STACKS for yourself.
  • Divine Hymn – 1 stack per tick (i.e. will wipe your raid)
  • Holy Fire (with Atonement) – 1 stack per tick. Do not use if you have atonement.
  • Penance – 1 stack for the whole channeled cast (i.e. not 1 per tick)
  • Power Word: Shield – 1 stack (even when glyphed)
  • Prayer of Healing – 1 stack
  • Prayer of Mending – NO STACKS
  • Renew – 1 stack on initial application

Binding Heal is a useful spell, because it doesn’t add stacks to you. The downside is that it doesn’t heal for as much as Greater Heal, so if the target is taking big damage and you’re not in danger GH is still favoured.

Do not try and use Atonement here, especially not with Holy Fire. Atonement in general is bad because you can’t plan where it’ll go and it’s fairly weak healing anyway, and especially not Holy Fire because every tick adds another stack.

Penance, Greater Heal and Power Word: Shield are your staples depending on what’s needed most, and because it doesn’t generate stacks, keep PoM bouncing at all times for stack-free healing.

PW:B doesn’t do anything here, so use it if you need it, although it’s better to save it for the evil combinations with 3 AoE damage abilities.

Spec and Glyphs

This fight requires really high output, and is a great example of a time when Archangel shines. You can DPS the boss or the incoming slime to stack Evangelism, then pop it for a healing boost when things get rough later on. It’s also a fantastic boost just after the Mana Void has spawned.

In terms of Glyphs, it’s again all about the output. Prayer of Healing and Power Word Barrier are must-haves here. Pick between PW:S or Penance depending on your usage. I went with PW:S, but there’s a case for both.

Because of no dispels and high raid damage, Prayer of Mending is the Major top pick here.

Cooldown Usage

PW:B and Divine Hymn should be kept for the Yellow – Black – Red combinations. You’ll need them to survive the damage.

Pain Suppression should likewise be use on the nasty AoE healing combinations to keep the tank relatively out of trouble while you focus on the raid. Anything with Yellow up will do that.

Life Grip is useful either to get people in on the Red or out to the incoming slime to get it killed in time.

I’ve touched on Hymn of Hope before, it can be used just after the Mana Void spawns to get your raid some mana back up. Remember that the buff grants a chunk of free mana while it lasts, so even if you have to break off to heal after only a couple of seconds chanelling it’s still worth it. If you’ve got your raid pre-shielded, this ought to buy you enough time to get a few ticks off.
Ideally though, you’d like a non-healing Priest to pop HoH if you have one, so you don’t need to take time out from healing.

I’d suggest saving Shadowfiend for another Mana Void phase. Although you’ll get mana back soon from the Mana Void, there may be times when you need it sooner. Because of the effect of the Mana Void, there’s no point holding more mana than you need throughout the fight, it’s better to have it in reserve.

Other Tips

As I’ve mentioned previously, Archangel from DPSing the adds or boss is very useful for AoE damage phases. Just don’t Holy Fire the boss for a Purple phase, because each tick of Atonement adds a stack of Deep Corruption. he fight on normal mode.

You can prepare for either a Blue or Purple (or both) phase by throwing as many heals and particularly PW:S around the raid as possible before the Deep Corruption buff comes up, to get some stack-free healing and protection out there. You’re going to lose your mana or be limited in your healing ability anyway, so you might as well get a head-start even at high cost.

Possibly Related Posts:

3 Comments