NB: This guide will assume you’ve already read my normal Warlord Zon’ozz strategy, or otherwise know the details of the fight on normal mode.
Fight Summary
Moving from normal to heroic mode there are three big changes. The first is that Zon’ozz has an increased health pool but a very tight 6 minute berserk timer, so you need to bounce the ball more times to stack Void Diffusion higher on the boss so you can beat it. The second big difference is that during the Black Blood of Go’rath phase 8 tentacle adds will spawn around the room, and the damage dealt by the Black Blood of Go’rath is multiplied by the number of tentacles still alive. The third is that the Disrupting Shadows debuff he casts on 3 random players in your raid will deal AoE damage and and AoE knockback when dispelled, so you have to take great care with dispelling it.
Let’s go through the more straightforward two first, then we’ll come to the tentacles.
Void Diffusion
As a reminder, every time you bounce the Void of the Unmaking it gains a stack of Void Diffusion, causing it to do 20% more damage on the next bounce. It also gives Zon’ozz a stack of Focused Anger, increasing his physical damage by 20% and his attack speed by 5%. When the Void is allowed to hit Zon’ozz, he gains Void Diffusion instead, increasing all damage he takes by 5%, and his Focused Anger stacks reset. This also triggers the Black Blood phase, which we’ll deal with later.
The Void Diffusion debuff is the key to beating his berserk timer. The debuff lasts 2 minutes, so you are able to stack it up progressively over the course of the fight every time you let the Void hit him. However, in order to beat the berserk you’ll need quite a few stacks. A typical bounce strategy is to go with 7 each time, and 5 on the fourth round. After the fourth set of bounces, you ignore the Black Blood phase adds entirely, pop Bloodlust and hope to burn him down before he reaches Berserk or your healers run out of cooldowns/mana/will to live.
If your DPS is low, you might want to push an extra pair of bounces, either on the first or last sets. 7 bounces shouldn’t require cooldowns to survive (and you’ll need them later, so try and save them) but the damage will be pretty high by the end. 9 may require special treatment, perhaps a PW:B if you have one spare, or you can use tricks like having a Mage with Cauterise or a Shadow Priest with Dispersion solo one bounce.
Disrupting Shadows
On 10-man heroic Zon’ozz will cast this on 3 random players at a time. Before resistances it deals 35,000 Shadow damage per 2s, but the real danger it poses is that when it gets dispelled it deals 60,000 Shadow damage to, and knocks back, everyone within 10 yards.
Because of the significant AoE damage the dispel causes, usually no one should be dispelled before they’ve run out of their cluster. On the other hand, you don’t want too many people running out before the Void reaches your group either or the damage won’t be split widely enough and people are liable to die. So when the Void is on its way to your group, you need to heal the debuffed people through the damage, and only when you’ve split the Void damage should they run out and be dispelled. This will stretch healing, but is manageable; Disc priests can help a lot here with absorbs acting as an extra buffer.
Getting this right is one of the biggest challenges in the encounter. You need to watch the game space as well as your healthbars so you can see where people are and when they’re 10 yards away. It’s also worth coordinating who will do the dispelling so you don’t get two dispels at the same time or waste mana. We assign one healer to the ranged and one to the melee and they dispel their own clusters only.
Black Blood of Go’rath
On normal difficulty, Black Blood of Go’rath is just a raid-wide AoE, you group up and heal through it and get back to bouncing the Void again. On Heroic the Black Blood of Go’rath deals 3,795 Shadow damage per 2 sec for every one of the freshly-spawned 8 tentacle adds (one Claw, two Flails and five Eyes) still alive. What this means is that the AoE damage at the start of the fight is pretty intense, but becomes manageable once 2-3 of the tentacles have died.
The way to deal with this is to have everyone group up at the start of the phase, throw out heavy AoE healing along with a raid cooldown, and have your DPS quickly take out the nearest three tentacles. (I’ll describe our assignments in a moment). The timing is such that you will be able to use 3-minute cooldowns every other Black Blood phase, so plan accordingly; remember that if you’re going to go for a burn after the fourth round of bounces, you’ll need to save your best cooldowns for that phase, which might affect which you choose to start with.
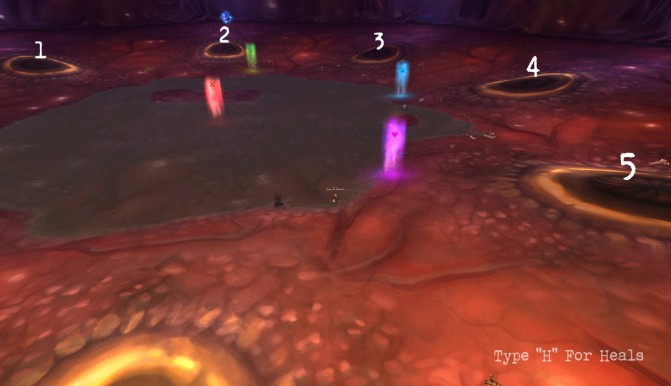
The tentacles spawn in predictable places, which makes planning for them easier:

Heroic Warlord Zon'ozz Positioning Diagram. Boss position is the red cross; Black Blood phase group-up spot is the blue square; the green triangle and purple diamond are the two Flail spawn positions
We split the raid into three teams at this point:
- Left: 2 ranged + 1 healer
- Right: 2 ranged + 1 healer
- Middle: 3 melee
Here’s how we handle this phase:
- Everyone groups up on the blue marker, right underneath the Claw. The claw needs to be tanked or it’ll do substantial raid-wide AoE Shadow damage and people have a bad habit of getting owned by this.
- Left group takes out the nearby Flail (spawns on the green triangle marker) while the Right group takes the right-hand nearby Eye (number 4) and the Middle group kills another nearby Eye (number 3). Except for the melee everyone should be stacked up at this point to help with the healing
- Once these first three tentacles are dead, the Left group heads out to deal with their two assigned Eyes (numbers 1 and 2), the Right group kills their Eye (number 5) and Flail (spawns on the purple diamond marker), and the Middle group switches to the boss, cleaving the Claw down at the same time.
After this phase ends the boss continues to be tanked on the Blue marker while the ranged position shifts to the centre of the room. This positioning then remains until the end of the fight.
Spec and Glyphs
The damage is quite high, so you don’t get the natural lulls you get elsewhere, but Smiting can be very useful for helping your team kill their tentacles in time, and you can build up Evangelism stacks during the early bounces in preparation for either the later few bounces or the beginning of the Black Blood phase.
In terms of Glyphs, it’s again all about the output. Prayer of Healing and Power Word Barrier are must-haves here, and I’d be inclined to take Penance for spot-healing; towards the end of each light phase Zon’ozz will be meleeing the tank pretty hard, and people may also be low from having Disrupting Shadoew dispelled.
Prayer of Mending is a very strong Major glyph here, because of the long periods of sustained raid damage.
Cooldown Usage
PW:B should be alternated with another raid cooldown at the start of each Black Blood phase to keep the raid alive until a couple of tentacles are down. Once everyone’s grouped up you can throw it down and it makes a big difference. I’d recommend saving Divine Hymn for the final burn phase, since you’ll only get one chance to use it and that’s when you’ll need a second cooldown up your sleeve.
Pain Suppression has two uses. First, you can use it to keep the tank alive when Zon’ozz is at >5 stacks of Focused Anger (or whenever else they need it). Especially if your assigned tank healer has to run out because they were unlucky enough to get Disrupting Shadows. The other use for it is if the ranged DPS are slow to return to the middle after killing their tentacles, you can save someone who will find themselves taking a larger share of the damage.
Life Grip can be used to get people to cluster points quickly, but shouldn’t be relied upon.
The Berserk timer on the fight is 7 minutes, so if you want a second Hymn of Hope you’ll have to use it very early in the fight, pretty much just after the pull. You could spam bubbles like crazy before the first bounce and then regen all that mana, but this might not pay off. The best time to pop this, if you’re only going once, is just after everyone’s got back in position after the Black Blood phase, but not when there’s a round of debuffs coming out. The damage is relatively low at this time.
You should be able to get a second Shadowfiend cast in though, so use it early and have it ready for near the end of the fight to allow you to spam like crazy.
Other Tips
Not too much besides what I’ve already touched on. The damage profile is more ramped than spiky, so if you can build up Evangelism before the high-damage portions you’ll be in a strong position. Clever, sparing use of PW:S as a buffer can be really helpful here too, because raid members will be taking some pretty large hits from time to time. In particular, bubbling the people with the debuff is a great way of buying time to allow them to run out and be dispelled safely.
The other thing of note is that Smite and Holy Fire are affected by Zon’ozz’s Void Diffusion buff. Especially in the nuke phase at the end you can get a lot of mileage out of Smite healing. At 45k per Smite your HPS will approximate that of PoH-spamming, plus Atonement stacks DA when it crits and is smart-targeting; not to mention you could also be pushing out 50k+ DPS at a time when, especially on early kills, you’ll be right up against the berserk timer.


Berserk is 6mins btw.
Recommend you bring a disc priest to spam Smite in the burn phase so he can beat everyone in DPS while doing huge heals.
And our kill took 5:59 – we’re totally pro! Have edited in the berserk timer, it’s good information.
Anyway I didn’t beat everyone on DPS, just the tanks. Real DPS were doing at least twice what I managed. And to you I say: L2DPS, n00b tank!
This guide should be re-named “Priest guide to Zon’ozz heroic” since it pretty much completely ignores the existence of druid, paladin and shaman healers.
Unfortunately as a raiding Priest I don’t have enough experience with the other classes to provide a guide with good advice for all the healing classes.
This is predominantly a Priest-centric blog, but can I instead suggest Healbot.net for paladin guides, Cannot Be Tamed for Druid guides, and keep an eye on Shaman Nebula for Shaman guides.
[…] Type H for Heals Heroic Warlord Strategy Posted in Uncategorized « Welcom to the raiding page!!! Links Tank Spot […]