NB: This guide will assume you’ve already read my normal Hagara strategy, or otherwise know the details of the fight on normal mode.
Fight Summary
The heroic version of the Hagara encounter shares the same mechanics as normal mode, but how you approach them needs to be a lot more coordinated in order to get through the fight safely. I’ll break down the differences by phase: normal, Frost and Lightning, and explain how we handle each phase.
Normal Phase
As I’ve said, there’s no new mechanics here, but you do need to be a lot more careful.
The biggest change, which I’ll mention first because it affects everything that follows, is that we choose to tank Hagara near the edge of the platform, by the portal, instead of in the middle, or wherever she happens to be. This is for two reasons: it reduces the risk of Shattered Ice landing on a ranged DPS, and it keeps the tank and melee near where they need to be for Phase 2.
The whole raid needs to be aware that the Ice Lances are a little different on heroic, because the stacking debuff they apply increases Frost damage taken, rather than slowing attack speed. That means you need to share the soaking duty around so that people aren’t taking excessive damage. With strong healing and/or cooldowns someone can survive solo-soaking at a push, but it’s better to share. Also remember that there is a short (3 yard) splash, so don’t get too up-close and personal with your soak-mate. This stacking debuff also makes Shattered Ice a potential one-shot ability, so it’s important to say well behind Hagara at all times as she prefers targets in front of her.
Assigning fixed positions is tricky here because there’s some randomness in who gets targeted and where the orbs spawn, so all of your ranged players (DPS and healers) will need to use their initiative and be actively soaking. We did find it helpful to have people generally hang to one side or the other though, so you don’t end up all clumping at one side. We also avoid crossing the beams by having people move around so that they’re on the appropriate side of the boss, and get targeted ranged to move in close to the melee pack (but not splashing close, of course). The aim here is to make soaking as simple and predictable as possible.
Ice Tombs are still cast on two random players and operate the same way as on normal. It’s a good idea to assign a spot for these part-way between the boss and the middle of the room so that you don’t risk blocking the healers’ line of sight to the tank if they appear in an unfortunate location.
The other big difference concerns Focused Assault. On normal you can just strafe away and she’ll not chase you, but this doesn’t work on heroic where she will merrily follow you. There are two ways to avoid this.
At the start of the fight, and after a Frost or Lightning phase, she will try and cast Focused Assault quickly, so the tank should stand near the edge of the platform and wait for her, so she wastes most of the channel time moving to you. Healers will still need to work hard to keep the tank up if he does get hit though, 50k per 0.5 sec still hurts! At other times, pop a tank or healer cooldown when it’s due, and have another player stand at range and taunt Hagara once she’s casting Focused Assault, with the MT taunting back again before she reaches the ranged. A Holy Pally works well because they have plenty of self-defence, but anyone with a real taunt will do (unfortunately Hunter taunts do not work, it does need to be a “tank” taunt from a Warrior, Druid, DK or Paladin).
In theory Focused Assault can be handled with just cooldowns and heavy healing, but with soaking and possibly Ice Tombs for healers to deal with it’s best to play it safe and minimise your exposure to the damage.
Frozen Tempest
OK, this phase does have one new mechanic to deal Frostflake. This is a magical debuff placed on a random player which slows their movement speed by 10% a stack, stacking every 1 sec up to 10 stacks. When this is dispelled it leaves a patch of frost on the ground that slows movement speed for 50% for anyone inside it. This is rather detrimental to staying out of Ice Waves, so dropping one is to be avoided.
Luckily, dispelling it while the person is inside the bubble prevents the Frostflake Snare from going down; so anyone who gets the Frostflake debuff should immediately step inside the bubble and stay there until they are dispelled, then move out again.
If this is your job, make sure that you have Watery Entrenchment as a custom debuff so you can tell when it’s safe to dispel someone.
Because of the need for dispels it’s best to all move around as a group during this phase, taking out each crystal one at a time, as opposed to just spreading out into smaller teams. We use a raid marker, the purple on the screenshot in the next section, to mark the Crystal where we all start.
Big Note! Hand of Freedom, Cloak of Shadows, Druid shapeshifting and any other effect which removes snares or magic will count as a dispel, so these must be avoided unless you know you’re safely inside the bubble. Your team mates will not thank you if you try and be clever!
Pro tip from Grav: it’s pretty safe to use Aspect of the Pack in this phase and the 30% movement speed boost is a big help to stay ahead of Ice Waves, get into the bubble, and dodge the falling ice things. The falling ice will daze you though, so don’t get hit by it!
I should also address an alternative strategy, which is to have your ranged and healers group up in the middle of the platform while your melee run around the edge. This lets the ranged DPS have free rein to DPS any crystal, and negates the need for them to move if they get Frostflake. The damage is fairly high but at high enough gear levels and with three healers it is possible to heal through this damage. However this strategy is designed as a DPS boost at the expense of healer sanity and it’s probably not going to be necessary now we’re at the 15% nerf point, but it is an option if you’re really struggling with DPS.
Lightning Storm
The main difference in this phase is that there’s twice as many Lightning Pillars as on normal (8, up from 4) and the damage from the chain lightning is a lot higher than on normal and gets higher as the phase goes on, so you really need this phase over as quickly as possible so people take as few ticks as possible. Doing that requires quite a bit of coordination, and a battle plan.
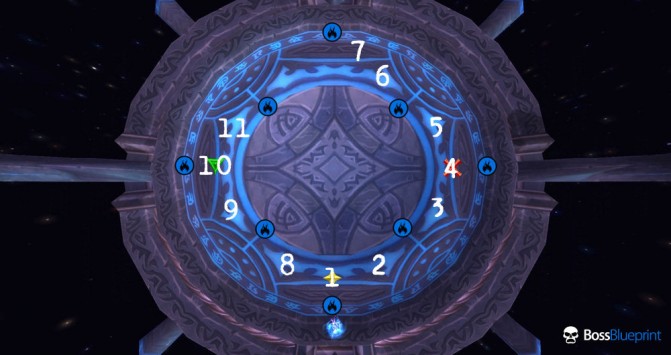
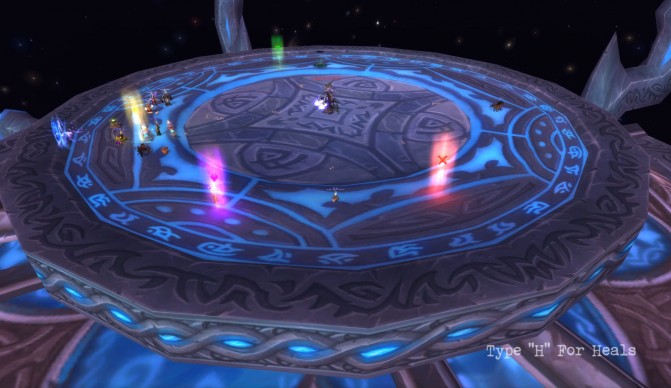
Have a look at the diagram and screenshot below. I’ll point out a few of the important features and what the markers mean.

Hagara Lighting phase positions. Blue markers are Lightning Pillars, Numbers are raid members, Raid marks are to help line up the diagram with the screenshot below
In the diagram the Pillars are the blue markers, numbers refer to raid members and the raid markers line up with the screenshot.
Also, Boss Blueprint needs to go to eleven!
When the phase starts the tank grabs the add and positions it on the yellow marker, labelled “1”. As it begins to die, people should break off and get into their assigned positions before the tank and players 2 and 8 finish it off and start the chain. The add’s death should activate the southern-most pillar, then the Chain Lightning will jump to player 1, then to 2 and 8, and will continue from there.
The more eagle-eyed of you will have spotted a mathematical conundrum: there are eleven spots, but only ten raid members. This is where you’ll need to be clever and use your raid’s tricks to fill the spots. You’ll need to at least get all the spots covered, but if you can reuse more people then then you can free up a healer or two to stand centrally and focus on healing through the damage, which helps massively.
The first trick is to use a permanent pet (e.g. Warlocks, Hunters and presumably Frost mages and one flavour of DK) to occupy a spot because Lightning will happily chain through them and they can be positioned in advance. On the screenshot above you can see a wolf in position in the upper right; on the diagram that’s position 7, and our hunter occupies position 6. NB pets can aggro the boss, so remember to run them carefully around the outside!
The other trick is to make the most of mobility abilities. Hunters have disengage, Mages have Blink, Warriors have Heroic Leap or Intervene and Warlocks have Demonic Teleport. They can easily cover a position early in the chain and then quickly change position and slot in later in the chain as well. For example in our particular case we have a Warrior take position 2 and then leap out to take position 4.
Even if you don’t need to reuse people, those movement abilities should also be considered when assigning people, so that you assign people with movement abilities to the furthest positions.
The other thing to stress which helps a lot with reducing damage taken is to move into the middle of the room when you’ve done your job as a link in the chain so you don’t take any more damage than is absolutely necessary.
Spec and Glyphs
This isn’t really a demanding fight, healing-wise. It can get intense during the lightning phase if your coordination is less than ideal, but otherwise the healing is fairly pedestrian.
I’d recommend taking Soul Warding to help spread bubbles around to buffer people during the Lightning phase, and because the damage is in waves there’s good opportunities to make the most of an AA spec as well. If you go that route you’ll want to pop your wings for the the Lightning phase, which is where the raid damage gets really high.
If you’re on dispelling duty for Frostflake then you should pick up the Glyph of Dispel for some free healing. I’d also recommend the Glyph of Prayer of Mending, since you’ll get good uptime on PoM on this fight, especially in the Lighting phase.
If you’re the only Priest and confident at both specs, this is a reasonably good fight to switch to Holy for utility: Body and Soul is handy for getting people with Frostflake to safety quickly and HW:S can heal people in Ice Tombs.
Cooldown Usage
There’s not really a great time or place to use PW:B on this fight, because it’s pretty spread out. You could use it at the start of the Lighting phase, which will save some mana, or perhaps to provide a safe spot for some Ice Lance soakers.
PW:B can also be used as a weaker replacement for Pain Suppression on the tank for Focused Assault. Either hold tank cooldowns until asked, or use them proactively if a healer or especially if your Focused Assault taunter gets Tombed.
As I mentioned earlier you can use leaps/teleports/blinks to move people around the chain in the Lightning phase. Life Grip is another trick you can use, although if you use it to bring someone to you you’ll increase their total damage taken as lightning bounces between you and them until they get to their assigned spot. Give them a bubble and PoM to help out.
Although it’s more risky you could also LG the tank away from a Focused Assault if you have no taunter available, but you might also upset your melee DPS and risk hitting the wrong people with Shattered Ice, so use this as a last resort.
The Shadowfiend and Hymn of Hope used together should be used after the first Lightning or Frost phase, because the boss will be taking increased damage and not dealing any. Almost like that downtime was made for us! You can use a Concentration potion on the next one, if you need to.
Other Tips
Atonement has no line of sight requirement, so if the Ice Tombs go down near to the boss you can get heals on the frozen people to buy some time. The same applies for ground-based heals like HW:Sanctuary, Efflorescence and Healing Rain.
Good luck, and have fun!


1 – Hunter taunts don’t work for some reason so it has to be a DK, Warrior, Pally or Druid.
2 – In Lightning Phase we usually have the 2 6s on your diagram being different people, we also have a resto drood in the middle hitting Tranq.
The idea is you need 10 different spots covered and some classes can cover 2 spots with movement tricks (warlocks/teleport, mages/blink, warriors/leap, hunters/disengage) or pets (hunters, warlocks, frost mages?).
Fixed, including a shiny new diagram. Boss Blueprint only has numbers up to 8, which is really annoying, so I had to add my own numbers.
Oh I forgot to mention for the Frost phase – this isn’t so much to do with healers, but if you’re using the running strat there are 2 things to note:
1 – Everyone needs to move together, which means you all need to start in the same quadrant and nuke the same pillar. That’s what the purple marker is for on the screenshot.
2 – If you have a hunter, have them use Aspect of the Pack since nothing dazes you besides falling iceblocks. 30% extra movement speed = trololol easy ice phase.