Home
Subscribe:
Contact:
Subscribe to this blog by RSS Follow me on Twitter
Subscribe to this blog by RSS

Archive for December, 2011

About My Heroic Guides

Posted by Malevica on December - 15 - 2011

I’m doing the heroic guides in the same format as the normal mode guides, but instead of doing them all at once I’ll be pushing them out one at a time as we gain experience with the encounters. Keep checking the front page, this post and the Raid Guides menu above for additions, or you could always subscribe to see new posts the minute they’re published. </shameless-plug>

I would really appreciate comments on these guides if people have them. I typically wait until we’ve either killed it or we’ve nailed the strategy before posting, but there may still be things I’ve overlooked that need including, and commenters are really valuable for improving the guides for everyone.

Big List of Heroic Guides

MorchokUp!
Yorsahj the UnsleepingUp!
Warlord Zon’ozzUp!
Hagara the StormbinderSoon!
UltraxionSoon!
Warmaster BlackhornSoon!
Spine of DeathwingSoon!
Madness of DeathwingSoon!

Possibly Related Posts:

  • No Related Posts
Categories: Blog Stuff

Heroic Yorsahj the Unsleeping

Posted by Malevica on December - 15 - 2011

NB: This guide will assume you’ve already read my normal Yorsahj strategy, or otherwise know the details of the fight on normal mode.

Fight Summary

The key difference between normal and heroic mode is that Yorsahj spawns four slimes instead of three, dramatically increasing the damage and meaning that you have some more difficult choices to make about which add to kill.

What this means in practice is that you’ll have to deal with the Purple debuff a lot more often, about half of the combinations will include a Purple, and your DPS will need to be much more on the ball to kill the double spawn of adds that comes from a Black/Yellow combination.

There’s also a trick to using the Blue Mana Void to your advantage, which I’ll talk about later.

First though, those combinations. There are in fact only 6 combinations that come up. I’ll list them all, along with a recommended kill target (underlined), and then talk about them all in detail.

These are listed in the order that the current version of DBM reads them out so you can use this as a quick reference if need be. I’ve left Black as white, for obvious reasons.

PurpleRedYellowBlack

PurpleGreenBlackBlue

GreenRedBlueBlack

GreenYellow – Black – Red

Blue – Black – PurpleYellow

BluePurpleGreenYellow

Combinations in detail

PurpleRedYellowBlack

This is just nasty. Kill the Yellow to keep the damage in check, and then go easy on the heals. You may blow one or two people up, but keep your head and plan ahead and this one is manageable.

If you have a surfeit of cooldowns, you could consider killing Purple, but you’ll need your cooldowns for a later combination so I’d recommend going with Yellow initially and learning to handle it.

The rest of the damage is pretty rough though, so blow those cooldowns and crank out the AoE heals.

PurpleGreenBlackBlue

By contrast, this is one of the easiest combinations to deal with. We kill the Black here to allow ourselves some solid distraction-free DPS time on the boss, but you could go with Green instead for a real healing chillout.

GreenRedBlue – Black

You have to pick between Red and Green and since you want to stack to kill Black adds, pick Green to kill. There’s a fair amount of raid damage out there, but there’s no Purple to worry about so go to town with the heals and you should be fine.

GreenYellow – Black – Red

This is another really rough one. Whichever way you slice it you’ll end up with 3 AoE damage abilities to deal with, so you’re going to need to pop some raid cooldowns and AoE heal your heart out to get through it. If there are no cooldowns available pop a Bloodlust instead, which will also help with the Black adds.

You’re pretty much forced to kill the Green so you can stand in to reduce the damage from the Red.

Blue – Black – PurpleYellow

An easy one. You need to kill the Yellow, because if you don’t the AoE it does will overwhelm you and you can’t heal enough because of the Purple, leaving you with just the damage from the adds to handle, which is manageable.

BluePurpleGreenYellow

Here you’re picking between Yellow and Green to kill, and as with the previous combination you should kill the Yellow for the same reason.

That leaves Green and Purple, which is healable.

Handling the Mana Void

The trouble with the Mana Void is that when you get your mana stolen you really need it back immediately to deal with the silly damage, and because four combinations include a Cobalt Blood you won’t have mana cooldowns available every time. You don’t have time to wait while the Mana Void is taken down from full HP, people will be dead by then.

So, when the first Mana Void spawns you should pop your raid mana cooldowns (Mana Tide, Hymn of Hope) and get by without killing the Mana Void at that time. Then either throw spare DPS on it or assign one person to it specifically while the next slimes are coming in; either way, get it down to around 10% then leave it alone.

Now, when the next Mana Void spawns and you have no mana and no cooldowns left, quickly kill off the old Mana Void for a free full mana bar. DPS the new Mana Void down to 10% again, rinse and repeat.

The advantage of this, despite being a bit more complicated, is that you’re always only a few seconds away from a replenished mana bar whenever you need it.

Deep Corruption

Here’s a full list of abilities that stack Deep Corruption.

Highlights for Discipline Priests:

  • Atonement – 1 stack
  • Binding Heal – 1 stack to the person you heal. NO STACKS for yourself.
  • Divine Hymn – 1 stack per tick (i.e. will wipe your raid)
  • Holy Fire (with Atonement) – 1 stack per tick. Do not use if you have atonement.
  • Penance – 1 stack for the whole channeled cast (i.e. not 1 per tick)
  • Power Word: Shield – 1 stack (even when glyphed)
  • Prayer of Healing – 1 stack
  • Prayer of Mending – NO STACKS
  • Renew – 1 stack on initial application

Binding Heal is a useful spell, because it doesn’t add stacks to you. The downside is that it doesn’t heal for as much as Greater Heal, so if the target is taking big damage and you’re not in danger GH is still favoured.

Do not try and use Atonement here, especially not with Holy Fire. Atonement in general is bad because you can’t plan where it’ll go and it’s fairly weak healing anyway, and especially not Holy Fire because every tick adds another stack.

Penance, Greater Heal and Power Word: Shield are your staples depending on what’s needed most, and because it doesn’t generate stacks, keep PoM bouncing at all times for stack-free healing.

PW:B doesn’t do anything here, so use it if you need it, although it’s better to save it for the evil combinations with 3 AoE damage abilities.

Spec and Glyphs

This fight requires really high output, and is a great example of a time when Archangel shines. You can DPS the boss or the incoming slime to stack Evangelism, then pop it for a healing boost when things get rough later on. It’s also a fantastic boost just after the Mana Void has spawned.

In terms of Glyphs, it’s again all about the output. Prayer of Healing and Power Word Barrier are must-haves here. Pick between PW:S or Penance depending on your usage. I went with PW:S, but there’s a case for both.

Because of no dispels and high raid damage, Prayer of Mending is the Major top pick here.

Cooldown Usage

PW:B and Divine Hymn should be kept for the Yellow – Black – Red combinations. You’ll need them to survive the damage.

Pain Suppression should likewise be use on the nasty AoE healing combinations to keep the tank relatively out of trouble while you focus on the raid. Anything with Yellow up will do that.

Life Grip is useful either to get people in on the Red or out to the incoming slime to get it killed in time.

I’ve touched on Hymn of Hope before, it can be used just after the Mana Void spawns to get your raid some mana back up. Remember that the buff grants a chunk of free mana while it lasts, so even if you have to break off to heal after only a couple of seconds chanelling it’s still worth it. If you’ve got your raid pre-shielded, this ought to buy you enough time to get a few ticks off.
Ideally though, you’d like a non-healing Priest to pop HoH if you have one, so you don’t need to take time out from healing.

I’d suggest saving Shadowfiend for another Mana Void phase. Although you’ll get mana back soon from the Mana Void, there may be times when you need it sooner. Because of the effect of the Mana Void, there’s no point holding more mana than you need throughout the fight, it’s better to have it in reserve.

Other Tips

As I’ve mentioned previously, Archangel from DPSing the adds or boss is very useful for AoE damage phases. Just don’t Holy Fire the boss for a Purple phase, because each tick of Atonement adds a stack of Deep Corruption. he fight on normal mode.

You can prepare for either a Blue or Purple (or both) phase by throwing as many heals and particularly PW:S around the raid as possible before the Deep Corruption buff comes up, to get some stack-free healing and protection out there. You’re going to lose your mana or be limited in your healing ability anyway, so you might as well get a head-start even at high cost.

Possibly Related Posts:

Heroic Morchok

Posted by Malevica on December - 15 - 2011

NB: This guide will assume you’ve already read my normal Morchok strategy, or otherwise know the details of the fight on normal mode.

Fight Summary

The key difference between normal and heroic mode is that at 90% HP Morchok splits into two clones, one named Morchok and one named Kohcrom, with a shared health pool. Both have the same abilities as on normal mode; Kohcrom does his approximately 6 seconds after Morchok does his, with the exception of the Earthen Vortex/Black Blood of the Earth, which happen simultaneously.
Morchok and Kohcrom both get Furious at 20% HP.

In addition, the Stomp applies a debuff making you take 100% increased physical damage for 10 sec, so you have to split the raid into two teams spread at least 50-60 yards apart (so that one boss’s crystal can’t spawn in the other boss’s Stomp range either) or risk players, especially tanks, being gibbed. There is no Crush Armor, at least!

This splitting of the team requires some thought: in each 5-man team you need a tank plus someone pretty tough to soak the double-hit from the Stomp, which was hitting our Ret Paladin for ~140,000 Physical damage after armour. Rogues can Feint every Stomp, making them excellent candidates, otherwise you’ll need to keep your soaker well topped-off and where possible give them a PW:S too.

On top of that, you need three players to split the damage from the Resonating Crystal. It is unclear whether this targets only ranged players or just ignores the two closest players to the boss, it was merrily targeting someone on the other side of the map rather than picking on the melee DPS soaker if we lost a ranged DPS or healer. You may need to check, and maybe switch an extra melee DPS for a ranged.

A note on composition: we ended up using 4 healers for this encounter, 2 per side. You might be able to lower this eventually but I’d strongly recommend starting with 4 and seeing how you go, even if you get an offspec healer in they’ll be valuable.

Once you have the two teams sorted out, the execution is pretty straightforward, although it is fairly challenging for healers to prioritise healing where it’ll keep people alive – the long-lost art of triage.

There’s a rhythm to the fight, but the most important thing to remember is that every crystal explosion is preceded by a Stomp, so it’s important that when a crystal spawns you wait and soak the Stomp before then running for the crystal. You have roughly 5 seconds to get there, which is easy as long as the tank isn’t miles away from the crystal.
The number one cause of early deaths was people immediately running for the crystal and not splitting the Stomp.

[EXPAND Click to see this in tabular form, if you prefer it that way: ]Before the first Black Blood:

Time Korchom Morchok
0 Crystal
5 Stomp
12 Stomp
15 Crystal
20 Stomp
21 Crystal
26 Stomp

Subsequently:

Time Korchom Morchok
0 Stomp
5 Stomp
8 Crystal
14 Stomp
19 Stomp
21 Crystal
26 Crystal
26 Stomp
31 Stomp
35 Crystal
41 Crystal
41 Stomp
46 Stomp

[/EXPAND]

Note that Morchok’s side takes one additional crystal each time, so bear that in mind when planning teams. For example, if your raid has limited mana restoring cooldowns it might be worth putting more on Morchok’s team.

Remember: when a crystal spawns, wait for the next Stomp, then run out to the crystal. You have ~5 seconds to get there, which is plenty of time.

Spec and Glyphs

This fight, on heroic, really rewards damage mitigation. I’d recommend a Soul Warding spec so you can cover your entire group, or at least the three people taking the crystal. Archangel/Atonement is less useful here because Prayer of Healing, with the associated guaranteed Divine Aegis absorption, is a much more valuable tool for recovering from and preventing Stomp and Crystal damage. Given the heavy weight placed on PW:S and PoH it’s probably worth glyphing those.

Cooldown Usage

Morchok takes a little over 6 minutes. To get a second PW:B in, you need to use it between the first and second Black Blood phases, and it will be available again during the Furious stage.

Pain Suppression should be used to support your tank and your Stomp soaker during the enrage, when they’ll be taking extra damage from the stomp and may not be able to rotate cooldowns for every one. Earlier in the fight, it can be handy if one person on your team is too low before a damage spike.

Life Grip can save someone’s bacon if they’re slow to run out to get away from the Black Blood or especially if they’re too slow getting in for a crystal.

Finally, the Black Blood phase is a good time to use Hymn of Hope, since there’s no damage caused while you’re safely behind the pillars. Shadowfiend is also safe from the Black Blood because it’s AoE damage, yet Morchok himself can still take damage.

Other Tips

Discipline shines on this fight, because there’s spaced-out damage spikes.

Make sure you PW:S the Stomp soaker and use a few casts of PoH to stack Divine Aegis before the Stomp, then while running to the crystal you can get PW:S on the three people that will take the damage. Once you’re back by the boss and in the ~8 sec lull before the next Stomp, bring everyone back up with Binding Heal and PoH in preparation for the next round.

Binding Heal is a real gift on this fight too, it really helps keep you alive while healing other people and it’s a nice quick cast for triage purposes.

Possibly Related Posts:

Dragon Soul Difficulty

Posted by Malevica on December - 7 - 2011

The current hot topic amongst the raiding blogo- and twitterspheres is the question of the tuning of the new Dragon Soul raid instance: far too easy and not enough to keep us going for potential 8 months? Tuned about right, when you consider it as a difficulty curve and realise that Firelands was rather flat compared to a strong curve in Dragon Soul. I also commented that I thought the raid was undertuned, but I think I may have been a little hasty in that assessment.

Some Data

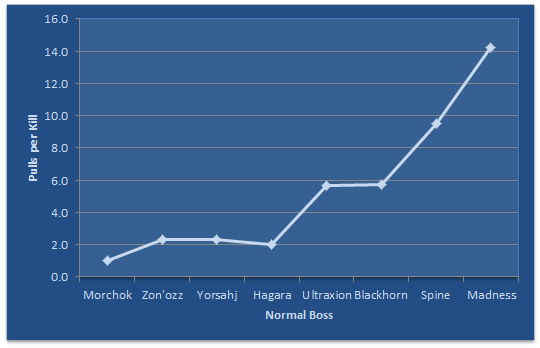
<Abraxas> cleared Dragon Soul on Normal this week, taking a total of 20 pulls for the first 6 bosses and then 33 pulls on the last two together, although quite a few of those were on the Spine where we were 9-manning for practice because we had too many people LD that evening. For a better sample (albeit still small), I’ve taken the top 5 guilds on my server and averaged their pulls to kill for each boss for which data were available; it’s not very scientific, but it’s interesting:

First Week Pulls to Kill for Normal Dragon Soul 10-man

First Week Pulls to Kill for Normal Dragon Soul 10-man - Data gathered from World of Logs for the top 5 guilds on Dath'Remar-US

Caution is due here because there may have been server issues affecting guilds on later bosses, or experimentation with tactics, or less information available from the PTR, but this does suggest that there was a pretty strong increase in the difficulty throughout the raid, for whatever reason, lining up with what Rohan observed over at Blessing of Kings.

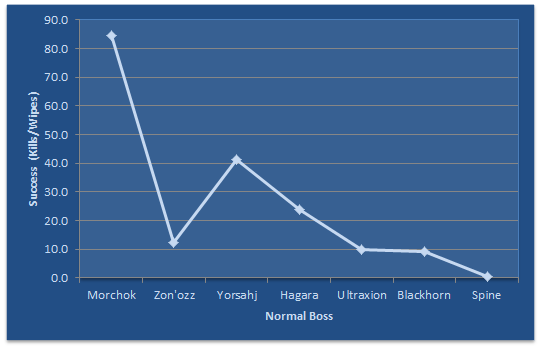
For additional data, we turn to WoL again, tracking the kills-to-total-pulls ratios for the bosses, again on 10-man normal for comparison:

Success Percentage (Kills/Wipes) for Normal Dragon Soul 10-man - Data from World of Logs for all uploaded reports

Madness of Deathwing has no kill detection so it doesn’t appear, and Spine seemed to have dodgy kill detection earlier in the week so take that figure with a pinch of salt.

With the exception of Zon’ozz who seems to be causing raids a great deal of difficulty, once again you can see a curve there. Morchok is a pushover, but then there’s a good ramping up of difficulty between Yorsahj, Hagara and Ultraxion.

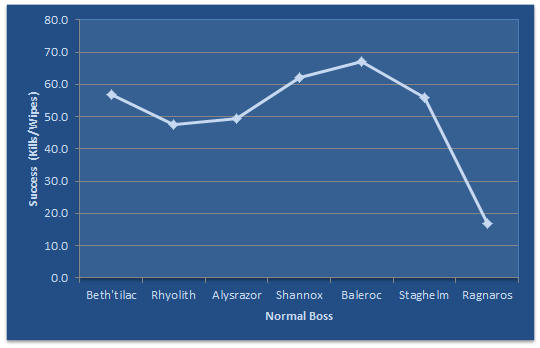
Both of these data sources point to a strongly-graded difficulty curve. Compare that to Firelands:

Success Percentage (Kills/Wipes) for Normal Firelands 10-man - Data from World of Logs for all uploaded reports

Again, a note of caution. Dragon Soul is a snapshot of week 1, whereas the Firelands graph includes the effects of nerfs which I’d expect to have flattened the curve somewhat, but again it’s suggestive of a difference.

So Is Dragon Soul Actually Too Easy?

Initially I thought it was. We’re a very strong but not elite guild and we’ve cleared 8/8 bosses in the first week. And we’re far from alone: on Dath’Remar, hardly a hotbed of hardcore raiding, 7 guilds went 8/8 in Week 1, and a further 8 are 7/8.

However, the situation we’re in is atypical. Guilds like ours, high-ranked but not the cutting edge, benefited from the Firelands nerfs to gain a gear advantage that wouldn’t have been available to us in previous tiers, so Dragon Soul normal probably should feel easy to us. It’s meant to be done in ilvl378 gear, not ~ilvl388 like many of us have, and it absolutely has to be designed that way. By the time we came to the Madness of Deathwing we were very close to the Cataclysm and Berserk timers on several occasions, so a starting position closer to ilvl378 should indeed mean a few weeks of farming would be needed to meet the checks of the later encounters.

In short, I think all is as it should be with the raid, the trouble is more a consequence of the previous tier, and perhaps premature reactions to first nights from surprised raiders like myself incorrectly assuming the whole place is at the same level.

The trouble though, with guilds like us being in this position, is that we’ve lost something important in the raid lifecycle: the “inevitable kill” phase.

Working through normal modes, for a guild like us, is supposed to be something that takes a bit of time while we learn the fight, but which we always know we’re intended to kill. It’s a good feeling, it’s reassuring, and the successes help to lift our spirits and build some momentum. Now, instead, what we have to look forward to are heroic modes which are a far from a certain prospect. We didn’t kill heroic Ragnaros; most of us didn’t make much progress in heroic Tier 11 let alone kill Sinestra; heroic Lich King (even with the 30% buff) evaded many. So every kill from now until MoP is likely to be a long, hard grind, and some kills we may not even get.

You’ll forgive me for feeling a little cheated.

Possibly Related Posts:

Categories: Featured, Opinion