Home
Subscribe:
Contact:
Subscribe to this blog by RSS Follow me on Twitter
Subscribe to this blog by RSS

Reflections on Heroic Healing

Posted by Malevica on April - 18 - 2012

Now that heroic Dragon Soul is over with I find myself in an interesting position: this is the first time in my WoW career that I’ve completed an end boss on heroic while it’s been current content. It’s been a fascinating experience, and I’d like to talk a little about how heroic raiding and healing has felt to me. Are you sitting comfortably? Then I’ll begin…


Context is King

I’ve been flirting with heroic raiding for the last two expansions, but it took me a while to work my way through the ranks of guilds raiding progressively closer to the cutting edge before finally ending up in a guild that was in the running for the top of the server charts.

WotLK was the first time I managed to join a guild that was running hardmode and heroic content, but we didn’t manage to kill heroic Anub’Arak or heroic Lich King on 25-man, only on 10-man with 25-man gear. Not that I’m not proud of the team I achieved those feats with, we all worked hard for them and they were a great bunch of people to raid with, but I still felt we fell short of what some members of the guild could, and probably should, have achieved in the expansion.

In Cataclysm I only got a couple of heroic bosses down in Tier 11 before rerolling yet again to Oceanic so that was a bit of a washout, and reaching 85 midway through Firelands pretty much put paid to my chances of earning a heroic Ragnaros kill before Dragon Soul (although we did go 6/7H post-nerf after starting the guild only weeks before). So DS with <;Abraxas>; was my big opportunity to really push progression and I’m very grateful for the opportunity and for the victory.

What my previous experience gave me was a sense of what heroic fights entailed mechanically but what I’d missed out on from being late to the heroic party and not raiding heroics relatively early, with less gear and thus at the difficult end of the progression curve was a sense of what those fights require of raiders personally.


Heroics Require Focus

And by this I mean total, full-time concentration. When an encounter is really stretching your team’s limits, when your tank is fractions of a second away from dropping dead and when those green bars just don’t seem to ever want to come up again you absolutely have to pay attention the whole time. Glance at your chat log and someone might end up dead. Fail to spot an enemy spell cast and don’t hit your cooldown in time, someone’s dead. Stand in the fire for a second too long and your HPS will be zero for the rest of the fight.

And it’s not just paying attention, it’s also having to constantly think. There’s so little time that you can spend just mashing the same button and waiting for a big blue DBM warning; instead you’re watching timers or learning to feel the fight so you can be ready for the next big thing to come at you, switching spells and healing targets on the fly, and working out what your fellow healers are doing.

And let me tell you, this gets exhausting. We raid 9½ hours per week spread over three nights which isn’t much by some standards, but we generally raid hard for those hours with quick re-pulls after wipes and as little downtime as possible. By the end of good progression nights I’m quite often completely frazzled and no use to anyone for a while afterwards. That’s not to say I didn’t enjoy myself, but it’s hard work, mentally, and if you can’t keep it up for the duration of the raid then you’re just going to be wasting time by the end.


Heroics Require Motivation

So we’ve established that healing heroics is sometimes hard work and tiring; that inherently means you need to find your motivation.

You can be intrinsically motivated – motivated by your own reasons like killing bosses makes you happy or you have a desire to be the best healer you can be – or extrinsically motivated – motivated by something outside the task, maybe so your raid leader will stop yelling at you, or for bragging rights or a shiny mount – or a combination, and neither is inherently “better” than the other.

Whatever you use, you need to be able to stay motivated because healing heroic raids is not going to be fun all the time. For me, it’s a combination of factors, and they come in and out of play as progression rolls on, for example:

  • At a basic level I want to kill bosses because it makes me happy to overcome a challenge I’ve been set, but I’ll admit sometimes I wonder if it’s worth the stress.
  • I also keep turning up because my team needs me and I don’t want to deny other people the opportunity to raid and beat encounters. That’s partly intrinsic because I know that turning up is the right thing to do, and also partly extrinsic because I’ll lose my raid spot if I leave people in the lurch.
  • I also set myself targets like improving my usage of a certain spell or cooldown, or beating my numbers compared to last week. Those small, measurable, achievable goals keep me coming back even when a boss takes weeks to move past and it’s frustrating as hell.
  • And yes, I want to stand around Stormwind showing off the title and mount that are the metaphorical carrots dangled in front of me every tier. Nothing wrong with that as a motivational tool!

I think that a good team community helps a lot with motivation. If you feel loyalty to your raid team you’re more likely to want to come back day after day to help them out even when you’re not personally having much fun, and some healthy competition and banter can provide side-goals to keep you aiming at something.


Heroics Require a Thick Skin

This is probably the thing that I’ve struggled with the most. We don’t have a culture of yelling at people in Vent as a general rule, but I know when I’ve missed a cooldown or got myself killed or got someone else killed. I am my own worst critic and I set myself standards which are probably too high, and I’m very good at beating myself up when I don’t meet them.

At the end of the day, you need to remember that heroic raiding is difficult. You will make mistakes and you will cause wipes, everyone does. And because of that you’ll probably be the target of other people’s frustrations at times and even if you don’t get yelled at immediately or called out publicly you’ll probably feel it anyway.

Heroic raiding requires you to pick yourself up, acknowledge your mistakes (to yourself or to your team or both), learn from them, and move on.


Heroics Require Flexibility

Unlike normal modes, where the tuning is a bit more forgiving, heroic raids require the right composition. Over the years the definition of the “right composition” has been made a little more reasonable than stacking your raid with Shaman and making everyone take up leatherworking, but (pre-nerf, at least) 3-healing Ultraxion on heroic just wasn’t happening. So you need to be able to adapt yourself to the demands of the encounter.

For healers (and tanks too, probably more so than for healers) that often means being competent at a DPS spec or being willing to sit out for a mainspec DPS when there’s not a spot for you. I’ve sat on a few bosses and I’ve even tried DPSing, albeit without much success. Fortunately we have healers in the team who are competent in their offspecs, and they make up for my inadequacies!

I’ll also mention that you will sometimes need to work harder, and it might feel like you’re being asked to “carry” another role. We’ve all been there, when you’re dropping a healer because you’re hitting a berserk timer instead of giving your DPS the kick up the backside (you feel) they really deserve. Maybe it’s not fair to make you work harder, maybe other guilds manage just fine with 3 healers instead of 2, but you have to at least be willing to give it your best shot. Whatever it takes to get the boss down, even if that means going way outside your comfort zone.

Flexibility also means tailoring your spec and glyphs to the encounter you’re currently working on, and that’s something everyone will end up doing to some extent. Every fight is different and you can’t rely on one spec, one glyph setup and one reforge and never change anything for an entire tier. You need to think ahead about the mechanics, and look back at logs, to see where you can improve or what needs to change.


Heroics Require Analysis

Which leads nicely to the last thing on my list: you have to be analytical. Not your raid leader or your healing lead, you! And by “you” I of course mean “everyone”. You need to analyse your own performance, your raid’s performance and your strategy and also be able to communicate your ideas to the team (or at least to your raid leader) clearly and concisely.

Your raid leader will have an idea of the strategy they want to employ; they’ve watched the videos, read the guides, understood the mechanics and come up with a plan. Yet the boss is still defeating you. WTF?! Your raid leader will have questions you need to answer, and they can’t answer them on their own. Questions like:

  • Why did you die? – Not “what killed you”, plenty of addons will report the proximate cause of your death, but “why were you able to be killed”. The answer might be that you stood in fire for too long, but was there a reason for that? Was everyone too clumped up? Were you preoccupied by too many things to watch? Is something preventing you from seeing the spell effects? Do we need to call out that mechanic? When your raid leader asks a question like this, pretend they’re really asking “how can we help prevent this from happening again”.
  • Why didn’t X get healed? – Maybe X got 2-shot and you couldn’t have healed him up, that’s good information. Perhaps a healer was out of commission (Ice Tombed, maybe) and no one noticed. Maybe someone took an unexpected damage spike and everyone switched off the tank to heal him up. To answer this question well you need to understand your assignment and how it relates to everyone else’s, and bear in mind that those assignments might not be formal, they might just be what the healers expect each other to do.
  • Why is your HPS (or DPS) so low? – Bad answer: “I don’t know”. Worse answer: “<;myClass>; sucks on this fight. Better answers should relate to the strategy or mechanics. Is there too much movement? Are you missing buffs? Are you not maximising AoE (or cleave, for DPS) opportunities? Bad timing for cooldowns? You get the picture.

I’ll repeat myself, because I think this is one of the most important things I’d tell a new heroic raider: When your raid leader asks a question about why something happened or didn’t happen, don’t stop at answering the question they asked. Instead pretend they’re really asking “how can we help prevent this from happening again?” and answer that question.

Sometimes you might not get your wish, but if you never ask then how will your raid leader know there’s a problem at all? They’re only one person, playing one role, they’re not omniscient.


Is It Worth It?

Absolutely, one hundred per cent, without a doubt.

But do bear in mind that heroic raiding will not always be fun. In the words of the great Del Preston:

It will not be easy.

You will get tired. You will get blisters. You will get aches and pains.

But you will also get good.

Possibly Related Posts:

Categories: Anecdotes, Opinion

Heroic Madness of Deathwing

Posted by Malevica on April - 6 - 2012

NB: This guide will assume you’ve already read my normal Madness of Deathwing strategy, or otherwise know the details of the fight on normal mode.

Fight Summary

So you’ve killed Spine and now you’re ready for Madness. The good news is that Madness is probably easier than Spine, at least from a technical point of view, and the gear requirements are similar or lower. The bad news is that it’s another 14-minute-plus fight with a long ramp-up time.

There’s not too much different on Heroic, but if you’re used to normal mode you’ll have to tighten up quite a bit to get through it. You can take two tanks but it’s doable with one and you may find you need to go with one tank to beat the berserk timer.

I’ll cover positioning first, then we’ll look at the new mechanic in Phase 1, the Corrupting Parasite, then I’ll cover dealing with Impales before finally talking about each of the phases, including a close look at Phase 2.

Positioning

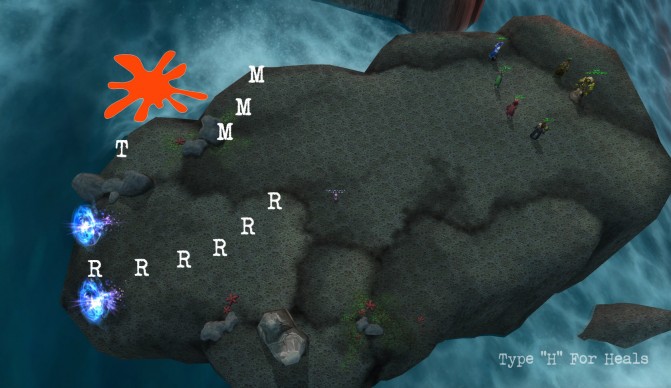
The first thing you’ll need to tighten up on is your positioning. The Mutated Corruption’s Crush hits very hard, around 80-100k, so you want to minimise the number of people hit by it both to reduce healer mana expenditure and to prevent a second Crush from killing someone. The way to do this is to have the ranged spread out in a curve near the back of the island behind the tank, and the mêlée spread out on the other side:

Positioning for Crush on Heroic Madness

R are ranged and healers; M are mêlée; T is the tank; and the orange blob is the Mutated Corruption

That’s your baseline positioning while the Mutated Corruption is alive. There will be perturbations in response to mechanics, and I’ll get to those, but you should always aim to return to this general layout.

Phase 1 – Corrupting Parasites

This is the new mechanic on the islands. Twice during the phase, on a fixed timer, Deathwing will cast Corrupting Parasite on a random player. The first comes just as the first Impale is due and the second comes around the time the Regenerative Bloods spawn.

Corrupting Parasite lasts 10 seconds and deals increasing Shadow damage every second while it lasts, starting at 18,000 and topping out at around 80,000 (before resistances), so it’s worth assigning someone to watch this person so they don’t slip through the cracks. When the debuff ends it kicks out a Parasitic Backlash dealing 250,000 Fire damage to everyone within 10 yards and spawns a Corrupting Parasite with around 2.7 million HP. You need to focus on this because at the end of its 10-second Unstable Corruption cast it will explode, dealing damage equal to its remaining HP split across the whole raid.

The short version is that you need the Parasite placed 10 yards away from other people and then you need to kill it, or at least bring it to a safe HP level (around 30% is fine, that’s 80,000 Fire damage per person), before it explodes. Where and how you do that is important though, because efficiency of DPS is a key factor on this fight so you beat the berserk timer on each island and, more importantly, so you have time in hand to take Phase 2 at your own pace.

The first Parasite on each island should be dropped right next to the Mutated Corruption, on the edge of the island, so that you can cleave the Mutated Corruption along with the Parasite. The Parasite is the top priority but adding extra damage to the Mutated Corruption is no bad thing. On the diagram above that’s between the tank and the mêlée so you may need to shuffle around to make sure there’s room, especially if you have more mêlée DPS than I’ve shown there. Also, be careful not to fall off the edge or the Parasite will end up on the wrong island and out of range of DPS. Not that that happened to me, of course…

The second Parasite will spawn as the Mutated Corruption is dying, so this time you want to drop it next to the Arm or Wing Tentacle instead. The Regenerative Bloods will have spawned by this time, so they’ll also be brought over to the Arm or Wing Tentacle and everything should be AoE’d down together for maximum DPS efficiency.

Running through, or standing in, Nozdormu’s Time Zone will slow the tick rate of the debuff, allowing you to extend the time before the Parasite spawns. Basically, you can use this if your Mutated Corruption isn’t quite dying in time to buy time for the tank to bring the Regenerative Bloods over, but if you find you’re waiting for the Parasite to spawn then go around the Time Zone instead. We found the Time Zone handy on the third island, but of course your mileage may vary.

Handling Impale

The Mutated Corruption’s Impale is a big deal on heroic. It deals 840,000 Physical damage as a baseline, and you really can’t afford to take a second one for twice that. Two things need to happen: you need a decent cooldown rotation for any Impales your tank(s) will take, and you need a solution to second Impales.

On the cooldown front, you will need to stack tank cooldowns and healer cooldowns to get through the damage. The first island is easy enough because you have Dream available, so any decent (40% or more) cooldown will do. On the next island you’ll need to stack two 40% or higher cooldowns, such as Shield Wall and Pain Suppression. On the third you’ll not have Alexstrasza’s 20% HP boost so this is a good time to pop a Last Stand-equivalent as well as those cooldowns, and on the last island healers’ 3-minute cooldowns should be up again. Remember that Power Word: Barrier can be used as a 25% cooldown, and if you’re really pushed Spirit Link Totem is a 10% cooldown, which might make the difference.
The Stay of Execution trinket is another 20% cooldown that tanks can use on every island (it applies after any other damage-reducing cooldowns have taken effect, so the damage cap isn’t a problem).

On top of cooldowns, Inspiration/Ancestral Fortitude are good for a further 10% reduction and should be kept up on the tank, and Demoralising Shout/Roar should be kept up on the Mutated Corruption for a 10% Physical damage reduction. Tanks also have their own damage reduction from their tanking stance, presence, form or aura (10%, 14%, 18%, and 10% respectively) which should be added in as well. And don’t forget the raid-wide nerf, Power of the Aspects, which as I write this is at 15%.

Big warning: “cheat death” abilities like Ardent Defender Guardian Spirit do not work on this encounter. AD’s 20% damage reduction does work, but it will not prevent a player’s death.

Just multiply together your cooldowns and damage reductions and check they’ll be enough. For example, here’s our setup for each island, with a Warrior tank:

  1. 840,000 x 0.85 (Power of the Aspects) x 0.90 (Demo Shout) x 0.90 (Inspiration/Ancestral Fortitude) x 0.90 (Defensive Stance) x 0.60 (Shield Wall) x 0.80 (Stay of Execution) x 0.50 (Dream) = 124,921
  2. 840,000 x 0.85 (PotA) x 0.90 (Demo Shout) x 0.90 (Insp/AF) x 0.90 (Def Stance) x 0.60 (Shld Wall) x 0.80 (SoEx) x 0.60 (Pain Suppression) = 149,906
  3. 840,000 x 0.85 (PotA) x 0.90 (Demo Shout) x 0.90 (Insp/AF) x 0.90 (Def Stance) x 0.60 (Shld Wall) x 0.80 (SoEx, not totally effective because the hit exceeds the absorb cap) = 255,324 (Survived by using Last Stand and being topped off)
  4. 840,000 x 0.85 (PotA) x 0.90 (Demo Shout) x 0.90 (Insp/AF) x 0.90 (Def Stance) x 0.60 (Shld Wall) x 0.80 (SoEx) x 0.60 (Pain Suppression) = 149,906

Now, for the second Impale on an island you can either have a second tank or use a neat little trick to avoid having to worry about the Impale at all. What this relies on is the fact that the Mutated Corruption will Impale anyone it can reach, so you can force it to Impale a specific person by having everyone run out so that they are the only person in range when the cooldown is up. Of course the soaker will also be taking mêlée hits too while before the Impale goes off, so they need to be able to take care of themselves for a short time.

The best choice for this job is a Shadow Priest, because they can use Dispersion to reduce the Impale to a meagre 57,834 Physical damage, and they can do this on every island. If you don’t have a Shadow Priest, you can use a Rogue or Hunter for the same job. Have them step in with Evasion or Deterrence up so they don’t get killed by mêlée swings, and as soon as they get the Impale debuff they should Vanish or Feign Death. This clears the debuff and voilà, you’ve skipped an entire Impale! Just make sure to let the tank get back in first afterwards, or else the keenest mêlée will get killed instead.

Phase 1 Overview

We’ve been through the new abilties in detail, but it’s worth stepping back and looking at them in context.

To begin with, island order. I recommend Ysera, Alexstrasza, Nozdormu and then Kalecgos, as on normal mode. With the extra Crush damage and cooldowns being tied up you need Nozdormu as long as possible, but you still need Kalecgos more to ensure you get everything killed in good time.

Here’s the order of events for a sample island:

  1. At the start you’ll hit the Arm or Wing Tentacle for a while, then you’ll break off and get into your arcs ready for the Mutated Corruption. Do not bring the Tentacle under 80% HP on the latter two islands until after the Regenerative Bloods have been killed, you don’t want Blistering Tentacles when you’re busy dealing with other things
  2. Shortly after that the first Corrupting Parasite will be cast, which should be delivered to the spot right in front of the Mutated Corruption
    • On the first island you should ignore the Parasite, save DPS and use Dream when it is about to explode
    • On subsequent islands it should be killed, cleaving the Mutated Corruption where possible
  3. A couple of seconds after the Corrupting Parasite cast comes the first Impale. Stick with your cooldown rotation and all will be fine
  4. You get a ~20 second lull here before the Elementium Bolt is cast, which all DPS should switch to and kill before it lands as usual
  5. Shortly after the Bolt is dealt with the second Impale comes out. You’ve got a plan for this, so execute it
  6. Immediately after the second Impale the Regenerative Bloods will spawn. These should be brought and misdirected to the tank and held while the Mutated Corruption dies
  7. A few seconds after the Bloods spawn the second Parasite gets cast. This should be dropped over by the Arm or Wing tentacle
  8. Once the Parasite is dropped and the Mutated Corruption is dead, the tank should drag the Regenerative Bloods over to the Arm or Wing Tentacle and the whole lot should be AoE’d down.
  9. At this point the fight is the same as normal mode. Kill the Arm or Wing Tentacle, and any other tentacles that might spawn

On the fourth island you should handle the Elementium Bolt as usual, running away from it, popping PW:B if you use it and Tranqs and Divine Hymns if you have them. However to help prevent half the raid getting Crushed while clumped in the bubble you can have people with personal cooldowns stand outside the bubble instead. Your healers will thank you!

Each of the islands proceeds along much the same lines, although the general level of damage increases as you go along. There’s a lot to take in but there’s also a clear rhythm to the encounter which you’ll soon figure out, and it’ll end up feeling a lot less complicated than it looks.

Phase 2

Hopefully you’ve completed Phase 1 in good time, because Phase 2 is as much about control as raw output, although there’s a hefty burst DPS requirement too.

The Elementium Fragments are still in play, as are the Elementium Terrors. Handle them as you always would: kill them ASAP, use Dream if you get targeted by Shrapnel and tank the Terrors in the Time Zone to slow the rate at which they can stack Tetanus. On heroic 7-8 stacks is quite enough, needing external cooldowns and intensive healing to survive.

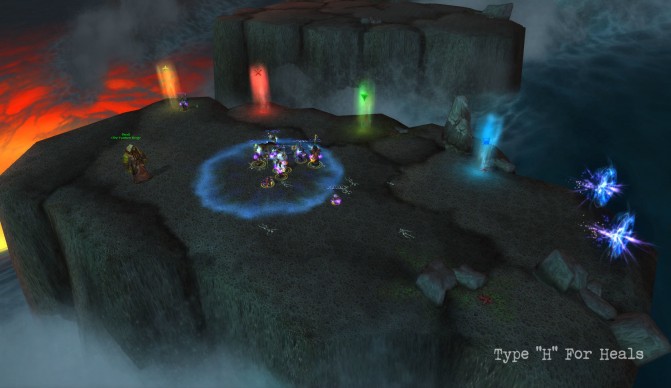
The new aspect is the Congealing Blood. These start to spawn at 15.9%, 10.9% and 5.9% from approximately the locations shown on the screenshot below, and slime their way towards Deathwing. If they reach him they heal him for 1% each. Even one getting through could spell disaster though, because if you take Deathwing above a trigger point he’ll spawn more Congealing Bloods when you DPS him down past it again.

Congealing Blood approximate spawn locations

Congealing Blood approximate spawn locations

The Bloods cannot be stunned, rooted or knocked back, so slows and AoE damage are vital here. Be careful not to overwrite slowing effects. We chose to have our rogue use Fan of Knives with Crippling Poison on the Bloods to keep them slowed, and we had a DK with Chillblains helping out as well while everyone else focused on killing them.

The key to this phase is control and not trying to do too much at once. If your tank can drop the Tetanus debuff easily (DK, Paladin) then go ahead and tank the Terrors with the Bloods and AOE everything together. However at 15% this isn’t necessary any more, you have time to kill each thing in turn, and the encounter feels a lot more manageable if you take your time.

Here’s the sequence we went for:

  1. DPS Deathwing to 17% (not much lower so that DoTs and spellweave (the AoE bonus you get from Kalecgos) don’t take him under prematurely)
  2. Kill the first Fragments
  3. Kill the first Terrors
  4. Push Deathwing under 15.9%
  5. Kill the Congealing Bloods
  6. Push Deathwing under 10.9%
  7. Kill the Congealing Bloods
  8. Kill the second Fragments
  9. Kill the second Terrors
  10. Push Deathwing under 5.9%
  11. Kill the Congealing Bloods
  12. Kill Deathwing, ignoring any Fragments that might spawn at the end

The timing was pretty tight on getting the second Bloods killed before the second set of Fragments spawned but we ended the encounter with 30-40 seconds in hand, so there was time for us to have waited if necessary to survive.

Spec and Glyphs

There’s a bit of everything to deal with, so picking a focused spec is a little tricky. I stuck with the Atonement spec because with the fixed range on Atonement you can do a good job of smart-healing people from Crushes. Plus Atonement benefits from the double damage on the Arm and Wing Tentacles for the third minute on each island making it competitive HPS at a very low cost. Archangel is also great to pop when the Blistering Tentacles spawn for a bit of an extra boost to your raid healing, and for healing up after the Elementium Bolt on the fourth island.

Although PW:B gets used I found that people weren’t standing in it enough to make the glyph worthwhile. I ended up settling for PW:S, PoH and Penance as Prime glyphs. Penance is good as a quick heal on Crushed people, for keeping Inspiration on the tank or for keeping up my Heart of Unliving stacks, and I was casting PW:S frequently for Rapture procs.

For Majors I swapped Dispel for Glyph of Prayer of Mending, since there’s nothing to Dispel, and because PoM should be bouncing for most of the fight.

And once again, get the Glyph of Fading. You’ll need it every time the Regenerative Bloods come up, and every little helps.

Cooldown Usage

Your tank cooldowns will be almost entirely dictated by the fight and your strategy. Because you’ll typically spend up to 2 and a half minutes per island you can’t guarantee that your 3-minute cooldowns will be available for the same point on every island, so play it safe and plan to have them up every other plate. Your PW:B will be needed on the fourth island, so avoid using it on the third, although there may just be enough time between the first impale on the third and the Bolt on the fourth, it’ll depend on your raid’s DPS and speed.

In Phase 2, Pain Suppression should be used on the Terror tank when their Tetanus stacks reach 6 or above, followed by spam-healing until the debuff fades. You can either use PW:B on the raid to mitigate the damage later on or on the tank again for the next set of Terrors, depending on the other cooldowns used. Bear in mind that if you can get a few raid members to stand in it Spirit Link Totem can be a lifesaver for a Terror tank, giving them access to a much larger effective health pool, so you may wish to use your PW:B on the raid instead.

Leap of Faith isn’t a terribly useful ability on this fight if the strategy is being executed correctly. You can extract people who are slow to move away from the Mutated Corruption before an Impale, but otherwise no one should have trouble getting to where they need to be.

Timing Shadowfiend and Hymn of Hope is tricky here. Ideally you’d get them in three times, given a 14-minute-ish duration, but it’s quite possible you just won’t need them on the first island. I’d recommend using them early anyway, you might help someone with the Hymn of Hope and the DPS from the Shadowfiend can help get the Mutated Corruption out of the way a fraction quicker. And even if most of the mana is wasted, it’s better than not casting them at all.
If you cast them after you’ve healed up the first Parasite explosion you’ll have a mana deficit to recover, and then you can cast them together on the third island and on Deathwing’s head during Phase 2.

Other Tips

Keep Fade handy for the Regenerative Blood spawn, especially if you’re 1-tanking the fight. Fade early too to avoid getting any DoT stacks and keep them going where they’re supposed to.

Rapture is so important for maintaining your mana on this encounter. If you’ve got a bit sloppy up to now, it’s time to get back on the straight and narrow. Remember, even after the Mutated Corruption dies there’s going to be enough raid damage to burst the bubble pretty reliably so cast it on anyone when the Rapture ICD expires and enjoy vastly improved mana regen.

That same raid damage also means PoM will almost never fail to use all of its charges, making it quite mana-efficient and a good use of a GCD. Keep it going as much as is practical, especially once the Arm or Wing Tentacles are below 70%.

On the first and second set of Congealing Bloods in Phase 2 you can help with some Mind Searing. Remember to pick a mêlée DPS to sear off instead of tab-targeting a Blood, or it’ll get interrupted every time the Blood dies.

Finally, not a Discipline tip but a good one anyway: if you have trouble with the portal at the entrance sometimes sending you to Wyrmrest Temple instead of the Maelstrom, go up onto the Skyfire gunship and talk to Sky Captain Swayze to set it in motion, then use the portal in the bridge to get to the Maelstrom. After that, the entrance portal will go to the right place (until the instance resets).

Good luck, and have fun! Comments, questions and additions appreciated.

Possibly Related Posts:

Heroic Spine of Deathwing

Posted by Malevica on March - 30 - 2012

NB: This guide will assume you’ve already read my normal Spine of Deathwing strategy, or otherwise know the details of the fight on normal mode.

Fight Summary

On heroic, the Spine of Deathwing fight demands precise timing, fast target-switching, efficient healing and a lot of patience!

The fight will take at least twice as long on heroic as it does on normal because each Burning Tendon has a greatly increased health pool. You should expect to take two burn phases to remove each plate instead of just one. What this also means is that there will be a lot more Corrupted Blood spawning than you would normally be used to, making Blood control by tanks and Blood removal on the rolls much more important.

For ranged DPS, dealing with Fiery Grips quickly becomes really important, given that each tick can take 1/4 of your health away and you might not be healable at that moment. You want to be in position to DPS the Corruption immediately, but you also need to stop DPS quickly once it’s released or you’ll kill it early and end up with an extra Amalgamation killing people. The margin for error is fairly small here. I’ll talk about the timing in detail in the section on Hideous Amalgamations, but if you time things carefully you can avoid having a Fiery Grip during the Burning Tendons phase, which is a huge DPS boost if you’re having trouble getting the Tendons down reliably.

For healers, besides needing a bit more work to remove the Searing Plasma debuff on people and the fight going on a lot longer, the only major mechanic to be changed is the addition of the Blood Corruption debuffs, which I’ll give their own section below before other sections on dealing with Hideous Amalgamations and Corrupted Blood.

Blood Corruption

Every Hideous Amalgamation that spawns will cast Blood Corruption: Death on a random player in the raid. This is a magical debuff with a 15s duration. When it gets dispelled it jumps to another random player and may either stay the same or change into Blood Corruption: Earth. The duration persists through dispels, so you have 15s total before it expires. When it does expire, if it’s still Death (red icon) it will explode and insta-wipe your group; if it’s Earth (yellow icon) it will grant that player Blood of Neltharion, a 20% damage reduction for the rest of the fight (including through combat resses (Anyone able to confirm this?)), stacking up to 2 times for 40% total.

One person (25-man teams may want a second person) should be assigned to dispelling this, and their priority should be:

  1. Get rid of any red Death debuffs
  2. Get the yellow Earth debuff onto the tanks, up to 2 stacks apiece
  3. Get the yellow Earth debuff onto anyone who is likely to pull aggro on Corrupted Blood later in the fight, which tends to mean healers and perhaps melee DPS too.

Because you want this damage reduction on the tanks as soon as possible, the best way to begin the encounter is to kill all four Corruption tentacles, then wait on the roll until all 4 Amalgamations have cast their Blood Corruption. Then roll and throw them off. This gives you 5 Blood Corruption debuffs to work with right from the start and believe me, getting your tanks sorted early when you’re not panicking about healing all the things is a good feeling.

Amalgamation Management

Speaking of those Hideous Amalgamations, let’s look a bit more closely at when, where and how to spawn them, dump them and kill them.

As I’ve mentioned, you want to spawn four pretty quickly at the start, so on the ‘pull’ you’ll kill all four of the active Corruptions; To help your tank pick them up it’s worth killing one side and then the other rather than a random order.
These four are going to be held by the tank(s) until they’ve cast their Blood Corruption and then you should execute a roll to throw them off. At this time, kill the new Corruption and the fight begins properly.

Because the Amalgamations have pretty high health and their Superheated Nucleus pulses hurt a lot you really don’t want them to reach 9 stacks before you’re ready, so make sure your Corrupted Blood is killed on one side of the Spine and your Amalgamations are tanked on the other.

The timing on the Amalgamation’s death is very tight. You need to be watching its health bar, the number of dead Bloods (Residue) on the ground, and the timer for Fiery Grip, and making sure you’re ready to move at the precise time. When there is ~6 seconds to go on the second Grip of that phase, move the Amalgamation across the Spine and into the pile of Residue. It should get to 9 stacks immediately and start pulsing. Hopefully it was at ~5% or less HP when you started moving, and if it’s much above 10% then you may have problems. While the Amalgamation is moving the melee DPS should work on finish off the Amalgamation, the ranged DPS should be DPSing the Corruption to break the Fiery Grip, then switching back to either finish off the Amalgamation or start work on the Burning Tendons.
If you got the timing right there will be a Fiery Grip right after the Burning Tendon goes away, so be ready to quickly kill the Corruption to break it out, then rinse and repeat the previous process.

After every plate is removed you’ll want to execute a roll to clear out some of the Corrupted Blood. Spawn an extra Hideous Amalgamation (so you can soak up more Residue), then AoE down the Corrupted Blood that remains, using raid cooldowns to prevent the Burst damage from killing people. Start the roll as you drag the Hideous Amalgamations through the Residue pile so it soaks up as many as possible, and then the roll will throw it off the Spine safely.
Once again the timing is tight: you should be in the process of starting the roll because if the Amalgamation absorbs nine Residue it will start to pulse, and you really need to minimise the number of pulses it can get off before flying away. If you’re fairly quick on the roll, you’ll also avoid getting a Fiery Grip during the roll, which helps a lot.

Corrupted Blood Management

Mostly because of the length of the fight you will have to deal with a lot more Corrupted Blood on heroic than on normal, and you will need to carefully manage this to stop it causing too many problems.

The first thing to sort out is positioning. On the first plate it’s not so important, but from the second onwards your Blood tank will be having trouble picking the Bloods up fast enough. The best way to have the Bloods remain under control here is to have the ranged and (especially) healers position themselves near the Blood tank so that the tank’s AoE/cleave attacks alone are sufficient to pick up the incoming Blood, leaving taunts free for the few which genuinely go astray.
Pay close attention and be careful to run away when the Amalgamation is due to die, because getting Fiery Gripped next to the Nuclear Blast is just embarrassing.

The next thing to deal with is not killing too many Corrupted Bloods. Any Blood that is killed (barring the Blood that gets thrown off in rolls or used for exploding Amalgamations) will just come back later once it’s slimed its way to the fiery pits at the side, so killing more Blood than you need to just means you have to heal through more Bursts. When each Burst is around 10k Physical damage raid-wide, that’s a lot of unnecessary mana spent. DBM can keep track of how many Residue are on the ground, so keep a close eye on this number and don’t go crazy.

The only way to actually get rid of Blood, which you’ll want to do to keep your tanks from getting splatted on the last couple of Amalgamations, is to throw Residue off. I’ve talked about this before, so I won’t repeat myself.

The final thing to talk about is what happens on the last plate. Once the second plate has been blown off you’ll have AoE’d down most of the remaining Corrupted Blood and thrown them off with Amalgamations in a roll. After this, the first Amalgamation on the third plate should proceed more or less as before, but the rate at which new Corrupted Bloods are arriving is pretty high and after the first Tendon phase your Blood tank will be taking a real beating from all the Blood, requiring very heavy, focused healing.
At some point that tank may very well need to start kiting; if you’ve been on time (2 grips per Amalgamation) and throw off enough Blood, this shouldn’t need to happen until the second half of the last plate, the 6th Amalgamation. The less kiting the better, because it’s easy to make a mistake and have a tank die. The Bloods can be stunned, including by a Paladin’s glyphed Holy Wrath, which helps with the kiting, and Life Grip can be used to help your tank keep distance. If they feel they might take a few hits in passing, they’ll need a cooldown to get through it.

Because one tank is engaged in kiting full-time and not in picking up new Blood, your Amalgamation tank will need to take over picking up the Blood instead. The ranged and healers need to move over to that tank to help with the Blood pickup, and healers need to be aware and give them extra healing. Everyone should be extremely careful not to kill any of these Bloods so the Amalgamation doesn’t gain stacks prematurely.

Spec and Glyphs

As a Disc Priest your primary jobs here will be damage mitigation, dispelling, and DPSing, in that approximate order, and for me that meant an Atonement spec. You could go a different way and go with a tank-healing build with Train of Thought and Strength of Soul if you want more single-target efficiency, but because of the way Grace works and the fact that absorbs don’t help to remove Searing Plasma debuffs you’re far better off letting the other healers focus on clearing the debuffs while you cover the dispels and use PW:S to protect people with Searing Plasma who are taking, or going to take, damage. Atonement is a pretty mana-efficient way to heal, assuming the damage isn’t wasted, and does seem to prefer people with Searing Plasma debuffs (perhaps it sees the debuff as a deficit?).

The key to surviving the fight as a healer is efficiency. Spamming GH bombs around the place for 12 minutes just isn’t practical, nor is it necessary. Slow and steady is the key here.

You’ll also want to pick up Soul Warding so you can quickly throw out a few bubbles before the Amalgamation hits 9 stacks or before a roll.

Glyphs-wise, go with Glyph of Dispel Magic and the Glyph of Power Word: Shield for a bit of extra healing, and make sure you have the Glyph of Power Word: Barrier for the same reason.

And if you don’t have the Glyph of Fading yet, go get it for this fight, you won’t regret it. And keep it, it’s pretty much the only useful third minor glyph. (When was the last time your Shadowfiend died?)

Cooldown Usage

Work with your fellow healers on cooldown rotations. You should expect to have them up once per plate, but not once per Amalgamation. The points where cooldowns are valuable are the rolls, especially if you’re AoEing Blood, and when the Amalgamation pulses at 9 stacks.
We chose to use PW:B on the first roll, then after each plate when Blood was being cleared out before the roll. Tranqs are good to use during or right after rolls to clear out remaining Searing Plasma debuffs and get people topped up. Because of the long cooldown, save Divine Hymn for during or just after the final roll, once the second plate has been removed.
A special note on Spirit Link Totem: the effect ignores Searing Plasma! You still can’t heal the person directly, but healing pumped onto the raid as a whole gets shared with them, so this is hugely valuable when debuffed people people might otherwise die from incoming damage, so we found this handy when the Amalgamation was pulsing.

I found two important places for Pain Suppression, but there was time for at least one other use as well, your choice. The first is on the Amalgamation tank before first roll, when there will be four Amalgamations active. The second important use is on the final plate, where your Blood tank might need to call for it if they run out of stuns or personal cooldowns. Besides that, use it freely on either tank if they start taking too much damage or even on a healer if Bloods have got away.

Besides rescuing people who are standing in a bad place (under the Nuclear Blast, or too far out for the Blood tank to hit their Bloods, for example) this can be used to help keep your Blood tank stay away from the Bloods while kiting them. If you want to use this it’s best to plan it in advance so you can be standing in a sensible place and facing the right direction. There’s nothing quite like failing to LG because you’re facing the wrong direction!

Your Shadowfiend and Hymn of Hope can and should be used together on this fight where possible. Bearing in mind the 12-minute duration you should expect (unless you have extra talent points in it, in which case go your own way on timing too) to get 2 Hymns and 2 Shadowfiends in. I went with throwing out both on the first Burning Tendons to get them on cooldown and they’re not wasted because I’ve usually just burned a ton of mana moving 5 Blood Corruption debuffs around the raid, and then I can use them again on the last Burning Tendons, on the first burn because I really don’t have the time to sit and channel on the second burn.

Other Tips

I think I’ve covered most of it above. I should just re-iterate the need to keep an eye on your mana and be efficient. Don’t look at the meters on this fight because you should expect to be behind, but you bring vital mitigation to the fight as the only way (outside a Spirit Link) to protect people with Searing Plasma from incoming damage, and that can be a life-saver. Plus you free up other healers to do their thing by covering the dispelling duties and add a bit of DPS to the equation.

Good luck, and have fun! Comments, questions and additions welcome as always. (Grav, I’m looking at you!)

Possibly Related Posts:

Heroic Hagara the Stormbinder

Posted by Malevica on March - 29 - 2012

NB: This guide will assume you’ve already read my normal Hagara strategy, or otherwise know the details of the fight on normal mode.

Fight Summary

The heroic version of the Hagara encounter shares the same mechanics as normal mode, but how you approach them needs to be a lot more coordinated in order to get through the fight safely. I’ll break down the differences by phase: normal, Frost and Lightning, and explain how we handle each phase.

Normal Phase

As I’ve said, there’s no new mechanics here, but you do need to be a lot more careful.

The biggest change, which I’ll mention first because it affects everything that follows, is that we choose to tank Hagara near the edge of the platform, by the portal, instead of in the middle, or wherever she happens to be. This is for two reasons: it reduces the risk of Shattered Ice landing on a ranged DPS, and it keeps the tank and melee near where they need to be for Phase 2.

The whole raid needs to be aware that the Ice Lances are a little different on heroic, because the stacking debuff they apply increases Frost damage taken, rather than slowing attack speed. That means you need to share the soaking duty around so that people aren’t taking excessive damage. With strong healing and/or cooldowns someone can survive solo-soaking at a push, but it’s better to share. Also remember that there is a short (3 yard) splash, so don’t get too up-close and personal with your soak-mate. This stacking debuff also makes Shattered Ice a potential one-shot ability, so it’s important to say well behind Hagara at all times as she prefers targets in front of her.
Assigning fixed positions is tricky here because there’s some randomness in who gets targeted and where the orbs spawn, so all of your ranged players (DPS and healers) will need to use their initiative and be actively soaking. We did find it helpful to have people generally hang to one side or the other though, so you don’t end up all clumping at one side. We also avoid crossing the beams by having people move around so that they’re on the appropriate side of the boss, and get targeted ranged to move in close to the melee pack (but not splashing close, of course). The aim here is to make soaking as simple and predictable as possible.

Ice Tombs are still cast on two random players and operate the same way as on normal. It’s a good idea to assign a spot for these part-way between the boss and the middle of the room so that you don’t risk blocking the healers’ line of sight to the tank if they appear in an unfortunate location.

The other big difference concerns Focused Assault. On normal you can just strafe away and she’ll not chase you, but this doesn’t work on heroic where she will merrily follow you. There are two ways to avoid this.
At the start of the fight, and after a Frost or Lightning phase, she will try and cast Focused Assault quickly, so the tank should stand near the edge of the platform and wait for her, so she wastes most of the channel time moving to you. Healers will still need to work hard to keep the tank up if he does get hit though, 50k per 0.5 sec still hurts! At other times, pop a tank or healer cooldown when it’s due, and have another player stand at range and taunt Hagara once she’s casting Focused Assault, with the MT taunting back again before she reaches the ranged. A Holy Pally works well because they have plenty of self-defence, but anyone with a real taunt will do (unfortunately Hunter taunts do not work, it does need to be a “tank” taunt from a Warrior, Druid, DK or Paladin).
In theory Focused Assault can be handled with just cooldowns and heavy healing, but with soaking and possibly Ice Tombs for healers to deal with it’s best to play it safe and minimise your exposure to the damage.

Frozen Tempest

OK, this phase does have one new mechanic to deal Frostflake. This is a magical debuff placed on a random player which slows their movement speed by 10% a stack, stacking every 1 sec up to 10 stacks. When this is dispelled it leaves a patch of frost on the ground that slows movement speed for 50% for anyone inside it. This is rather detrimental to staying out of Ice Waves, so dropping one is to be avoided.
Luckily, dispelling it while the person is inside the bubble prevents the Frostflake Snare from going down; so anyone who gets the Frostflake debuff should immediately step inside the bubble and stay there until they are dispelled, then move out again.
If this is your job, make sure that you have Watery Entrenchment as a custom debuff so you can tell when it’s safe to dispel someone.

Because of the need for dispels it’s best to all move around as a group during this phase, taking out each crystal one at a time, as opposed to just spreading out into smaller teams. We use a raid marker, the purple on the screenshot in the next section, to mark the Crystal where we all start.

Big Note! Hand of Freedom, Cloak of Shadows, Druid shapeshifting and any other effect which removes snares or magic will count as a dispel, so these must be avoided unless you know you’re safely inside the bubble. Your team mates will not thank you if you try and be clever!

Pro tip from Grav: it’s pretty safe to use Aspect of the Pack in this phase and the 30% movement speed boost is a big help to stay ahead of Ice Waves, get into the bubble, and dodge the falling ice things. The falling ice will daze you though, so don’t get hit by it!

I should also address an alternative strategy, which is to have your ranged and healers group up in the middle of the platform while your melee run around the edge. This lets the ranged DPS have free rein to DPS any crystal, and negates the need for them to move if they get Frostflake. The damage is fairly high but at high enough gear levels and with three healers it is possible to heal through this damage. However this strategy is designed as a DPS boost at the expense of healer sanity and it’s probably not going to be necessary now we’re at the 15% nerf point, but it is an option if you’re really struggling with DPS.

Lightning Storm

The main difference in this phase is that there’s twice as many Lightning Pillars as on normal (8, up from 4) and the damage from the chain lightning is a lot higher than on normal and gets higher as the phase goes on, so you really need this phase over as quickly as possible so people take as few ticks as possible. Doing that requires quite a bit of coordination, and a battle plan.

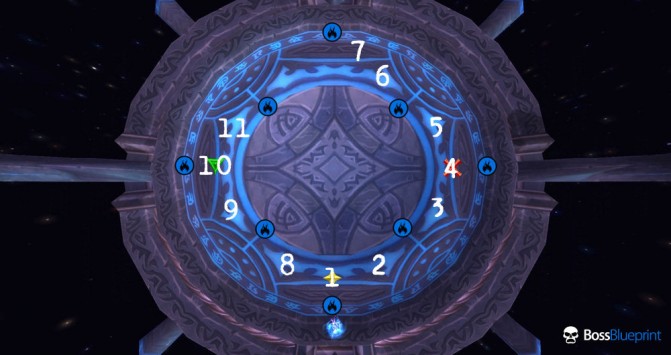
Have a look at the diagram and screenshot below. I’ll point out a few of the important features and what the markers mean.

Hagara Lighting Positions

Hagara Lighting phase positions. Blue markers are Lightning Pillars, Numbers are raid members, Raid marks are to help line up the diagram with the screenshot below

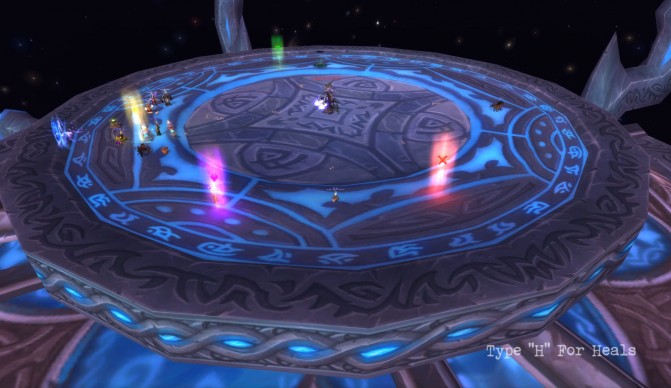
Heroic Hagara Lightning Phase Positioning

Heroic Hagara Lightning Phase Positioning

In the diagram the Pillars are the blue markers, numbers refer to raid members and the raid markers line up with the screenshot.
Also, Boss Blueprint needs to go to eleven!

When the phase starts the tank grabs the add and positions it on the yellow marker, labelled “1”. As it begins to die, people should break off and get into their assigned positions before the tank and players 2 and 8 finish it off and start the chain. The add’s death should activate the southern-most pillar, then the Chain Lightning will jump to player 1, then to 2 and 8, and will continue from there.

The more eagle-eyed of you will have spotted a mathematical conundrum: there are eleven spots, but only ten raid members. This is where you’ll need to be clever and use your raid’s tricks to fill the spots. You’ll need to at least get all the spots covered, but if you can reuse more people then then you can free up a healer or two to stand centrally and focus on healing through the damage, which helps massively.

The first trick is to use a permanent pet (e.g. Warlocks, Hunters and presumably Frost mages and one flavour of DK) to occupy a spot because Lightning will happily chain through them and they can be positioned in advance. On the screenshot above you can see a wolf in position in the upper right; on the diagram that’s position 7, and our hunter occupies position 6. NB pets can aggro the boss, so remember to run them carefully around the outside!

The other trick is to make the most of mobility abilities. Hunters have disengage, Mages have Blink, Warriors have Heroic Leap or Intervene and Warlocks have Demonic Teleport. They can easily cover a position early in the chain and then quickly change position and slot in later in the chain as well. For example in our particular case we have a Warrior take position 2 and then leap out to take position 4.

Even if you don’t need to reuse people, those movement abilities should also be considered when assigning people, so that you assign people with movement abilities to the furthest positions.

The other thing to stress which helps a lot with reducing damage taken is to move into the middle of the room when you’ve done your job as a link in the chain so you don’t take any more damage than is absolutely necessary.

Spec and Glyphs

This isn’t really a demanding fight, healing-wise. It can get intense during the lightning phase if your coordination is less than ideal, but otherwise the healing is fairly pedestrian.

I’d recommend taking Soul Warding to help spread bubbles around to buffer people during the Lightning phase, and because the damage is in waves there’s good opportunities to make the most of an AA spec as well. If you go that route you’ll want to pop your wings for the the Lightning phase, which is where the raid damage gets really high.

If you’re on dispelling duty for Frostflake then you should pick up the Glyph of Dispel for some free healing. I’d also recommend the Glyph of Prayer of Mending, since you’ll get good uptime on PoM on this fight, especially in the Lighting phase.

If you’re the only Priest and confident at both specs, this is a reasonably good fight to switch to Holy for utility: Body and Soul is handy for getting people with Frostflake to safety quickly and HW:S can heal people in Ice Tombs.

Cooldown Usage

There’s not really a great time or place to use PW:B on this fight, because it’s pretty spread out. You could use it at the start of the Lighting phase, which will save some mana, or perhaps to provide a safe spot for some Ice Lance soakers.

PW:B can also be used as a weaker replacement for Pain Suppression on the tank for Focused Assault. Either hold tank cooldowns until asked, or use them proactively if a healer or especially if your Focused Assault taunter gets Tombed.

As I mentioned earlier you can use leaps/teleports/blinks to move people around the chain in the Lightning phase. Life Grip is another trick you can use, although if you use it to bring someone to you you’ll increase their total damage taken as lightning bounces between you and them until they get to their assigned spot. Give them a bubble and PoM to help out.

Although it’s more risky you could also LG the tank away from a Focused Assault if you have no taunter available, but you might also upset your melee DPS and risk hitting the wrong people with Shattered Ice, so use this as a last resort.

The Shadowfiend and Hymn of Hope used together should be used after the first Lightning or Frost phase, because the boss will be taking increased damage and not dealing any. Almost like that downtime was made for us! You can use a Concentration potion on the next one, if you need to.

Other Tips

Atonement has no line of sight requirement, so if the Ice Tombs go down near to the boss you can get heals on the frozen people to buy some time. The same applies for ground-based heals like HW:Sanctuary, Efflorescence and Healing Rain.

Good luck, and have fun!

Possibly Related Posts:

Heroic Yorsahj the Unsleeping

Posted by Malevica on December - 15 - 2011

NB: This guide will assume you’ve already read my normal Yorsahj strategy, or otherwise know the details of the fight on normal mode.

Fight Summary

The key difference between normal and heroic mode is that Yorsahj spawns four slimes instead of three, dramatically increasing the damage and meaning that you have some more difficult choices to make about which add to kill.

What this means in practice is that you’ll have to deal with the Purple debuff a lot more often, about half of the combinations will include a Purple, and your DPS will need to be much more on the ball to kill the double spawn of adds that comes from a Black/Yellow combination.

There’s also a trick to using the Blue Mana Void to your advantage, which I’ll talk about later.

First though, those combinations. There are in fact only 6 combinations that come up. I’ll list them all, along with a recommended kill target (underlined), and then talk about them all in detail.

These are listed in the order that the current version of DBM reads them out so you can use this as a quick reference if need be. I’ve left Black as white, for obvious reasons.

PurpleRedYellowBlack

PurpleGreenBlackBlue

GreenRedBlueBlack

GreenYellow – Black – Red

Blue – Black – PurpleYellow

BluePurpleGreenYellow

Combinations in detail

PurpleRedYellowBlack

This is just nasty. Kill the Yellow to keep the damage in check, and then go easy on the heals. You may blow one or two people up, but keep your head and plan ahead and this one is manageable.

If you have a surfeit of cooldowns, you could consider killing Purple, but you’ll need your cooldowns for a later combination so I’d recommend going with Yellow initially and learning to handle it.

The rest of the damage is pretty rough though, so blow those cooldowns and crank out the AoE heals.

PurpleGreenBlackBlue

By contrast, this is one of the easiest combinations to deal with. We kill the Black here to allow ourselves some solid distraction-free DPS time on the boss, but you could go with Green instead for a real healing chillout.

GreenRedBlue – Black

You have to pick between Red and Green and since you want to stack to kill Black adds, pick Green to kill. There’s a fair amount of raid damage out there, but there’s no Purple to worry about so go to town with the heals and you should be fine.

GreenYellow – Black – Red

This is another really rough one. Whichever way you slice it you’ll end up with 3 AoE damage abilities to deal with, so you’re going to need to pop some raid cooldowns and AoE heal your heart out to get through it. If there are no cooldowns available pop a Bloodlust instead, which will also help with the Black adds.

You’re pretty much forced to kill the Green so you can stand in to reduce the damage from the Red.

Blue – Black – PurpleYellow

An easy one. You need to kill the Yellow, because if you don’t the AoE it does will overwhelm you and you can’t heal enough because of the Purple, leaving you with just the damage from the adds to handle, which is manageable.

BluePurpleGreenYellow

Here you’re picking between Yellow and Green to kill, and as with the previous combination you should kill the Yellow for the same reason.

That leaves Green and Purple, which is healable.

Handling the Mana Void

The trouble with the Mana Void is that when you get your mana stolen you really need it back immediately to deal with the silly damage, and because four combinations include a Cobalt Blood you won’t have mana cooldowns available every time. You don’t have time to wait while the Mana Void is taken down from full HP, people will be dead by then.

So, when the first Mana Void spawns you should pop your raid mana cooldowns (Mana Tide, Hymn of Hope) and get by without killing the Mana Void at that time. Then either throw spare DPS on it or assign one person to it specifically while the next slimes are coming in; either way, get it down to around 10% then leave it alone.

Now, when the next Mana Void spawns and you have no mana and no cooldowns left, quickly kill off the old Mana Void for a free full mana bar. DPS the new Mana Void down to 10% again, rinse and repeat.

The advantage of this, despite being a bit more complicated, is that you’re always only a few seconds away from a replenished mana bar whenever you need it.

Deep Corruption

Here’s a full list of abilities that stack Deep Corruption.

Highlights for Discipline Priests:

  • Atonement – 1 stack
  • Binding Heal – 1 stack to the person you heal. NO STACKS for yourself.
  • Divine Hymn – 1 stack per tick (i.e. will wipe your raid)
  • Holy Fire (with Atonement) – 1 stack per tick. Do not use if you have atonement.
  • Penance – 1 stack for the whole channeled cast (i.e. not 1 per tick)
  • Power Word: Shield – 1 stack (even when glyphed)
  • Prayer of Healing – 1 stack
  • Prayer of Mending – NO STACKS
  • Renew – 1 stack on initial application

Binding Heal is a useful spell, because it doesn’t add stacks to you. The downside is that it doesn’t heal for as much as Greater Heal, so if the target is taking big damage and you’re not in danger GH is still favoured.

Do not try and use Atonement here, especially not with Holy Fire. Atonement in general is bad because you can’t plan where it’ll go and it’s fairly weak healing anyway, and especially not Holy Fire because every tick adds another stack.

Penance, Greater Heal and Power Word: Shield are your staples depending on what’s needed most, and because it doesn’t generate stacks, keep PoM bouncing at all times for stack-free healing.

PW:B doesn’t do anything here, so use it if you need it, although it’s better to save it for the evil combinations with 3 AoE damage abilities.

Spec and Glyphs

This fight requires really high output, and is a great example of a time when Archangel shines. You can DPS the boss or the incoming slime to stack Evangelism, then pop it for a healing boost when things get rough later on. It’s also a fantastic boost just after the Mana Void has spawned.

In terms of Glyphs, it’s again all about the output. Prayer of Healing and Power Word Barrier are must-haves here. Pick between PW:S or Penance depending on your usage. I went with PW:S, but there’s a case for both.

Because of no dispels and high raid damage, Prayer of Mending is the Major top pick here.

Cooldown Usage

PW:B and Divine Hymn should be kept for the Yellow – Black – Red combinations. You’ll need them to survive the damage.

Pain Suppression should likewise be use on the nasty AoE healing combinations to keep the tank relatively out of trouble while you focus on the raid. Anything with Yellow up will do that.

Life Grip is useful either to get people in on the Red or out to the incoming slime to get it killed in time.

I’ve touched on Hymn of Hope before, it can be used just after the Mana Void spawns to get your raid some mana back up. Remember that the buff grants a chunk of free mana while it lasts, so even if you have to break off to heal after only a couple of seconds chanelling it’s still worth it. If you’ve got your raid pre-shielded, this ought to buy you enough time to get a few ticks off.
Ideally though, you’d like a non-healing Priest to pop HoH if you have one, so you don’t need to take time out from healing.

I’d suggest saving Shadowfiend for another Mana Void phase. Although you’ll get mana back soon from the Mana Void, there may be times when you need it sooner. Because of the effect of the Mana Void, there’s no point holding more mana than you need throughout the fight, it’s better to have it in reserve.

Other Tips

As I’ve mentioned previously, Archangel from DPSing the adds or boss is very useful for AoE damage phases. Just don’t Holy Fire the boss for a Purple phase, because each tick of Atonement adds a stack of Deep Corruption. he fight on normal mode.

You can prepare for either a Blue or Purple (or both) phase by throwing as many heals and particularly PW:S around the raid as possible before the Deep Corruption buff comes up, to get some stack-free healing and protection out there. You’re going to lose your mana or be limited in your healing ability anyway, so you might as well get a head-start even at high cost.

Possibly Related Posts: