Home
Subscribe:
Contact:
Subscribe to this blog by RSS Follow me on Twitter
Subscribe to this blog by RSS

Archive for the ‘Advice and Strategy’ Category

Healing Halion

Posted by Malevica on July - 2 - 2010

Last night my guild and I had the pleasure of valiantly coming to the aid of the Ruby Dragonflight and slaying the invading Halion and his Lieutenants. Well, my guild did that, I was stuck listening on Vent while reinstalling every patch since November 2008 (3.0.1 onwards) because the Blizzard repair tool got a bit overzealous, but I did get finished in time for the last half-dozen attempts and the kill.

I should point out that I’ve got a strategy here on this very site, updated with info from last night. That’s where the bulk of the information on the fight is, while this will just be some extra thoughts, tips and healer-centric comments.

Trash

I didn’t actually get to see the trash, but it was quietly pleasing to hear the “hmm, maybe we need to do something about those” after a very quick wipe on an early trash pull. Most of the pulls have tricks to them: some mobs have a stacking buff depending on proximity to others, for example, which means they need to be tanked apart.
I can’t offer many more details, except to warn anyone new to the encounter to pull carefully, separate big, scary-looking mobs, face everything away from the raid and CC whatever you can as a precaution. This is my default approach to new raids, which was, to my utmost disappointment, generally unnecessary even in Icecrown.

The Lieutenants

The biggest dangers posed by Baltharus are from the knockback and the stacking damage buff. Make sure you’ve cleared the space around him so no one can pull anything extra, and keep a close eye on Baltharus for his stack of Siphoned Might. A Brand on melee quickly gave him quite a large number of stacks and we lost a tank, so keep fingers on cooldowns.
The whirlwind got a mixed response, with some people claiming they didn’t notice it and others confirming that it exists and hurts. I’d suggest getting melee DPS to run out to begin with, and see what the damage is like on those people who’re slow (you know there’ll be some) to decide if it’s safe to let people stay in.

Saviana doesn’t need any special care from a healing perspective, since the things she does can be countered by the raid as a whole playing smart. You will need to watch her for the Enrage, which can be unpleasant if your hunters or rogues are slow to dispel it, and keep an eye on people who get Flame Beacon and will be conflagrated, since this hits pretty hard.
I’d suggest making sure healers are spread out, to avoid too many running away at once, as the only major organisational thing required.

Zarithrian is also not a terribly difficult encounter. Healers will need to be careful of their aggro when adds are spawning and tanks are controlling them. Priests with Fear Ward and Shaman with Tremor Totem should be working together to keep fear off the main tank, and preferably themselves as well.
The tanks in our 25-man were swapping at 3-4 stacks (once their debuff had faded), and the damage at low stacks is very weak, just don’t get lulled into a false sense of security, and be aware that it will change.

Halion

Ah, the bit I do know about first-hand.

Beforehand

The first question is probably how many healers to take. We used 7 for 25-man normal, although it could easily have been done with fewer. For 10-man it could probably be covered by two decent healers, but a third will add some wriggle room, especially in Phase 3. On heroic the healing load is significantly higher, so 7 on 25-man and 3 on 10-man would be necessary, I think. You could argue for taking a 4th healer for 10-man heroic, but usually this means your raid is taking too much hurt, not that you don’t have enough healers, so my advice would be to address that first.

Before pulling, you need to have a plan for Phase 3, and for dispelling. You will need to split your healers in Phase 3, so those people need to know who they are. One strong MT healer should be in each group, and the Twilight Realm group would benefit from a Resto Druid because of the aura, but the exact split isn’t as important as making sure it’s relatively even. Every healing class can dispel the Mark of Combustion/Consumption debuffs (Priests and Paladins can do magic, Druids and Shaman can do curses) so this shouldn’t be a problem.

Whether or not you assign someone to dispel the Marks or just leave it as free-for-all is a decision for your raid group to come to for itself. The benefit of a dedicated dispeller is that you don’t have multiple healers running around trying to cleanse people at the same time, but leaving it free-for-all can mitigate the impact of someone running out too far from the named dispeller. If you do assign a dispeller, give them a raid icon (and a macro to reapply it, DBM gets a bit mark-happy) so people know not to run to the opposite side.
If you’re planning on heavy use of Body and Soul, that priest would probably also be well-placed to dispel, which might simplify things.

Phase 1 and the Pull

First things first, know where your tank is pulling from and where he’s going to face the boss. If he’s inconsistent, nag him until he picks a position and sticks to it. The reason for this is that Halion cleaves and stuns with his tail, so you need to know where he’s going to be so you can get in and start healing right away.

Phase 1 is really just a bit of a warm-up. Don’t get over-excited and twitch-dispel the unusual debuff that’s just popped up on your rogue (not that I put a flame patch under the melee by accident, of course not… /nonchalant) and keep an eye on where the Meteor is going to hit (melee can find it tricky to see the rune on the ground, especially under things like Consecration) and life should be fairly straightforward.

Phase 2

When he gets to 75%, move to the portal but don’t click it until you can see that the tank for Phase 2 has already gone. This applies to everyone, not just healers. We lost way too many people who went down immediately and found they had aggro, or that the tank hadn’t had time to turn Halion away.
Because of the aggro-drops when taking portals, and the delays caused by zoning between Realms, we left a tank and healer in the Physical Realm twiddling their thumbs so that the tank was ready to pick Halion up immediately when Phase 3 began. It’s not a fun job, but it is useful.

The Twilight Realm is more interesting. The AoE damage aura, Dusk Shroud feels roughly equivalent to normal Sindragosa: the average tick was a shade over 2k, which isn’t really enough to stress people out, although I suspect it will be much more of a factor on heroic.

The other big thing from a healing perspective is the requirement to heal on the run when Twilight Cutter is active. On normal mode it’s not too difficult to avoid this if you watch for the emote and then run to a position just behind where the beam will turn up (you have 5 seconds to move, and as of today DBM will show a cast timer for this to help out), and if you’re lucky you might not need to move again since the beam only sweeps out about 90 degrees.
Remember to account for latency when you move though: the beam may not be exactly where you think it is if you have high-ish latency, and the damage extends a yard or so either side of the actual animation, so give it a bit of respect, like you did for Yogg-Saron’s clouds.

The biggest problems we had in here from a healing perspective tended to be tank deaths due to healers moving or being dead. There’s not much we can do about Cutter deaths (although a bubble might make the difference if someone clips the edge of the beam, since it’s a number of very quick hits, not one big hit), people just need to learn to look up at the world and dodge.

You’ll probably blow Bloodlust/Heroism at the beginning of this phase.

Phase 3

I was mostly in the Twilight Realm for this week, so I can’t tell you too much about life upstairs. Really though you have all the information you need since nothing has really changed from Phase 1/2, although since there will be fewer healers in each Realm every healer should be watching out for the tank in case the “tank healer” has to move at the wrong moment.

The other adaptation your raid can make to make your life easier, especially as a Physical Realm healer, is to stop DPS at the transition and let the Physical Realm DPS and healers get through the portal and into position. Otherwise it’s quite possible to push Halion to high Corporeality very quickly and make the tank take double damage before healers are ready. Count to 5, or 10, whatever works for your raid, then start DPS again.

A good general tip is to have someone watch the Corporeality counter and call for DPS pauses as appropriate to keep damage under control.

Overall

Really the point to emphasise is that this is a survival fight with high mobility and awareness requirements. You will need to be aware of the area around you, and be ready to move if necessary. You should also be able to change your healing rotation to keep healing on the move, especially for the Twilight Realm and even more especially on heroic.

Other info

Keeva at Tree Bark Jacket posted a couple of PowerAuras exports for the debuffs you need to run away with. You can modify them to suit your needs, but they’re a good quick starting point.

PlusHeal also has an entire forum dedicated to this, albeit with only two posts at the moment.

Derevka at Tales of a Priest has a guide to heroic 10-man from a healer’s perspective, which is highly recommended reading.

Possibly Related Posts:

Categories: Advice and Strategy

Healing Heroic Professor Putricide

Posted by Malevica on June - 15 - 2010

For the last couple of weeks my guild has been working on Heroic Professor Putricide, and I thought I would share some of the lessons we’ve learned over the nights.

I’ll assume that you’ve seen the normal mode of this fight, so if you haven’t then the mechanics might be unfamiliar.

Phase 1

The big differences between normal and heroic here is that the Volatile Ooze (green) and Gas Cloud (orange/brown) hurt more and move faster, and the addition of the Unbound Plague.

The Ooze and Cloud are easy enough to deal with, you just pull out the strategy you used initially, and possibly stopped bothering with once the buffs began ratcheting up:

  • When the green Volatile Ooze is spawning, we have all the melee DPS gather next to its spawn point, aiming to be knocked back to the table (all in the same direction is important, and towards the table is a good habit for transitions), and the ranged and healers all stand well away so the Ooze has a long way to run. The biggest problem people are those who don’t get in quickly enough and are therefore not knocked back. If you don’t think you’re going to make it, back out again rather than standing at 10 yards, your raid will thank you.
  • When the Gas Cloud is spawning, everyone should stay at range until it has got a target. If it’s not killed in time and is going to pick a different target, everyone should run away from it. A melee getting hit by it immediately has a fair chance of killing raiders, and is not recommended.

If you get your positioning sorted out, and people are quick on their feet, these shouldn’t pose many problems.
As a bonus tip, having a Holy Priest specced for Body and Soul is not essential but extremely handy to save a Gas Cloud target who finds themselves trapped or unable to escape.

From a healing perspective, the melee will be taking the brunt of the damage in this phase, along with the tank who will be taking 30-40k blows from the Professor. An Ooze exploding on a typical melee complement will be landing for around half their health each, a bit more if people are slow. This is not hugely dangerous unless they get an unfortunate hit again shortly afterwards, in which case you need to have words about positioning.

It should also be noted that the person with Volatile Ooze Adhesive or Gas Bloat will be taking 10-14k ticks, so they do need some focused healing.

The fight as a whole is extremely mobile, so healers can help themselves by assigning people to sectors of the room. You will need to move throughout the fight, but having somewhere to gravitate back to helps to ensure that everyone is in range of someone.

The extra wrinkle in Heroic mode, which begins in Phase 1 and continues to the end of the fight, is the Unbound Plague. This is an undispellable debuff placed on a random player every 60 seconds (although he seems to delay casting in at the start of each phase). The plague has a 60 second duration, but the damage done increases with every 1s tick, as illustrated in the table below, until it gets passed on to another person by running into them. That person keeps the duration the plague had when it was passed, but the damage starts low again.
(Edit: I’ve corrected an anomaly in the table at stack 14, which was due to an absorb being credited fully and artificially raising the number to 17338).

Tick Damage Increase
1 932
2 1164 1.25
3 1455 1.25
4 1819 1.25
5 2273 1.25
6 2842 1.25
7 3552 1.25
8 4441 1.25
9 5551 1.25
10 6938 1.25
11 8673 1.25
12 10840 1.25
13 13551 1.25
14 16938 1.25
15 21173 1.25
16 26466 1.25
17 33083 1.25
18 41354 1.25

The upshot of all this is that the plague needs to be passed off at around the 10-11 second mark. It’s theoretically possible to hold it for longer, but with latency, the risk of an extra tick, people running out of range, and all manner of other unforeseen problems, it’s best to err on the side of caution.

Vent/TS help a lot with this. When you get the plague, look around you for someone to pass it on to. Avoid people who’ve already had the plague, identified by a green haze around them (or the Plague Sickness debuff on Vuhdo/Grid), because Plague Sickness increases the damage the plague does to you by 250% per stack, and you gain a stack when the plague leaves you (60s duration). Once you’ve identified your target, tell them on Vent or whisper them (%t macros can be handy, think back to Lady Vashj), so they know not to run off at the wrong moment. We found it somewhat helpful to make /say macros with something like “I’m free” or “WTB plague” to let people nearby know you’re available to pass plague to.
Healers need to remember that the person with plague will need dedicated healing, preferably from more than one person, and that if a healer gets it they will not be able to heal themselves as effectively if they’re moving to pass it on, so be sure to cover for your fellow healers!

A refinement you can use is to look at the duration of the plague. If it has 10 or fewer seconds left you can keep it until it fades. This minimises the number of passes, and thus keeps more people without Plague Sickness. It helps if you announce your intention to keep it, so healers can keep a close eye on you and people know not to try and take the plague off you.

Finally on this phase, what to do if the plague gets into the melee? Well, the simplest thing to do is to just let it bounce around. It only does damage when it ticks, and it’s often passed on before it can tick. But this can’t carry on forever, because with high stacks a slow pass could mean a one-shot for your melee, so you do need to pass this off eventually.
The easiest way to pass it off is when the Volatile Ooze is exploding and the melee get knocked out to range. If you have the plague when you get knocked back, just pass it to a nearby ranged player. But please, make sure you actually have got rid of it before running back in.
If this isn’t convenient, have your spare tank(s) stand slightly further out from the melee group. When they get the plague they can quickly step away from the melee cluster and out of passing range, and then hand it off to a ranged player. Warriors with Intervene work well for this role.

Transition

Timing of the transitions is a huge deal in Heroic mode. Because Putricide will spawn 2 additional adds in this phase, one Volatile Ooze and one Gas Cloud, having another add up at the same time will probably lead to a wipe because they can’t all be slowed. Stop DPS fully at 82% (DoTs will tick him down to 81%), and be sure to burn him under once the previous add is dead, before he can spawn another one.

Where in Normal mode Putricide would stun the raid with Tear Gas, in Heroic he runs to the table and spawns a Volatile Ooze and a Gas Cloud simultaneously from their usual positions. What’s more, half of the raid will gain Ooze Variable, making them only able to attack (and according to the tooltip, only able to be targeted by) the Volatile Ooze, and the other half will gain Gas Variable, making them only able to attack (and be targeted by) the Gas Cloud.

Positioning is everything here.

Everyone with the Ooze Variable should gather up under the Volatile Ooze, standing on the table side of it so they will all be knocked in the same direction. Everyone with the Gas Variable should run away from the Gas Cloud’s spawn point, and stay away from the Ooze spawn point as well since sometimes they seem to target the “wrong” people.
The reason for this grouping is that you maximise your chances of having enough people gathered on the Ooze when it explodes, and you can DPS it while it is spawning and acquiring a target.

Bear in mind that the Variable debuffs seem to be random, so you can get more healers in one team compared to another. Healers can and should do some DPS here, as getting the adds down quickly is extremely important.

The Abomination should be able to apply three slows in this phase, one to the Ooze and two to the Gas Cloud is recommended. To do this the Abomination needs to leave a pool or two intact in order to suck them dry during the transition. They do not grow while the Professor is at his table, so this cannot be relied on for energy generation.

Phase 2

A bit of an anticlimax after the fun of Phase 1, there’s not much different here. The Unbound Plague continues (after a delay at the start before the first plague is introduced), the Ooze/Gas still spawn, and the Malleable Goo works the same as it does in Normal mode.

The only real difference is that there are three Malleable Goos on Heroic, rather than two on Normal. This makes it a bit trickier to avoid them, especially if several are launched in roughly the same direction, but if you’re attempting Heroic Putricide you should be able to cope.

Don’t worry though, things get more exciting at 35% when Phase 3 starts, initially with a transition like the one at 80%. Stop DPS at 37%, kill off the previous add and then burn him down to under 35% quickly.

Phase 3

Unlike the Phase 1 – Phase 2 transition, I’ve not given this a separate section. This is because it helps to think of Phase 3 as one long DPS burn phase, rather than a transition followed by a burn.

At 35% Putricide again runs to the table and again spawns one of each type of add, which should be handled as you did for the Phase 1/2 transition. Once he’s finished at the table he will become active and begin stacking Mutated Plague on his current tank every 10 seconds or so (later if he’s casting at the time).

Just like Normal mode the Malleable Goo and Choking Gas Bombs will continue, and the slime puddles will continue to grow, blocking your path. This burn phase will last longer on Heroic though, so you need to be more careful where you place the slime puddles. Being ahead of the boss is a big no-no. Also, because DPS is so crucial, it is vital for ranged and healers to stay at range so that you always have 8 or more, meaning Malleable Goo won’t target melee. If this happens the DPS loss is crippling.

The big damage source is the Mutated Plague mentioned earlier. This is applied to Putricide’s current tank every 10s, roughly, and deals raid-wide shadow damage dependent on the number of stacks, increasing faster than linearly with stacks so a 2-stack does more than twice the damage of a 1-stack.

To keep stacks as low as possible, tanks will be rotating every one or two stacks. We use a rotation which means our tanks get to 2 stacks initially, then take one more at a time after that, i.e. 1-2-1-2-1-2-1-2-3-3-3-3-4-4-4-4. The discussion that follows will assume this rotation, so if you use something different you may need to readjust the figures.

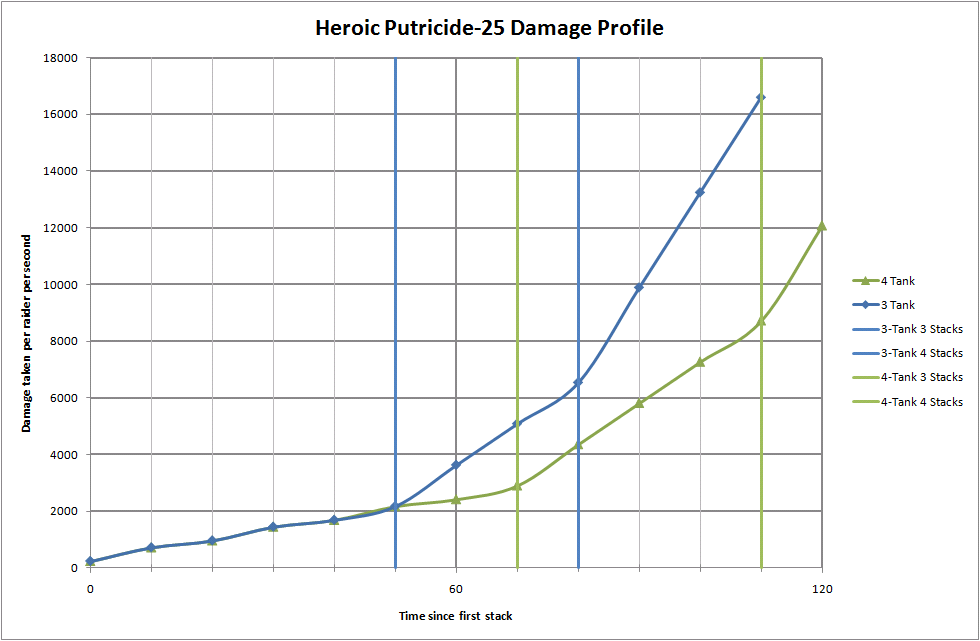
For healers, it’s vitally important to understand the damage profile here. Just watching the healthbars last night, once we got a couple of tanks on 3 stacks the bars just start to plummet and very quickly we were down half a raid.

I went through the logs and plotted out the damage profile, because it’s useful to see this. For reference, we’re wiping at around 90-100s, when 3 tanks have got 3 stacks on them. Times are from the first stack application on the first tank, which is pretty much immediately once he mutates. We use a 4-tank strategy. The 3-tank approach is frankly terrifying!

Heroic Putricide-25 Damage Profile

An illustration of the damage taken per player per second due to the Mutated Plague. This chart compares a 3-tank an 4-tank strategy.

At the point we’re wiping, each raider is taking an average of 6-7k damage per second (the ticks are every 3s, so there’s 4 ticks spread over a 3s window), so without heals we’re talking about 4-5 seconds time to live. At 70s (when the last of the 2-stacks is going on, before we hit the 3-stack regime) the TTL is over 10s. I’m assuming 30kHP, since that’s basically what I have in a raid, and I’m important!

Those numbers are pretty scary, especially when expressed in TTL terms, and when you look at how quickly the raid damage ramps up. The proportion of damage shifts dramatically towards the raid in the end of Phase 3, so healers need to be prepared, and assigned, to break off the tanks and start healing the raid. You’re only needing to buy maybe 10-15 seconds, but that’s crucial.
Healers need to be fully aware of the stacks on the tanks in order to know when to switch from tank-healing to raid-healing. Tanks can help out by saving their shiniest (damage-reducing) cooldowns for that point. Bonus healing isn’t as useful as a damage reduction when healing’s at a premium.

Things like Divine Sacrifice are amazing, but need to be saved for a very late in the fight. They’re needed when the 3-stacks start to go down (Paladins can use their judgement (see what I did there?) about the exact timing) to flatten the curve and buy a few more seconds. Your Paladins might be using them to save people from Goo, but people really need to be dodging that, not using cooldowns for it.

Also remember that Mutated Plague is shadow, so an Aura Mastery on Shadow Resistance Aura could be awesome too.

Saving this for last, because it’s often out of the healers’ control, but the best way of getting round the problem of wiping late in Phase 3 is simply to get it over quicker. Do it in 80 seconds and life’s easy; need 100 seconds and it’s a real struggle. The gradient of that curve turns into a pretty hard Enrage once there are 2-3 3-stacks active. Actually it’s easily arguable that dropping a healer might be a good way to go: it sounds counter-intuitive, but killing him in 90s compared to 100s lightens the healing demand by a full 20%, and might be enough.

One huge tip is to try blowing Bloodlust as soon as the adds are active in the transition, once debuffs are up. Here’s the logic:
Looking at Phase 3 as a single burn of adds plus boss, the logical thing is to use Bloodlust where you can do the most effective damage. In the transition, there are dangerous Oozes and Gas Clouds active which would be much better dead, and if they die early then you get uninterrupted, movement-free DPS time on the boss while he’s still at his table and in his initial tanking position before he throws out the Goo, or drops the bombs, or the slime puddles have grown too much, etc.

And healers can also help out with the DPS, especially early in the phase when healing’s light, by adding DPS. Pop Shadowfiends and Fire Elementals, lay DoTs or other damaging spells down when you have spare GCDs, it all helps.

Good luck!

Possibly Related Posts:

Categories: Advice and Strategy

"You Are Not a Tank Healing Spec"

Posted by Malevica on May - 27 - 2010

I came across the line in the title while dipping into the EJ WotLK Priest Healing Compendium recently, and it made me think about how we tend to try and pigeon-hole healers.

Why do we label healers?

Humans are fundamentally pattern-seeking creatures: it is our natural tendency to try and classify the world, to relate it to things we have experience of, and to reduce it to a set of simpler rules.
In WoW, when a raid leader is faced with 5-7 healers to assign, of up to five different specs, all with unique personalities and skills, their natural reaction is to fall back on these heuristics in an attempt to reach as nearly-optimal a solution as possible.

Because the assignment is based on these heuristics, the quality of the classification scheme will directly influence the quality of the resulting assignment.

Common classification schemes

I’m going to focus on two today. The first is the common “tank” and “raid” healer dichotomy, and the second is a modification which divides healers by their abilities rather than by role. I’ll also describe the ideal, which is what guilds should be aiming at.

“Tank healers” and “raid healers”

This is, for the most part, the prevailing paradigm in WoW today. Not in decent raiding guilds, I’m sure, but in my experience this is how the majority of players and raid leaders still think.

The trouble with this model is that it breaks down fairly quickly in the current game. Where does a Discipline Priest fit? What about a Resto Druid? Come to think of it, on many encounters a Shaman might be a weak ranged healer (Rotface heroic leaps to mind) but excel at bouncing Chain Heals through the melee, are they still a “raid healer”?

Typically Disc priests and Holy Paladins get dropped into the “tank healer” box, and everyone else into the “raid healer” box. And the boxes are fairly fixed across a raid, even though, as the Shaman example shows, this can change a lot depending on the fight.

In my experience the biggest weakness of this scheme is that it also tends to lead to over-simplified assignments. “X and Y on tanks, rest on raid” is very often inadequate, especially on challenging content, where healers don’t know each other well, or where healer capabilities are unknown.

Single-target vs multi-target healers

This is a slightly different way of categorising the healing population, but sticking with two groups again. I think this works a little better than the first scheme, because it allows the raid leader to match healers to the damage profile, rather than arbitrary roles.

For example, as a Discipline Priest I’m generally a single-target healer. I know that 25-mans tend to have Disc Priests on bubble-blanketing, but I’m still only handling one person at any one time. I can tank heal, if a single tank is taking sustained damage, but I can also very effectively heal up random secondary target damage (like Lana’thel’s Bloodbolts or Deathwhisper’s Shadowbolts) or rescue individuals who find themselves standing in fire.

It also allows Shaman to be used on tanks on fights where it’s appropriate, Marrowgar being a great example, and Blood Queen Lana’thel another decent example. When you have multiple tanks taking simultaneous damage, rotating Chain Heal across each tank in turn is a very effective tool; far more effective than trying to get a Disc Priest to heal three targets.
As another example, consider using a Shaman or two as part of your tank healing assignment on heroic Saurfang. They can keep a melee Mark up fairly well, while contributing significantly to the healing on the tanks. If you can even free up a Holy Paladin, that allows you to cover an additional Mark at range.

There are some weaknesses of this scheme still. In particular there’s a lot of variation in the “multi-target” group, ranging from Holy Paladins (Beacon of Light) through to Resto Druids, which is not accounted for. In practice, treating Holy Paladins as single-target healers tends to work best conceptually.

This scheme also requires a bit more thought on the part of the person doing the assignments, but can lead fairly naturally to more individualised healing assignments.

The ideal

Clearly, the ideal situation is for the raid leader, or the healing lead, to know the individual strengths, weaknesses, preferences, specialities and foibles of every healer in the raid team, and assign on that basis. There’s not much reliance on heuristics here, and the maximum information is being used to inform the decisions being taken.

As an example, I’ve talked before about healing Ulduar-10 as Disc with a Holy Paladin with few problems. We succeeded because we knew each other’s strengths and weaknesses and could adapt our tactics to each fight, despite the conventional wisdom that we had 2 “tank healers” in the raid.

But a PuG raid leader, or someone with new recruits in a guild, or simply someone who is less comfortable handling so much information, will need to simplify things to some extent.

Conclusions

You’ve probably figured out that I prefer to think about healers in the second way (when I’m not working with a guild group, where I’m a lot closer to the ideal). I prefer assigning healers based on their class’s abilities and strengths, in relation to the damage that will be taken.

This helps me understand how to relate to Holy Paladins. As a Disc Priest I’m often lumped in with Holy Paladins as “tank healer”, but the big difference is that Holy Paladins are dual-target healers, so on fights with more than one tank they will have a much easier time than me, and it’s noticeable in the raid (in the same way that Bone Storm is a very different proposition with and without a Disc Priest). Our single-target HPS is comparable, but they can double their overall HPS in a GCD, and they can sustain it over long periods of time, while mine is quite bursty.

Every healers is suited to different situations, and it’s much better all round if the person doing the assigning takes account of that.

And stop putting me on tanks, I really don’t like it.

Possibly Related Posts:

Disciplining the Lich King

Posted by Malevica on May - 7 - 2010

… Or: How I learned to love Power Word: Shield.

This post is a little overdue since we got our Lich King kills on 10 and 25 a few weeks ago, but better late than never, eh?

First there’s a bit of personal stuff about the kill itself, then I’ll talk phase by phase about how I approached healing this fight as a Discipline Priest.

The kill

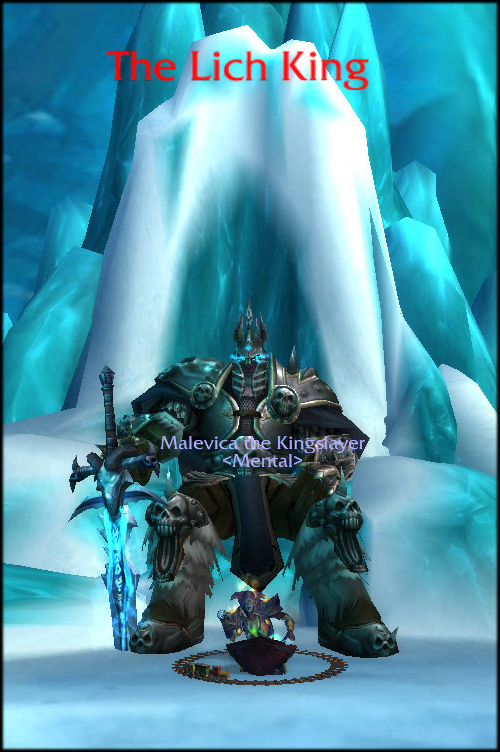
Malevica the Kingslayer sitting in front of the Lich King

Our 25-man kill came after around 100-120 tries. (I have WoL parses for 102, but I missed one night so some aren’t recorded.)

The feeling was incredible: we’d recently wiped at 11%, during which several people on Vent sounded like they were going to have heart attacks, so the tension as we saw ourselves getting closer and closer to 10% with most of the raid alive was palpable; the shouts over Vent when the RP started were deafening, and the whole experience was marred only by the tendency of my PC to crash WoW as soon as any video cutscene auto-loads (the same thing happened at the Wrathgate and after the build-up that got in /g I was miffed, to say the least). For those who care about the statistics, we were the 7th guild on the server to beat him on 25-normal.
We killed him on 10-man a couple of months ago, which helped us to understand some of the mechanics and feed that back to the 25-man, although I’ll say we had to be a lot tighter on the strategy and execution in 25-man.

Healing the fight as a Disc

Phase 1

Bubble, bubble, bubble, bubble, bubble, bubble, bubble, bubble, bubble, bubble, ProM, bubble, bubble, bubble, bubble… Ah, you get the idea.

Pretty much the best thing a Disc Priest can do here is control Infest, by keeping bubbles on the raid as much as humanly possible. The rest of the damage going out is focused on the three tanks, and Disc tank healing is quite time-intensive so it’s much better left to the other healers to cover it.

Infest deals around 8k damage to the whole raid and keeps ticking for 6k (initially, it rises over time) until the player’s health is over 90%, at which point the debuff is removed. A full PW:S can absorb this damage entirely, preventing the player’s health from dropping at all, so Infest will not be a problem for this player at all.

The refinement to this technique for a Disc Priest is maximising the mana returns through Rapture. Now I was under the impression that the Rapture trick had been “fixed” a couple of patches ago so that you were no longer able to gain multiple mana returns from multiple shields being removed simultaneously, but it seems this has been “unfixed” again.
I can manage the fight adequately without much Rapture optimisation simply by using my mana cooldowns judiciously and taking it easy in the first transition phase, so if you don’t nail it don’t panic. But if you can get it then so much the better.

So, how to maximise Rapture returns? There are two things to remember:

  1. You can only trigger Rapture every 12 seconds. This means that if you bubble a tank and the shield is removed you get one Rapture return and then nothing for 12 seconds, probably missing out on the next Infest cycle. So avoid bubbling tanks, or anyone else who is frequently taking damage (like that Whirlwinding warrior who grabs every round of adds).
  2. Rapture also only returns mana when ” your Power Word: Shield is completely absorbed or dispelled”. Even before the buff to PW:S absorbs, the vast majority of bubbles fully absorb the Infest and don’t return any mana.
    One option is to not reapply a partially-consumed shield, which would let it be removed the next time around, assuming it lasts long enough. The trouble is that this negate the point of bubbling in the first place, absorbing only a small portion of the Infest hit.
    The other option is to downrank. Usually downranking is counter-productive, since the lower ranks cost more than the top rank, but in this case getting Rapture gains more reliably outweighs the increased cost. I’ve not been in a LK raid since reading about this on PlusHeal so I’ve not got round to testing this out in detail, but the suggestion on PH is to drop to Rank 11 or 12.

Besides the mad bubble-spam, the other thing that’s very useful is to keep Prayer of Mending on cooldown. I tend to bounce it off one of the tanks and let it sit where it ends up.

Prayer of Mending is great for helping heal the tank(s), especially if you get it to bounce between the two add tanks, but it also helps a lot on Infest by helping to heal up a few people who missed out on bubbles or had low health for other reasons.

Phase 1.5

To be honest this phase isn’t ideal for a Disc priest, so I tend to use this as a bit of a mana break. I’ll throw heals at the tank if they need it, but I don’t get too involved with the raid healing because the Druids and Shaman are much better suited to it. Bubble-blanketing here is very mana-inefficient and you’ll need that mana going into Phase 2, so I’d stick to keeping a ProM bouncing and helping tank healers.

Also remember that Priests are among the higher DPS healers, so help out on the Frost Spheres if any are getting close. A well-timed Penance or Holy Fire could save the day here.

The other thing a Priest can do here is to Dispel the Soul Shriek off the tanks. A silenced tank is a less effective tank, and the raid needs all the threat lead they can get to kill off the Raging Spirits as quickly as possible.

There will be an Infest very early in Phase 2, but unfortunately Pain and Suffering renders pre-bubbling a bit useless. As soon as the Lich King starts casting Earthquake though you should be starting your bubble cycle, maybe avoiding people with high stacks of P&S.

Phase 2

Back to the bubbling, to keep Infest under control. You won’t be able to reach every player all of the time to keep them bubbled, so it will be a bit more hectic, but your default activity should be basically the same as Phase 1. There are other tricks you can employ though.

First, keep your eyes peeled for the person who will get Defile on them. Defile only grows when it damages someone, so if you can bubble them as they run out you might save one tick of expansion. It is worth talking to any Holy Priests in the raid though, in case they’re using Body and Soul instead to help the person run away more quickly.

Secondly, watch for the MT getting Soul Reaper on them. Since this hits for around 40k, boosting the tank’s effective health by 10k can easily be the difference between life and death if they have a health deficit at the time. Assuming you have a second tank taunting, wait until the taunt happens to prevent a mêlée swing from just removing the bubble again.

Thirdly, watch out for any of the MT healers being picked up by Val’kyr and be ready to switch to fill the gap immediately. Penance, a quick PW:S, a ProM or even a Pain Suppression can all be used to prop up a tank and support your fellow healers.

Phase 2.5

Another transition. As with Phase 1.5 I tend to slow down here and regenerate some mana.

Phase 3 – No more Infest!

The order of the day in Phase 3 is triage and reaction, with quite a strict priority.

The ultimate, top priority for this phase is Harvest Soul victims. One person will take 12-15k ticks every second, six in total (as shown in the log section below) and this person needs quick, focused healing, and failure on the part of the raid to keep this person alive could mean a wipe unless the tanks are very quick to notice and react to the resulting Enrage.
I usually default to PW:S first, then Penance as a follow-up, then take it from there.

WoL section, showing Harvest Soul damage on a player

The second priority for this phase is dealing with the risk of deaths from Vile Spirits exploding (Spirit Burst). The key here is to keep as many players as possible above 20k health at all times to keep them out of one-shot territory. At this stage of the expansion with Hellscream’s Warsong (or the Alliance equivalent) at 15%, most people will be approaching or above 30k HP, so you should be aiming to keep people above 70%.

Third priority is tanks again. Soul Reaper is still active in this phase, so watch out for tanks and use your PW:S to boost their EH as much as possible.

If you’re not engaged with any of the above, then I’d suggest falling back on keeping bubbles on the raid. People will get hit by exploding Vile Spirits and bubbles will help to prevent them getting into the insta-gib region in the first place.

A final note on what to do if you get Harvest Soul. The key is to heal Terenas Menethil as quickly as possible, since his DPS is in proportion to his current HP. First step is to get a PW:S on him to stabilise things, and then fall back on your high-throughput rotation. I might be out of date, but I tend to rely on PW:S > Penance > Greater Heal > FH until Penance is off cooldown again.
The other thing is to deal with the Soul Rip ability. This is the primary damaging ability the Spirit Warden will use on Terenas Menethis. Since Priests lack an interrupt, we should instead dispel the debuff off Terenas immediately to prevent this damage.

Possibly Related Posts:

Your Bête Noire

Posted by Malevica on March - 4 - 2010

We all know the feeling of seeing the Dungeon Finder pop up a certain instance, or knowing that tonight’s raid will be squaring off against that boss and feeling our heart fill with dread. Palms sweating, we have flashbacks of dying tanks, desperate DPS running in vain for their lives, followed by the agony of dissecting the wipe.
That (slightly over-dramatic) scene is a response to facing your bête noire. Literally “black beast”, but more figuratively translated as “nightmare”. Mine? Heroic Pit of Saron, and Heroic Anub’Arak-25.

Causes

Many things can cause a reaction like this, in different combination for every person. Reflecting and understanding the origins of your bête noir is vital to defeating it, so here are some common causes and things that have helped me in the past.

The Unknown

Some things are scary because you simply haven’t encountered them yet. This is a perfectly natural human reaction which keeps us out of danger in the big, wide, dangerous world. However it can lead us to build things up in our minds, imagine the worst and focus on the ways it can go wrong.
As a personal example, while we were working on ToGC I worried a lot about Anub’Arak: would I see the marks? Would I be quick enough? Would I misjudge it and overheal? I didn’t have any way to know, so I fell back on worrying.

The best way to counter this one is to do your research as thoroughly as you can in advance to reduce the uncertainty. Talk to people in other guilds; read strategy discussion threads (PlusHeal is excellent for this); look up boss abilities or analyse WoL parses so you can understand the mechanics in as much detail as possible. But accept that you can only know so much, you will never remove all doubts.

Pressure

I’ll set out my stall early and say for the record that I’m in principle a fan of measures like limited attempts which attempt to prevent “brute-forcing” encounters, and maybe I’ll touch on this in a later post. However I’m not a fan of things like the Naxxramas “Undying/Immortal” achievements or Tribute to Insanity.

I think that expecting perfection for most people is a bit of a stretch, especially when, at least from my perspective, the bulk of the pressure in those cases tends to be borne by the tanks and healers. I really believe that all three roles are equally important (I really do!), but immediate causes of wipes tend to be traced to tanks or healers while the underlying causes (e.g. why was there so much damage in the first place) tend to come up only in later analysis.

In any case the knowledge that a single slip-up could doom 24 other people’s achievement for that week can make a healer very nervous, to the point where they may dread an encounter. This one is, I think, harder to solve. A supportive guild will definitely help here: you might get a ribbing but if you know there’s no lasting animosity or risk of a summary gkick then that can be a great relief. I also suggest that a thorough analysis of the reasons for wipes (see a theme developing?) will allow you to root out those underlying causes, which allows you to feel better prepared for next time as well as properly apportioning the causes.

I’ll refer over to Critical QQ for a discussion of the Dunning-Kruger Effect in relation to WoW, which is also relevant here. This holds that the more competence one has at a given task the more this weakens self-confidence, essentially because mistakes are more readily recognised and noticed. Someone who understands the intricacies of healing will be acutely aware when they have made a mistake, while those raiders who may have made more mistakes overall may simply be unaware of this.

An example: Heroic Anub’Arak, Tribute to Insanity attempt, a wipe at a few hundred k health. The immediate cause of the wipe was a small gap in heals on the offtank which led to adds destroying the main tank and the raid in short order. While the initial diagnosis pointed to a slow or distracted healer, the subsequent discussion revealed a number of other mistakes which all contributed.

Difficulty

Perhaps the most difficult to work around are encounters feared for their subjective difficulty. I intend to return to the question of what makes healing challenging in a future post, but suffice it to say that this can be highly subjective. All healers have individual strengths and weaknesses and differences in style, as well as the particular focus of the class they play, so they can struggle with encounters that others shrug off effortlessly.

Handling this is just as subjective as the cause is, so each person’s solution will be unique. What has helped me as I’ve developed as a healer is to extend my understanding of my fellow healers in raids to learn where their strengths overlap with my weaknesses and vice versa, so I know that the raid as a whole has the skills to cover the demands of the encounter. When solo healing, when the teamwork solution obviously doesn’t apply, try “forcing” yourself to run the instances but do it with guildies if possible: guildies should be willing and able to adapt to a change in the execution to enable you to heal it more easily, or will be more understanding and forgiving of you testing your abilities and experimenting. I’ve been leaning on my guild recently as I try to regain a more in-depth understanding of the Holy playstyle on my Priest, having healed as Disc almost exclusively for a couple of tiers.

Possibly Related Posts:

Categories: Advice and Strategy