Home
Subscribe:
Contact:
Subscribe to this blog by RSS Follow me on Twitter
Subscribe to this blog by RSS

Archive for August, 2010

[Off-topic] Debating on the Internet

Posted by Malevica on August - 27 - 2010

Way too much of my time for the last day or two has been spent flipping between a couple of notable blogs, working my way through not just the posts but the comments. And it’s been a sobering, and at times frustrating, experience.

There’s no way I’m intending to throw more fuel on the fire here by raising the particular issues yet again. I’ve been more interested in how the discussions have progressed in very general terms, and discussions in general.

Accessibility

These days, just about anyone with the inclination can open up a blog and start sharing their thoughts, observations and opinions with the world; I think that this is, on the whole, a Good Thing. Progress is made off the back of the open discussion of ideas between different people, and the blogging community is a good recent example of that.

The other side of the coin is that this increased accessibility brings with it people with an extremely broad range of life experiences, educational backgrounds and language skills, all eager to engage in discussions. However, all these participants have very different expectations and personal standards of argument, which can act as a major impediment to constructive discussion that both sides need to work to overcome.

Logic

Bust of Aristotle

Aristotle

[Disclaimer: I am not a philosopher, and I’d value correction if I’ve misrepresented anything here.]

For a couple of millennia now (at least), people have been studying the art of the argument: logic. Alternatively described as the “science of valid inference”, a key goal of logic is to take facts and evidence and draw valid conclusions from them; the rules of logic (theoretically) ensure that our conclusions are ‘correct’. However, humans naturally tend not to think logically, and thus may arrive at ‘erroneous’ conclusions. (Arguably this is compounded by the relative lack of critical thinking training in modern education systems which means that many people are not equipped to make or defend logically consistent arguments.)

Which can all get rather frustrating in a discussion when you can spot a pretty big logical hole in someone’s argument but can’t find a way to get them to recognise it. In this situation, I personally find myself somewhat at a loss because after all, I’ve explained why the logic is flawed, it’s blindingly obvious (to me), so surely the person should correct or withdraw their argument. And yet they don’t. Which is why I try and avoid debating online!

Common logical traps

I’m not going to go through them all, I’ll settle for a couple of links. I just want to hit a few of the more common ones I spotted recently.
I’ve tried to be as generic as possible, but a couple of topical examples have slipped in.

Ad Hominem
This one gets a crazy amount of mileage, especially on the internet. Simply put, an ad hominem argument tries to discredit the argument by attacking the arguer. If someone proposes an argument, the logical strength or otherwise of the argument is not affected by the qualities of the proposer, thus an ad hominem argument is not a valid rebuttal.
Poisoning the well is a subset of the ad hominem, where negative information about an arguer is presented before their arguments in an attempt to influence the reader. On a blog, for example, you should be careful how you introduce a link to a post you’re disagreeing with.

The Slippery Slope
The slippery slope argument asserts that a small first step will inevitably lead to a succession of subsequent steps, and is often used to oppose change. In the example of feminism, one might claim that if we insist on having equal gender representation, we’ll inevitably end up with appropriate representation based on race, disability, sexuality, religion and so on. Essentially the argument is not against the first step, but the entire chain of events.
Logically speaking, it is invalid to argue on the basis of the entire chain of events, unless the inevitability of the chain can be established. Now, in the example here, you can make a reasonable case for the chain, but it will be uncertain.

Straw Man
The straw man is another very common internet fallacy, which consists of subtly, or not so subtly, distorting your opponents’s position to a form which can be argued against, and then claiming victory. While you’d think this would be easy to spot, a well-constructed straw man can be very hard to pick out.
Sometimes a straw man argument might be made unintentionally through a misunderstanding of a position, in which case it can be very difficult if you are unable to convince the other person that their argument is invalid.
The best way to debate around a straw man tends to be to keep the discussion focused on, and clarifying, your actual position.

Ad Populum
Go to the official forums, pick a role board and just dip into a few posts. “Everyone knows…”, “All my friends think…”, “The majority of the player base…” and so on, are arguments ad populum (to the people); the argument being that because a large, often overwhelming, number of people believe something to be true, it must be true.
I’m sure you can think of any number of exceptions to this rule…

Cherry-picking and Anecdotal Evidence
These two are broadly related, so I’ve grouped them together.
Cherry-picking is the selective use of data which support a claim over data which do not. Anecdotal evidence tends to be used to provide a counter-example which is overgeneralised to make a point. Wikipedia’s example:

“My grandfather smoked like a chimney and died healthy in a car crash at the age of 99” does not disprove the proposition that “smoking markedly increases the probability of cancer and heart disease at a relatively early age”

Both of these practices are logically dubious and do not provide sufficient basis to support an argument in themselves.

Argument from Fallacy
This is a subtle one, but also one that you’ll see a lot. The argument from fallacy says that if you find a flaw in my reasoning, my conclusion must be false. I’m going to borrow another example from Wikipedia to explain this better:

Tom: “All cats are animals. Ginger is an animal. This means Ginger is a cat.”
Bill: “Ah you just committed the affirming the consequent logical fallacy. Sorry, you are wrong, which means that Ginger is not a cat”

Bill is ably demonstrating the argument from fallacy for us in his statement (Tom’s logic is flawed therefore his conclusion must be wrong). In fact, all we can conclude based on Bill’s statement is that Ginger is not definitely a cat.

Where this crops up a lot in internet debating is where someone will look at an entire article, find a piece of flawed reasoning and then use that to assert that the conclusion of the article is wrong. Of course, the conclusion may be unsupported if the logical argument for it is invalid (until the author corrects the error), but that doesn’t automatically make it false or mean that the opposite is true. This can be a very frustrating tactic to debate against.

Argument from Personal Incredulity
From time to time on the beta I might catch myself saying things like “I can’t believe Blizzard would want my heals hitting for so little, it must be a bug”. As an opinion it’s fine (“I think this might be a bug”), as a logical assertion it’s not. Another way this shows itself is in statements like “I can’t imagine anyone enjoying…”.
The point is, just because you can believe it or imagine it, that doesn’t make it impossible or untrue.

Loki’s Wager
This ia a new one on me, but amazingly common. It refers to the position that a concept must be clearly defined in order to be discussed. In the recent feminism discussion, for example, I spotted a comment or two along the lines of “feminists can’t even agree what feminism is!”. This sort of general argument tends to be employed as a silencing tactic or to derail a discussion.

Incidentally, read the Wikipedia definition for this one, it’ll make more sense.

Psychologist’s Fallacy
The psychologist’s fallacy occurs when we assume that we are objective, while in fact we all have biases and prejudices which influence our thoughts, beliefs and actions.
Again, this can be a very difficult one to argue against, because most of our biases are subconscious, making it rather difficult to convince someone that they have them. A good education in critical thinking tends to at least begin to break this one by showing you how much influence your subconscious has over you.

Argument from Tradition
The last one I’ll touch on is the idea that, to put it slightly over-simplistically, something is right because this is how it’s always been.
This is based on one or two flawed premises:

  • The old way of thinking was proven correct when introduced – in reality this may be false, and needs to be backed up.
  • The past justifications for the tradition are still valid at present – in cases where circumstances have changed, this assumption may be false.

The feminism case arguably hits the second of those premises. Society changes over time, expectations change, morality changes, opportunities and participation change. Thus a re-evaluation of the norms in the fantasy genre might well be justified.

Possibly Related Posts:

  • No Related Posts
Categories: Opinion

Pulling Your Socks Up

Posted by Malevica on August - 26 - 2010

With the ICC buff up at 30% and ICC as close to ‘on farm’ as it’s probably going to get, I’ve noticed myself getting quite sloppy with my healing of late, a sentiment expressed by others I raid with. I decided to take the time to do something about it.

Why bother?

A valid question. After all, we’re mostly farming bosses, and we’re on a raid break probably until Cataclysm, so what does it matter if I ease off a bit for the next few months.

Well, first and foremost, pride. When I write on guild applications that I strive constantly to improve my character and my play, I really mean it. Like most people I’ll admit to coasting from time to time, but regression is a different matter.

Yes, regression, the opposite of progression. When you stop being able to conquer bosses that you vanquished with ease mere weeks or months ago, when ‘farm’ bosses give you pause despite the hike in power provided by Hellscream’s Warsong, it’s time to take a good hard look at how you’re playing and pull your socks up.

From a more practical point of view, healing in early Cataclysm is likely to be a lot more demanding, especially if I want to enjoy the same success I have in this expansion. So carrying bad habits over will be doing myself, and my raid team, a disservice. We like to think that we know we’re slacking but we could pick up our game whenever we wanted, but bad habits can be trickier to break than we think; so the earlier I start, the better.

The process

This sort of thing is the bread and butter of management consultants and the like. You’re looking at an iterative process, with the following basic structure:

  1. Create a snapshot of your performance
  2. Analyse your performance and identify both strengths (to make sure you retain them) and weaknesses (areas to work on)
  3. Make your change(s)
  4. Create another snapshot of your performance, to check that you’re actually making a difference and quantify its significance.

Obviously, you can (and should) go around this loop indefinitely, identifying new areas for development, making changes, then evaluating them. That’s what a good healer should be doing all the time.

Let’s take the stages in turn.

Setting a baseline

The first item on the list is to create a snapshot of your current performance. This is important so you have ‘before’ and ‘after’ pictures for comparison. Humans are prone to all sorts of mental foibles, amongst them confirmation bias (we tend to remember information which supports our beliefs and forget information which disagrees with us) and the placebo effect (where we perceive an effect simply because we believe there should be one), so it’s vital to have some relatively objective evidence to use in our evaluations.

By far and away the best tool available to you at the moment, in my opinion, is World of Logs. It’s a free service that allows you to upload combat logs from WoW, digests them, and presents you with the information in a much more flexible and easily analysed form.
Your guild might already have someone uploading logs to the site, so it’s worth asking around first to see if they have an archive you can look at.

I’m not going to go into how to use WoL in detail, because Vixsin has written two absolutely outstanding guides to WoL, which do a great job of explaining the ins and outs of the tools, and I can do no better than to suggest you go read them. The first is a basic introduction with details on how to make logs, upload them, and some basic analysis techniques. The second focuses on healer log analysis in particular. I’ll deal with what to look at in WoL reports in the next section.

As well as, or instead of, WoL reports you can use screenshots of tools like Recount or Skada as a permanent record. Make sure you hover over, or click on, your bar for a more detailed view though; just a screenshot of “winning the meters” isn’t likely to be very informative. Don’t forget to record any special assignments you had or other unusual circumstances in the encounters which might affect the results.

The other thing that I find valuable is to record observations and impressions at the time. So if you seem to be having trouble keeping tanks up, make a note. If you find yourself stressed out and frantic, make a note. If you find yourself throwing Smites or Lightning Bolts out of boredom, make a note of that as well.
I did say earlier that we needed objective evidence and clearly this is not, especially in the ‘after’ snapshot, but this is used not for decision-making but to add context to the hard data. Always remember that the WoL data is correct, and don’t let your impressions trump the facts.

The most striking use of this information is to compare what you thought you were doing to what you actually were doing. You might remember near-perfect uptime on Earth Shield or Weakened Soul on your tank, but It’s often sobering to look at what actually happened.

Analysis

From this point on, I’m going to assume you’ve either read the above-linked posts, or have some experience with WoL already, so I won’t always get into the nuts and bolts.

There’s a lot of information in a WoL report, far more than I can hope to discuss in a single article, so I wanted to focus on a few areas I think are the most important.

Overhealing

This used to be a big deal, and probably will be again come Cataclysm; it’s slipped from favour as a measure of healers in WotLK, because relatively limitless mana and extremely high raid and tank damage has led to what Vixsin referred to as a shift from “just-in-time healing” to “just-in-case healing”, where instead of only letting a heal land if it would be needed, and choosing an appropriate heal for the task, now we’re constantly casting heals and letting them land, just in case the tank takes a big hit. We rate the opportunity cost of a wasted GCD far higher than the mana cost of even 100% overheal.

However, keeping a rein on your overhealing while remaining successful is nonetheless a useful exercise. It can show that you are able to anticipate upcoming damage and heal the right people, that you are a quick responder since overhealing suggests that others have beaten you to the heal, and gives you time to think.

In World of Logs, the place to do this is to choose an attempt or a boss (I always keep to one boss, and preferably one attempt, at a time, since the different mechanics between bosses can complicate the analysis), then click on your name and choose the “Healing by Spell” tab.
Overhealing is shown in the far right column, as a percentage of the healing done by that spell.

Clearly you’ll need to make your own decisions about the numbers there, but there are some general rules of thumb:

  • AoE heals (Circle of Healing, Wild Growth and Chain Heal) are likely to have quite high overhealing. Chain Heal might be a special case, seeing as it’s one of the Shaman’s better heals, but if Circle of Healing or Wild Growth have very high overhealing then perhaps they could be used at better moments.
  • HoTs are another area where you’re likely to see high overhealing, except on aura fights like Sindragosa or Professor Putiricide. This is a side-effect of the general approach of HoT blanketing, where a large proportion of the ticks will actually go to waste. This is classic just-in-case healing. You can combat this by focusing on players who are actually taking, or likely to take, damage, although the Wrath healing model doesn’t favour this.
  • Shields are like HoTs, in that they tend to be used widely, but can end up being largely overhealing if their recipient fails to take any damage. Ideally shields should be cast only on those likely to take damage. Also bear in mind that a lot of shields cast on the raid can push HoT overhealing very high, since ticks while the target is shielded are wasted. As Kinaesthesia pointed out on the Circle of Healing podcast, there’s nothing more fun than watching Rejuv pop up on your raid members and smacking your PW:S on immediately!
  • If your overhealing on direct heals is very high, consider your target choices. Faster healers and spells are likely to be beating you to the heal, so you could try picking on people with smaller HP deficits (so smart heals don’t pick them as often) or anticipate the damage and either pre-cast or react quicker.

If, after considering all this, you find yourself with little to do to reduce your overhealing besides not casting, that might be a sign that your raid is healer-heavy. But it might also be that the healing requirements change throughout the fight, so don’t panic if you feel like your healing is unnecessary on Phases 1 and 2 of Professor Putricide, for example.

Spell Selection

On the same WoL page as before, you can see what proportion of your healing came from each spell. There are two main uses for this information: evaluating the importance of talents and glyphs, and checking that you’re using enough of your tools.

The former is the most straightforward to understand. Using a Priest example, points in Divine Fury are probably wasted if Greater Heal accounts for a tiny fraction of your healing. For a Shaman, an example might be points spent in Healing Way, or selecting the Glyph of Lesser Healing Wave.
Sometimes it takes hard numbers to prove to yourself that no, you don’t actually cast that spell as often as you think, and maybe you should lose those points.

Evaluating whether you’re using enough of your toolbox is a more tricky problem, and will depend strongly on your raid and assignment. This is an area where comparisons between yourself and others of your class are valuable. If you’re the only one playing your particular spec in your raids, either browse World of Logs for other guilds’ logs or ask other healers for logs to compare with.
You can browse the other guilds on your server who are uploading logs either by clicking on your realm name in the upper left (if you’re looking at a guild already) or by clicking on “Realms” and browsing to your region and server. The advantage of picking guilds on your server is that you are likely to be able to eyeball a guild’s progression level, and you’re more likely to be able to engage those players in conversation if you want to try asking them questions directly.

The "Realms" menu on World of Logs, indicated with a giant green arrow

Even if you can’t, or don’t want to find other logs to compare yourself to, you can have a look at your healing by spell and see what it looks like.

The first step is to make a list of your “core” spells, and check that they’re all getting some usage over a night or over a fight. For a Disc Priest, my list would be:

  • Power Word: Shield
  • Prayer of Mending
  • Flash Heal
  • Binding Heal
  • Penance
  • Divine Hymn

Note the last item on that list, Divine Hymn. Make sure that you’re actually using your cooldowns, and if they’re not getting much use, think about where you can use them to best effect. Saving cooldowns for a rainy day is all well and good, but if you find you never need them then it’s probably safe to spend them for a quick boost.

Nowhere in here have I tried to tell you what spells to use; only you know what it’s like healing in your raid team (informed by your observation notes, of course). The aim of this exercise is simply to make you think about your spell usage and consider if you might wish to make any changes.

Activity

Now that we’ve explored whether we’re using a wide enough range of our spells, and whether those spells are appropriate, timely and necessary, the final thing to check on is our activity: put simply, are we casting enough?

The best way to measure our activity is to use a more advanced feature of World of Logs, the Expression Editor. Some of this section is inspired by posts by Auracen at PlusHeal, heavily adapted.

I’ll take this step by step:

  1. Choose the time period you’re interested in and select it from the top menu. A single attempt or kill is best, to avoid confusions caused by downtime or trash.
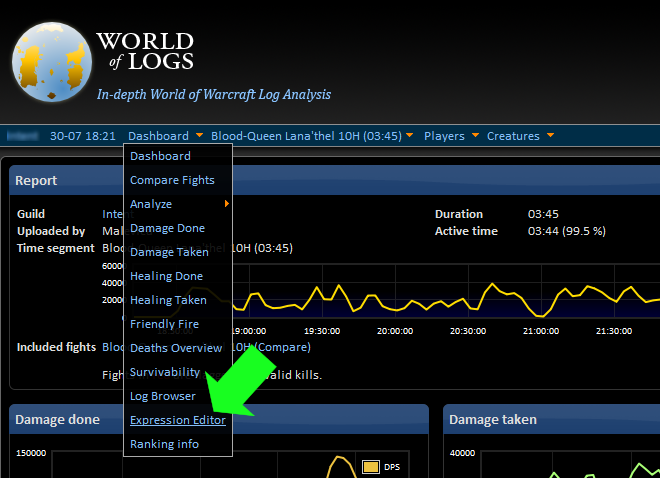
  2. From the Dashboard menu, choose Expression Editor
    The World of Logs Expression Editor menu option, indicated by another charming green arrow

  3. In the Query box, paste one of the following expressions, depending on your spec, remembering to replace “Malevica” with your name near the beginning of the expression:
    Discipline Priest
    SourceName = "Malevica" and (fullType = SPELL_CAST_START or fullType = SPELL_AURA_APPLIED or fulltype = SPELL_CAST_SUCCESS) and (spell = "Power Word: Shield" or spell = "Flash Heal" or spell = "Greater Heal" or spell = "Binding Heal" or spell = "Prayer of Mending" or spell = "Penance" or spell = "Divine Hymn")
    Holy Priest
    SourceName = "Malevica" and (fullType = SPELL_CAST_START or fullType = SPELL_AURA_APPLIED or fulltype = SPELL_CAST_SUCCESS) and (spell = "Circle of Healing" or spell = "Prayer of Healing" or spell = "Flash Heal" or spell = "Greater Heal" or spell = "Binding Heal" or spell = "Prayer of Mending" or spell = "Renew" or spell = "Divine Hymn")
    Resto Shaman
    SourceName = "Malevica" and (fullType = SPELL_CAST_START or fullType = SPELL_AURA_APPLIED or fulltype = SPELL_CAST_SUCCESS) and (spell = "Chain Heal" or spell = "Riptide" or spell = "Lesser Healing Wave" or spell = "Healing Wave" or spell = "Earth Shield")
    Resto Druid
    SourceName = "Malevica" and (fullType = SPELL_CAST_START or fullType = SPELL_AURA_APPLIED or fulltype = SPELL_CAST_SUCCESS) and (spell = "Rejuvenation" or spell = "Regrowth" or spell = "Wild Growth" or spell = "Nourish" or spell = "Lifebloom" or spell = "Swiftmend" or spell = "Tranquility") and healSpellId != 70691
    Holy Paladin
    SourceName = "Malevica" and (fullType = SPELL_CAST_START or fullType = SPELL_AURA_APPLIED or fulltype = SPELL_CAST_SUCCESS) and (spell = "Holy Shield" or spell = "Flash of Light" or spell = "Holy Light" or spell = "Holy Shock" or spell = "Aura Mastery" or spell = "Divine Sacrifice")
    NB: WordPress was converting the " " marks to smart quotes, which would have caused WoL to error if you copied and pasted straight from this post. It’s now fixed, sorry about that!
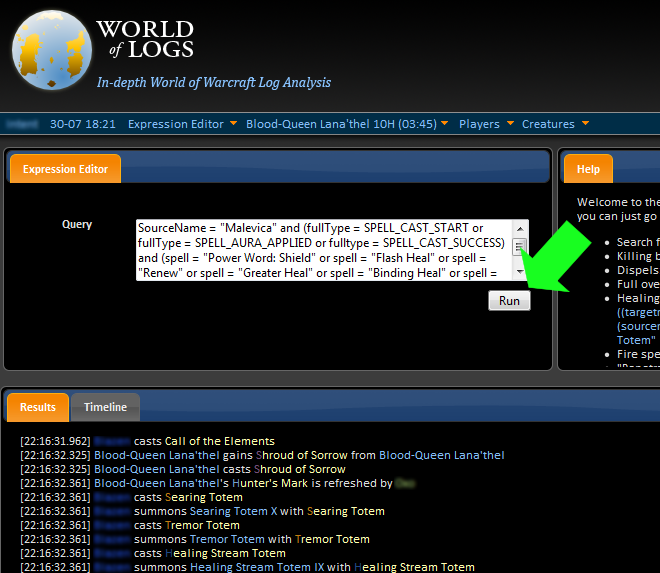
  4. Press the “Run” button.
    The World of Logs Expression Editor box filled in, and the run button indicated by yet another green arrow

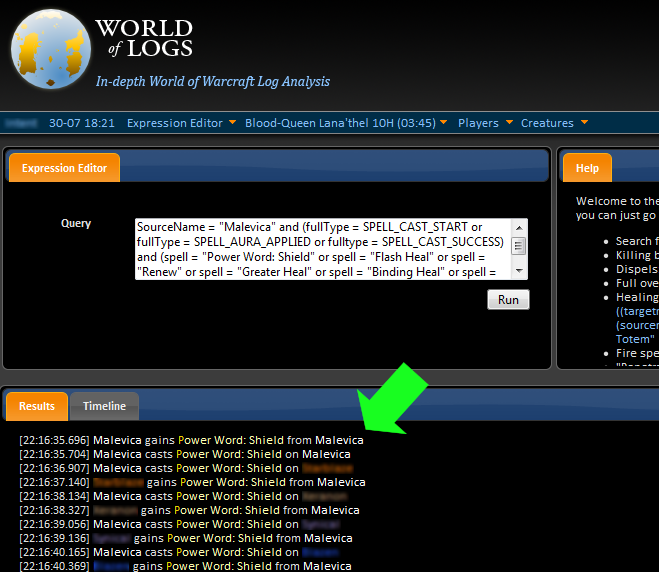
    Hopefully some lines have gone from the list of combat log events, but some still remain. If none remain, you’ve got something wrong in your query, so check again that you’ve copied and pasted the expression correctly and put your name in their, rather than mine.
    The World of Logs Expression Editor box filled in, and the now filtered combat log entries shown below it, indicated by... well, you get the idea
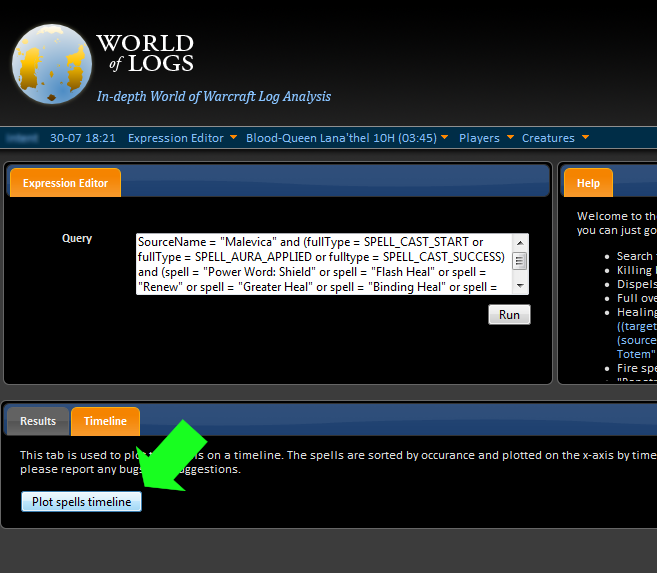
  5. A list of events might be what you’re looking for, but information like this is usually better represented visually. World of Logs has the ability to display a timeline of your actions over time.
    To bring this up, click on the Timeline tab and then click on the Plot Spells Timeline button.
    The World of Logs Timeline tab, with the Plot button subtly highlighted
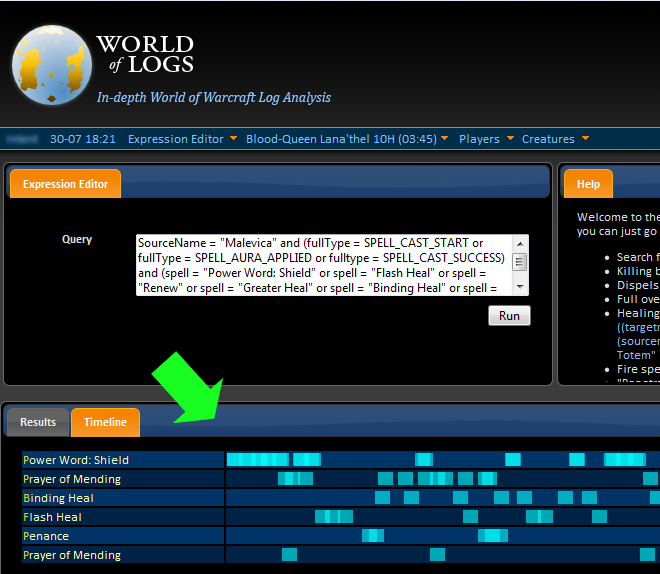
    The result should look something like the example below:
    The World of Logs Timeline display, with one last big green arrow pointing to the timeline

What you can see at a glance on this plot is the number and range of different spells you cast, and if you have a ‘rotation’ you can see how well you’re able to stick to it in practice.

In the example above, you can see that I tended to get distracted and I don’t get my shields refreshed on time every time, but there are a few clear blocks of PW:S casts, showing I’m using it fairly regularly on the whole. I’m also underusing Penance, which is probably hurting my output. I’m casting a wide smattering of spells, which might indicate a lack of discipline (no pun intended) or a reactive role, I’ll need to think a bit more about that.
On the plus side, I am getting plenty of use out of Prayer of Mending (see the little clusters as it bounces almost immediately), and I’m remembering to mix Binding Heal in with Flash Heal to keep myself alive at the same time as healing the raid.

Looking at the picture overall (I find squinting helps), I’m pretty busy throughout the fight without there being many big gaps in my casts. This view can help to highlight players with gappy timelines who might be slow to react, be distracted or AFK, who don’t heal well on the run, or who might just be waiting around for something to heal, depending on the players in question.

Making a change

Once you’ve identified areas you want to work on or tighten up in your play, obviously you need to actually make a change. Easy right? Well for some people it might be as simple as saying “I need to cast Prayer of Mending more” and having it happen, but almost everyone will need some amount of time and support to implement a change.

The first thing to stress is that it will take time and practice, there’s no way around that. You can heal the target dummies (could have sworn this worked, apparently it doesn’t, sorry!) yourself easily enough if you want to work on a rotation or practise keeping a spell on cooldown, or you can just get stuck in and raid; your best bet will be some combination of both.

My strong suggestion would be to pick one thing at a time and focus on that. If you try to change too many things at once you’re likely to forget about some or all of them and you won’t be anything like as effective as you could be. In my case, I’ve been working on improving my use of Prayer of Mending, trying to throw it out pretty much as soon as it comes of cooldown, so I’ll take that as a simple example.

What you do to actually improve depends on what works for you and what you’re trying to improve.

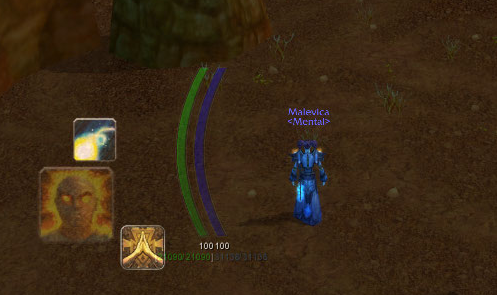
  • In my case I set up a PowerAura to flash up whenever Prayer of Mending was off cooldown, so I was reminded to cast it more often.

    PowerAuras for Penance, Prayer of Mending and Power Infusion
  • If you’re trying to improve your range of spells cast, perhaps unbind your most common spell to force you to play with your alternatives to find something which works instead (best used in a safe environment, at least at first, but using this in a raid can be a very powerful lesson).
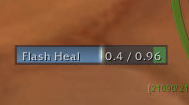
  • If you’re trying to increase your actions per minute, pick up a castbar addon like Quartz, or Az Castbar (ACB) which has a latency display built in, and start your next cast as soon as you’re within the red or green zone, as in the screenshot below:
    A close-up of AzCastbars showing the latency zone
    Alternatively, just keep your standard “filler” spell on an easy binding and practise hitting it whenever you can’t think of anything else to hit. Getting into the habit of Always Being Casting is a sound habit, even for Cataclysm (you’ll not always need to heal, but most healers will have the option to DPS and get mana back for it, so learning to fill spare time is a good habit).
  • Did it work?

    This is a step that many people can forget to include, but it’s so important to cementing the change: take another snapshot of your performance and repeat the analysis step.

    Make another log, and look closely at it. Did you change what you wanted to change? Are you actually using more spells? Casting more often? Using that crucial cooldown spell more often?

    If you don’t actually check, how can you know whether you’re actually making a change or if you just think you are? Remember how surprised you were when you first looked at your timeline or spell percentages or overhealing? That’s because you don’t actually remember very well, and you tend to fill in uncertainties with what you expect, not reality. So always trust the data.

    Either way, give yourself a pat on the back for taking things in hand!

    Rinse and repeat

    Needless to say, the process doesn’t end here; either that’s because you identified more than one thing you wanted to work on, or because when you changed one thing you’ve now shifted your healing balance around and something else might now be out of kilter.

    Once you’ve got your first change sorted and feeling like a comfortable part of the new healing modus operandi for your character, take the new baseline you acquired for the step above, and loop back to the Analysis step. Work out where your next area for development is, work out how to make a change, implement it and practise it, then evaluate how well it worked.

    Above all, you should always be somewhere on this cycle.

    Possibly Related Posts:

Categories: Advice and Strategy

Helping Out

Posted by Malevica on August - 17 - 2010

Moonra, the Resto Dude, recently proposed as the BA Shared Topic the question of how to assist or protect your team mates, to the benefit of everyone. This is an excellent topic, and in answering the question I decided to follow the “What healers want the rest of the raid to know”/”What the rest of the raid wants healers to know” format as used on WowWiki.

What healers want the rest of the raid to know

  1. We can see your health – Yes, really. If I had a copper for every time someone asked for a heal, I’d be gold capped by now. Well, maybe not quite, but the point is that if you’re not getting a heal, it’s unlikely to be because we don’t know it’s needed; it’s much more likely to be because someone else is lower than you or taking more damage than you now, because we’re moving or debuffed, or just because we’re doing something else.
    What’s more, calling for a heal, especially on Vent, just adds to our processing load and will (albeit slightly) further delay your heal.
    While we’re at it, let me get it on record that I can also see when you’re dead (chances are I’m kicking myself about it) so if you proceed to ask me for a res, rest assured you’ll be the last person to get one.
  2. Replenishment is not optional – Theorycrafting and gear choices are all based on the assumption of 100% Replenishment uptime, and we all gem for Intellect because it’s our best mana regeneration stat. Blizzard have even stated that they balance encounters and gear around having replenishment in raids. So if there’s not at least 1 replenishment in a 10-man raid, or 2 in a 25-man raid, and you can provide it then please consider doing so, even if it’s a personal DPS loss (Shadow Priests who refuse to Mind Blast, I’m looking at you…). Let us know about your sacrifice and we’ll thank you for it.
  3. We won’t be able to heal through stupid forever – There’s an interesting argument that crops up now and again. The premise is that DPS is uncapped, that is to say that more DPS is always better. Therefore if a healer has a spare GCD, they should be using it to protect a DPS player, allowing them to ignore environmental effects which might otherwise require them to move, lowering their DPS.
    I don’t like people trotting out this argument very much because it assumes that healing resources are unlimited and that unused GCDs are ‘wasted’ time. This might be true at the moment in a lot of the raiding content, either because you have ‘too many’ healers or too much mana regeneration, but it isn’t on hard modes and shouldn’t be in Cataclysm, if Blizzard don’t disappoint me.
  4. The reason you died is usually not “I didn’t get a heal”, and the solution is usually not to add another healer – Of course, sometimes this is the reason you died, and sometimes you do need more healers, but usually the answer to both is “I took too much damage”.
    Encounters, particularly on normal mode, are not balanced around an assumption that your healing team changes by more than one, if at all, over the course of a raid. If six healers is sufficient for the rest of the encounters, then six should be able to handle this one just fine as well. Look around at the damage being taken and where you can reduce it, before changing the team around.
  5. Healers aren’t omniscient, tell us things!Aunna mentioned this in his response (points 2 and 7), and he got it spot on: if you need an Innervate, Salv, Mana Tide or Hymn of Hope then ask for it. If you’re blowing your tanking cooldowns, make a macro to tell us about it, and if you need a cooldown and haven’t got one available, ask for it. If you’re going to swap tanks, give us a 3, 2, 1 so we can get Grace, various Shields and other buffs on you in advance. We’re concentrating on a lot of things, and we can’t guarantee we’ll always remember everything.
  6. Buffing is everyone’s job – I don’t begrudge the cost of Devout Candles to buff the raid, I’m talking more about rebuffing in combat. During a fight, if someone Soulstones or gets Rebirthed, locating them and rebuffing them takes valuable global cooldowns. Perhaps I’m more sensitive to this as a Priest with three buffs, but I really appreciate DPS taking the time to throw a Fort/Spirit on the newly-resurrected player so I can concentrate on healing them up instead.
  7. Cleansing is everyone’s job – Especially in 10-man raids, it’s entirely possible that one dispel type is being covered by one or no healers, so always make sure you’ve got raidframes up that can show dispellable debuffs, and if things aren’t being cleansed quickly enough, help out.
    Sometimes cleansing can be more powerful than healing (there are some DoTs in Cataclysm instances which tick for 4,000 per second, compared to an 8k Heal; in this case, a Dispel is by far the best choice).
  8. Meters aren’t everything – (Disclaimer: I know that DPS meters are far from the whole story for DPS as well, but they tend to be more relevant than healing meters for healers). Healers work by assignment, and work in very different ways.
    A healer with low healing might still have been playing an important role, might have been dispelling, maintaining a steady stream on the tank(s), or might have been saving their mana and cooldowns for a different phase. Professor Putricide and heroic Anub’Arak are classic examples of fights where some of the healers may have dismal eHPS for most of the fight because there’s simply very little to heal until the final Phase.
    And if you’re complaining about Disc Priests and not showing absorbs in your meters, go get Skada or RecountGuessedAbsorbs this instant!
  9. Your pet is your problem – Hunters, Death Knights and Warlocks are balanced around supporting their pets, should they take damage in combat, so healers shouldn’t need to heal them except in certain exceptional cases (a Warlock tanking Prince Keleseth comes to mind). We may choose to do so, if we have spare GCDs, in order to help your DPS, but you shouldn’t be relying on it. See point 3.
  10. If we have to run, so do you – Ah, the perennial favourite. If we wipe and I release and run back in, I fully expect you to do the same unless I say otherwise. Not much is more likely to make my blood boil than knowing that while I spent my time on the corpse run you were off getting a drink, feeding the cat, having a smoke, taking the rubbish out, or any other miscellaneous task.
    It’s just disrespectful to assume that my time is less valuable than yours. I’m afraid the passive-aggressive side of me comes out at those moments and you’ll find yourself staying dead until you at least show willing and release (at which point I’ll probably res you, just to speed things along).

What the rest of the raid wants healers to know

  1. Some damage is unavoidable – While usually there’s room to shrink down the amount of damage the raid’s taking, some raid damage is inevitable – that’s why we have raid healers, after all. Be realistic and always consider whether someone’s death was truly their fault for taking damage, or if they did in fact just slip through the cracks.
  2. DPS is not “faceroll” – Sure, no one’s arguing that healing’s not mentally demanding and often thankless, but DPS can have plenty to concentrate on as well: focusing on the right target, spotting new adds spawning, maintaining a sometimes complicated priority rotation, keeping DPS high while moving, and so on. Don’t assume that a DPS standing in the fire is being a “moron”, we might just have other things on their plate demanding their attention.
    While we’re on the subject, we agree that healing is a difficult job, but that still doesn’t qualify you to tell us how to do our job, even if you do sometimes spec Elemental, Enhancement, Shadow, Feral, Balance or Retribution at the weekends.
  3. If we can help you out, tell us how! – It’s better to light a candle than to curse the darkness, as they say. There’s no sense sitting in the healer channel complaining about the DPS being all spread out if you’ve not taken the time to ask us to group up so your chain heal bounces properly. A lot of fights require >12 yard separation so spreading out is probably the safer default choice, and if we’re not dying, why would we change?
    Likewise, if there’s a tricky healing phase coming up, for example one of the healers is currently an ice block while another has Unchained Magic, mention this on Vent so your DPS and tanks know we’re on our own for a while.
  4. Power Infusion is delicious – This is a bit of a Priesty one, sorry! I’ll admit I’ve not theorycrafted this much, but my two favourite targets for PI are Fire Mages and Moonkins under Lunar Eclipse (hasted crit-boosted Starfires are made of pure win). I gave up on Arcane mages, despite how useful the mana cost reduction might have been, after the umpteenth error message because their own haste proc had gone off.
    Pro-tip: PI doesn’t stack with Bloodlust (the haste bit anyway, the mana cost reduction still works), so check when BL is due in this fight so you don’t waste it.
  5. CCing can be dangerous – CCing mobs, which is usually the job of ranged DPS, is not without its risks and difficulties, and healers can help us by being aware of those tasked with CC, healing us if we take damage (from the mobs directly or from having to move into more dangerous territory) and using other tricks to help out:
    • Priests can use PW:S on casters to help us get a cast off even if our target is making trouble, and this goes double if we happen to be using a Succubus for your CC (remember those days? They’re coming back!). Hunters kiting mobs over traps might find a Body and Soul useful too.
    • Shaman can use their Earth Shield to prevent spell pushback as well, or use an Earthbind Totem to hold mobs in place long enough for CC to be (re-)applied.
    • Paladins can use their Hammer of Justice on a loose mob before it can get to its CCer, or just taunt it for a moment – you’re likely to be tougher than a clothie.
    • Druids can use Entangling Roots to protect a CCer, or if you’re a Tauren you can use your War Stomp to stun them for a moment.

  6. If you get aggro, don’t run away – You know how annoying it is when you can’t heal someone because they’re out of range or line of sight? This is the tank’s equivalent. Healers have a 40 yard range, and like to stand as far away as possible, while a tank’s taunt only has a 30 yard range.
    As natural as it is to run away from the big angry dragon/skeleton/zombie/ooze/whatever that’s chasing you, if you do then the tank will be unable to reach you to get it back without moving, and a great many encounters punish tanks for moving by Flame Breathing the raid. It takes a lot of discipline and practice, but it is possible to train yourself out of this habit.

Possibly Related Posts:

Categories: Advice and Strategy

[Cataclysm Beta] The new party UI

Posted by Malevica on August - 11 - 2010

Since this was first posted, the party UI and options have been developed further. Please check out my update post for the differences.


I’ve managed to heal a fairly dismal 2 instances, and we never finished the Stonecore. Still, I’ve had a good play with the new party healing UI, so it’s time to share some thoughts.

If you’re interested in other takes, Matticus (twice!) and Derevka have also posted about this, amongst others.

Although this is currently just being used for the party interface. I’m assuming this will be extended and used as a replacement for the default raid frames as well, so some of my thoughts and comments may also have raiding in mind.

What does it look like?

This:

Busy party UI screenshot

Or, when things are a bit calmer, this:

Quieter party UI screenshot

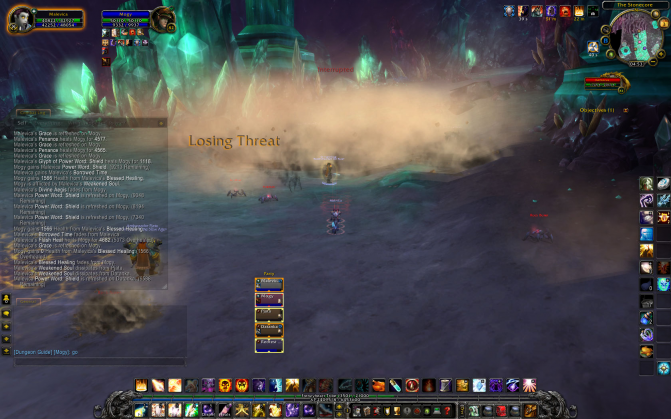
And in full context (1680 x 1050), it looks like this:

Party UI set within a whole screen

For the record, I wouldn't normally raid with the combatlog taking up half my screen, but it's really handy for seeing what the hell's going on in content I don't know well yet.

It looks something like a hybrid of VuhDo with Grid. It’s fairly compact and clean-looking without sacrificing too much functionality for compactness. It also fits well with the rest of the UI in general, which is a big plus.

Personally I don’t tend to get too wrapped up in aesthetics, and this is nothing really revolutionary, so I’ll skip on quickly.

Information display

How does the healing UI do straight out of the box? Actually, pretty well, with some caveats.

Class-coloured bars

The first thing I noticed when I looked at the UI in a freshly-formed group was that the bars are class-coloured Grid-style. I understand that UI design is a hugely subjective area, but I’ve never managed to see the appeal of class-coloured bars.
I don’t feel that class-coloured bars actually give me any information I need. Rarely do I think about what class someone is before healing them and the only situations I can think of where I’d need to know are when people are dead, and their bars are a uniform grey (I might choose to combat res a Druid, or not to combat res a Shaman, for example).

The argument for bars which change from green through orange/yellow to red as HP falls is that it draws your attention quickly to those in need of a heal and gives some indication of their state, in a more noticeable way than just shrinking the health bar. When you’re scanning 25 bars, a big bold colour change jumps out at you. So having class-coloured bars feels like a missed opportunity to give me information.

A more nitpicky point is that the standard DK colour could do with being made a bit bolder. It’s quite tricky to spot the health deficit on Sielydine’s bar, at least for me in my computer room in daylight.

Another screenshot, this time the dark red of the DK's health bar and the black background are tricky to distinguish

Role icons

In the upper left corner of each bar is an icon representing the role of each player as assigned by the Dungeon Finder. It’s a nice feature to have, for sure.

Ideally I’d probably prefer to be able to hide this information, since it tends to be something you look at once and never again and it’s currently taking up space, but given that the purpose of these frames is to Just Work™, hiding the icons behind a hotkey or right-click probably isn’t an option.

Target and Aggro indicators

The screenshot just above is a good example of this. The player you currently have targeted, in this case Muhmann, gets a cream-coloured border around them. Players with aggro get the expected red border, with arrow embellishments for good measure. These are standard features for raid frames these days. The target indicator seems to have higher priority than the aggro indicator, but the red arrow marks still show through since the target indicator doesn’t include them.

I’m a little confused about the other frame colours though. Let’s have another look at the first screenshot I posted (reproduced below, to save your scrollwheels):

Busy party UI screenshot

Mogy is the tank this time; he’s got the cream border because I’m targeting him, and he has aggro because you can see the red triangles. All fine and dandy.

It’s not made clear what the yellow and ochre borders around the others represent. My guess is that they’re part of the aggro indicator, corresponding to people with moderate and high threat. I’m basing this mostly on the fact that they’re a similar shape to the red aggro indicator.

Incoming Heals

Another screenshot, this time the dark red of the DK's health bar and the black background are tricky to distinguish

Another nifty feature you can see exemplified in the screenshot above is the display of incoming heals on the bar. There’s not a huge amount to say about this really, incoming heals show up as a big bright green chunk on the end of the bar, overheals spill out beyond the bar (which is good, it lets you see just how much of an overheal you’re casting) and the size of the bar appears to be more-or-less accurate, although I’ve not been able to fully test it with Mortal Strikes etc yet.

For this to be really useful in a raid situation it needs to be able to show other people’s heals as well as your own, so if Blizzard do make this the template for new raid frames I hope they’ve built that functionality in, but for a party just showing yours is plenty.

HoTs and Debuffs

For discussion purposes, here’s that screenshot, repeated once again:

Busy party UI screenshot

Working from the top, the blue circle in the top-right corner of my frame shows at a glance that I have a magical debuff. If you want to find out at a glance what debuff it is, that’s in the lower-left corner where all the debuffs are displayed together as standard icons, growing left to right. Both the small indicator and large icon will display tooltips on mouseover.

Moving down, Mogy has both PW:S and Weakened Soul, while below him Pjata only has PW:S. HoTs appear all together in the lower-right corner, growing from right to left.

Datanka is very kindly illustrating what a debuff with multiple stacks looks like. The number is nice and clear and readable, although it does obscure most of the icon. With space being at a premium though, some sacrifices are inevitable, and in this case I’d rather see stacks (which are hard to work out) than the icon (which you can figure out from context).

What you don’t get is any way to see the duration remaining as a number, only as the grey overlay. There’s just no way to fit that onto the icons sensibly, but I do prefer to see a number, since I often find the grey overlay thing a bit too tricky to discern.

I didn’t manage to catch a screenshot of this, but diseases work in the same way as magic debuffs do, with a small orange icon in the top-right and a “proper” icon in the lower-left. The last image on Matt’s first post shows this though.

I’m sort of torn on the dual debuff indicators. I imagine the top-right corner indicators are intended to highlight that someone has a debuff, to draw attention more quickly and help you select your cleanse spell of choice while you look at the icon and decide how you want to respond.
I’m all in favour of simple tricks to grab attention (see the discussion above about bar colours) but I’m not sure a relatively tiny icon is the best way to do it. I’d be happier seeing larger debuff icons (with thicker coloured borders) instead and the indicator space used for something else. I can’t help feeling like it’s awkward having related information in opposite corners.

Overall though the debuffs icons are pretty clear, stacks are obvious, the debuff type is readily apparent and they’re arranged logically in corners, so for a default, no-configuration UI this is actually really good.

The main missing feature that will be familiar to many of us is the ability to set up custom debuffs for special attention (Harvest Soul, Frost Blast, Penetrating Cold, amongst others). I’d love to see it, but I think that level of customisation is probably beyond the scope of what Blizzard is trying to achieve here, and possibly beyond what they’d be comfortable with including in the default UI.
Especially since different players care about different debuffs (for example, I don’t highlight Chilled to the Bone, while a melee DPS might want that displayed prominently).

Configuration

The thing to remember about this UI is that it needs to Just Work™ without needing to be configured or customised, and it needs to work for all classes, not just healers.

As a result, there’s not much customisation. Your layout choices are limited to showing pets, main tanks and main assists and keeping groups together (as opposed to sorting by name or role). You can also opt to turn off incoming heals, aggro highlights and to filter only buffs you can dispel.

Wishlist

If you’re used to healing with VuhDo, Grid, Healbot, Pitbull, Xperl or another set of full-featured, customisable raidframes you’ll probably find this quite limiting. This is not going to replace those addons, but it’s a pretty good compromise solution which shouldn’t impair your performance too much if you have to resort to using it (except the whole no click-healing thing…).

As Matt commented, “It’s important to discern between must have and nice to have but can probably heal without it type changes.” The danger is that if you add too much configurability, or too much information, you destroy the simplicity which is the whole point.

With that in mind, here’s my wishlist for must have items. These are things which I found actively obstructing my ability to heal effectively.

  • Let us choose between class-coloured and HP-coloured health bars. I thought about including this on the nice-to-have section, but actually this was causing me to neglect people or incorrectly estimate people’s status
  • Instead or as well as the previous point, brighten up the bar colours a bit, since some of the darker shades (DK in particular)can be tricky to tell from the background
  • Provide numerical timers, at least for HoTs. Make the icons bigger if need be

And the nice-to-have items:

  • Resizable bars. These are a decent compromise, but I did find them a little small at times. I tend to err on the side of larger boxes because poor eyesight combined with a high resolution screen is a bad combination
  • I personally tend to find it creates information overload, but numerical health deficits for players are fairly common to see in healing interfaces, especially when overhealing matters
  • Click-healing. The ability to bind spells to mouse buttons and modifiers. Not as the only way but many people find it a very intuitive way of healing. Unconfigured, a left-click could just be bound to targeting as normal, which wouldn’t interfere with people who didn’t want to click-heal. If you wanted to use a menu on someone, you could bind “menu” to something, or target them the old-fashioned way

On the whole the new party frames are a big step forward, and actually more-or-less a complete solution. They’re not perfect for me, but ‘perfect’ is a very subjective concept and the default UI is, after all, an exercise in compromise.

Possibly Related Posts:

Categories: Cataclysm Beta, Opinion

[Cataclysm Beta] Healing Throne of the Tides

Posted by Malevica on August - 3 - 2010

I have some thoughts on the new party healing UI but they’re not fully formed yet, and I was a little too busy to take proper screenshots on the way through, so I’ll return to that another time. For now, here’s my not-so-quick walkthrough of Throne of the Tides (without many pictures, although I may add them another time).

This is a rather long post, but it’s an entire instance and there’s a lot of detail in here. Ctrl-F is your friend!

This is based on beta build 12644, it’s all subject to change. I’ll add this to the strategy section once it’s closer to Live.

Layout and route

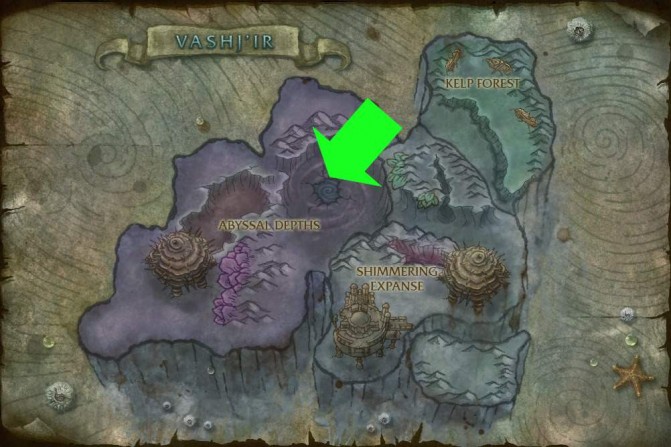
First and foremost, how to get there! The entrance is in the Abyssal Maw area of Vashj’ir, which is in the north-east of the Abyssal Depths subzone, or smack in the middle of Vashj’ir. I’ve included a map below:

Map of Vash'ir, with the Abyssal Maw entrance indicated by a green arrow

To get to the instance entrance area, just swim down into the Abyssal Maw as deep as you can go, and eventually you will ‘fall through’ the bottom and land in a cave with the instance entrance in it.

The layout’s a bit tricky to describe, especially since the game doesn’t yet include maps for the place, but I’ll do my best.

TotT (that’s a messy abbreviation…) essentially has three “wings” over two levels. When you walk in through the front entrance you’ll move forward through the first trash pack, up some stairs, and into a room with three exits. The left and right exits are blocked by wiggling tentacles, belonging to Ozumat, the end boss, who we’ll get to later. So first you need to fight your way forwards to the end.

When you reach the end you’ll find a friendly goblin who’ll tell you all about how he’s all set to get this elevator working. Since you’re in a bit of a hurry, ask him instead to teleport you upstairs (I can’t tell if this is an under-development kind of joke, or if we’re laughing at goblin workmanship). Another long hallway to fight through, with Lady Naz’jar at the end.

Once you’ve defeated Lady Naz’jar, turn around and go back the way you came. You’ll quickly discover Commander Ulthok has arrived and is inconveniently standing in your way, so dispatch him post-haste. Ask the goblin to teleport you back downstairs again, and head back to the three-way junction.

One of the side passages will be filled with purple elementals, that’s the way to Neptulon and the end, so go the other way first, past a lot of smaller Gilgoblin mobs. After a short slog through the trash you’ll come to Erunak Stonespeaker, who’s boss number three. Finally, head back to the centre again and hack and slash your way through the corrupted elementals to Neptulon’s room, and prepare for the final battle.

Lady Naz’jar

I’ll cover the trash mobs leading to each boss as well as the bosses themselves in each section, since some of the packs need a bit of care.

Trash

Getting to Lady Naz’jar involved taking out packs of 4-5 naga, consisting of the following types:

  • Naz’jar Spiritmender – Will cast Healing Wave a lot, or Wrath otherwise, and need to be kept under control or you will literally not kill anything. If there’s two in a pack, CC one and burn the other with stuns, then either leave the second one or kill it, it’s up to you. These will pretty much be the biggest challenge you’ll face in these packs.
  • Naz’jar Invader – Will melee swing and also apply Lacerate to their target. Lacerate was doing 225 damage per second per stack to the tank I had, but I saw it stack as high as 30 (for 6750 damage per second) on our tank before he died and we wiped. This shouldn’t be a problem as long as the rest of the mobs are going down in a timely fashion though, since you get one stack every 5 seconds.
  • Naz’jar Tempest Witch – These mobs have a Chain Lightning which starts at around 10k for the first hit although it does drop by about 2.5k per jump. Ranged need to be at range and spread out to mitigate the worst of this. Tempest Witches will also cast Lightning Surge on a random player giving them a magic debuff of the same name, which causes the player to explode for around 15k Nature damage after 5 seconds if it’s not dispelled. All healing classes can now dispel magic on friendlies, so this needs spotting and dispelling.

There are also a couple of lone patrolling Naz’jar Sentinels to watch out for. They hit fairly weakly in melee, but they will cast Noxious Mire on a random player, leaving a patch of green fumes on the floor which lasts 10 seconds and deals 5000 Nature damage per second to anyone inside it. Again, ranged should be spread out and the tank should kite the Sentinel out of any fumes on their location.

Boss

Lady Naz’jar is an alternating boss/adds type fight. At 66% and 33% she will banish herself by casting Waterspout and spawn three adds, unbanishing after one minute (possibly also once all the adds have died).

When fighting Lady Naz’jar herself, there are a few things you’ll need to watch out for. The most dangerous is Fungal Spores, which is a disease cast on a random player causing them to take 10000 Nature damage every 3 seconds for 15 seconds (5 ticks). It’s recast pretty much as soon as it fades, so you’ll spend a lot of time dealing with this. This can be healed through by an attentive healer, or dispelled where available.

Besides the disease she will summon a Geyser on a random person. You have a small delay of a second or two before the Geyser deals 30k frost damage to you and knocks you into the air. This is likely to kill you if you’re not fully topped off, and the falling damage can be risky as well, so healers need to be alert for this one.

When she casts Waterspout and banishes, she will spawn two Naz’jar Tempest Witches (which we’ve seen before) and one Naz’jar Honor Guard. The Honor Guard will melee fairly weakly initially, but will also use Arc Slash every 6 seconds or so. Arc Slash is a 5-yard frontal cone attack which cannot be dodged, blocked or parried, so this keeps a consistent background level of damage on your tank and the cleave aspect means you need to take some care with positioning.

My recommendation is to CC one of the Tempest Witches to keep the dispel requirements manageable (remember that Lightning Surge) and the Chain Lightning under control, and burn them down one at a time before moving on to the Naz’jar Honor Guard.

Rinse and repeat, and she should go down easily enough.

Commander Ulthok

Trash

There is no trash. As you turn around to head back into the rest of the instance, Ulthok will pop up in front of you from the pool on the floor. If you’re careless you may find yourself in combat automatically, but it is possible to avoid this.

Boss

Ulthok is a more challenging boss in theory, although we discovered on beta that he can be kited and killed solo by a class with slows due to his infrequent casts and the number of places to line-of-sight him. I imagine this will be altered before going Live.

His melee swings on the tank come in at around the 5-6k mark, which is not massive but can add up.

Ulthok’s first special ability is Dark Fissure which is a 2 second cast, at the end of which Ulthok smashes the ground in front of his feet, dealing 60k Shadow damage to anyone within 2 yards of the target (i.e. directly in front of him) and leaves a Dark Fissure on the ground (lasting 2 minutes) which deals shadow damage to anyone in it.
The tank should move away quickly to avoid being one-shot, and should move Ulthok out of the way so that melee DPS can avoid standing in the resulting Fissure.

The other thing Ulthok will do is Squeeze a random player in his hand, stunning them and dealing 5k Shadow damage to them per second for 6 seconds (6 hits). Given that health levels are around 30-35k for most non-tanks it is important to keep players topped off where possible, or to give them some focused healing if they’re low.

Erunak Stonespeaker

After heading back to the three-way intersection near the beginning of the instance, there will be two paths to take. Erunak Stonespeaker is along the path which does not have purple elementals on it. (I forget whether it’s east or west, but it’s on the right as you enter the instance).

Trash

There are three types of trash mobs to deal with here: two types of goblin forming mixed packs, and single Faceless Watchers, some patrolling.

  • Gilgoblin Hunters will attack with Poisoned Spear, which hits for around 15k Nature damage and ticks for around 1k Nature damage per stack.
  • Gilgoblin Aquamages will cast Water Bolt which deals 5k Frost damage and reduces melee, ranged and spell haste by 5% (dispellable, magic).

Pulling a pack with more than a couple of hunters is a risky business, because 4x15k from a barrage of Poisoned Spears may make short work of your tank. Be sure you’re at full health and go in with a bubble/CD, or pull with a stun/CC to reduce the numbers to manageable levels (being sure not to get your mage gibbed, of course). The Aquamages have a 2 second cast, but the Hunters have a 0.5s cast, so you’re unlikely to be able to interrupt them easily off the pull.
Once the pull is made though, the mobs die fairly easily and their damage is not nearly as focused.

The Faceless Watchers are interesting to fight. They will cast Void Rip, lifting everyone up into the air and drawing them inwards, and then after three seconds Void Rip fades and you are all dropped near his feet. He’ll then cast Ground Pound, which makes the ground near his feet rumble and deals 6k Physical damage per 0.5s to anyone inside. The Ground Pound lasts 6 seconds, but you should run out of it before this happens, or you’re likely to not survive. Given that you’ll have a maximum of 30-35k HP on average, you’re looking at 2.5-3s TTL from full health, and probably less since you’ll have just taken falling damage as well.

Boss

Erunak Stonespeaker is not truly the boss here; he’s actually being controlled by Mindbender Ghur’sha, a sort of ooze/headcrab thing riding on his head. You need to kill Ghur’sha, but it’s pretty stubborn and you need to “persuade” it to let go.

When you first pull, you’ll need to take Erunak Stonespeaker to 50% HP, at which point Mindbender Ghur’sha will detach and sit on the floor for a time. Burn it as hard as you can during this vulnerable time, before it picks another target,the highest threat player each time, and leaps onto them. Once again, DPS this target to 50% health (or wait 1 minute, but why would you?) and Ghur’sha will detach again. From here it’s just rinse and repeat until you’ve killed Ghur’sha for good.

While you’re fighting Erunak Stonespeaker, he will be doing one of three things besides meleeing your tank. He will randomly cast Lava Bolt on a random player dealing 20k Fire damage and knocking them back, and he will also send Earth Shards towards a random player, which will turn into a patch of spikes when they hit, dealing around 2k physical damage per second to anyone remaining in the area.
The big danger in this phase is the Magma Splash, which is a frontal cone Fire attack dealing 20k damage upfront and applying a DoT to anyone afflicted dealing 2k Fire damage per second for 10 seconds unless dispelled (Magic).

Once you’ve passed the 50% mark and Ghur’sha is Enslaving players, it will use its own set of abilities rather than the player’s own.

The first, and most subtle, is Absorb Magic. This magical debuff (Purgeable) is cast by Ghur’sha on itself, and absorbs all spell damage. What’s more, when damage is absorbed Ghur’sha will be healed for three times the amount absorbed. Purge this one quickly or stop DPS, although currently this doesn’t heal for enough to make much of a difference.

The other ability the whole party needs to react to is Mind Fog. A patch of fog will appear around Ghur’sha and remain for 20s, which pacifies anyone inside it and deals 500 Shadow damage per 0.5s. Run out, and ranged DPS might have to be careful of their threat while the tank is pacified.

The big damaging ability in this phase is Unrelenting Agony. This looks a lot like Mind Flay beams from Ghur’sha to every player, and ticks for around 2k Shadow damage per second for 10s. This needs some preparation to top people off and spread some healing around, although it’s not fatal in and of itself.

Ozumat/Neptulon

Trash

The trash to Neptulon’s room takes the form of a gauntlet, with the constantly spawning small Unstable Corruption mobs controlled by the large Tainted Sentry elementals.

The Unstable Corruptions will spontaneously die, casting Wall of Corruption on nearby players. This is a disease which ticks for 250 Nature/Shadow damage per second per stack, up to a maximum of 20 stacks, with a duration of 8 seconds. The trick to handling these is to ignore them and just proceed to the Tainted Sentries, although if your healer requires time to catch you up (not all healers can remove diseases) then you can build a pause into the progression.

Tainted Sentries are mostly melee mobs, although they have the ability to buff themselves with Swell, causing them to deal 10k Nature/Shadow damage to the party every 3 seconds for 9 seconds. This can be deadly, especially on the last pull when there are two of them or when you’ve got diseases ticking, so it must be purged as quickly as possible. If you have no purge available, try and keep one out of commission while you heal through the other one.

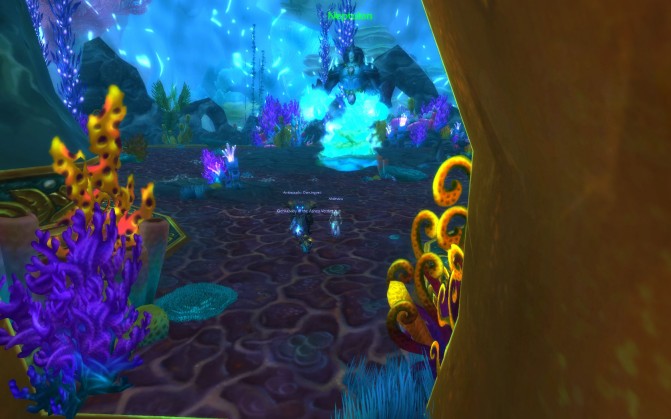
Neptulon in his room in the Throne of the Tides.

Neptulon in his room in the Throne of the Tides

Boss

To start the fight, talk to Neptulon. You’ll actually be fighting against Ozumat, the leviathan outside the room you’re in, in a three-phase fight. You must keep Neptulon alive for the duration of this fight, or the encounter will reset.

Phase one is a bit of a warm-up, where you’ll pick up and kill Deep Murloc Invaders, Vicious Mindlashers and Unyielding Behemoths. The Murlocs are easy enough to deal with through AoE, they only melee swing.

Vicious Mindlashers will cast Shadow Bolt on their target for around 5k Shadow damage, and will also curse their target with Veil of Shadow, reducing healing taken by 50%. Their final ability is Brain Spike, which is a 3 second cast that deals 7k Shadow damage to the party and drains 1k mana. This can be nasty, and needs to be the priority for interruping.
Vicious Mindlashers should be the kill priority in this phase, burning them one at a time. They do not seem to melee swing, so they do not need a tank staying near them to tank them, which is just as well, as we’ll see.

The Unyielding Behemoths do need to be controlled by a tank, and they need to be moved on frequently because they will periodically cast Shadow Blast, where they will leap into the air, hover for 5 seconds, and then slam into the ground dealing 25k Shadow damage and a knockback to anyone close to them.
Care also needs to be taken because they will also cast Blight Spray in a 25-yard cone in front of them for 3.5k Shadow damage per second for 4 seconds.

Phase 2‘s arrival is heralded by three Faceless Sappers spawning and running in. They will spread out around Neptulon and channel Entangling Grasp on Neptulon, stunning him. These all need to die before Phase 3 can begin.

Hindering you in this are the Blight Beasts which are spawned. These definitely do need to be kited around the outside of the room, since they will apply Aura of Dread to anyone within 7 yards of them, dealing 2k Shadow damage and increasing Shadow damage taken by 10% per stack (up to 200 stacks!). There will be multiple Blight Beasts active at any one time, so this can become very deadly very quickly.

Current strategy on beta seems to be to have the tank kite the adds while the DPS nuke the Sappers down a.s.a.p. This might not be optimal on Live though, perhaps a melee/ranged split onto Sappers and Beasts respectively might feel more controlled.

Throughout this phase, Ozumat will also be throwing black patches of Blight of Ozumat onto the floor, which stack a 200 Shadow damage per second per stack DoT to anyone standing in them. Run out of these quickly. They are a little tricky to spot, since there’s a lot of black shadow around the place, but they are visible if you watch out for them.

Phase 3 starts when the Sappers die. The first goal is to clear out the remaining trash mobs as quickly as possible, before turning your attention to Ozumat.

Neptulon is now active and will cast Tidal Surge on the whole party, increasing HP, healing and damage massively, as well as your size and run speed. He will also help you to kill Ozumat by chain-casting Pure Water on Ozumat, dealing 100k Frost damage at a time.

Because Ozumat will be constantly casting Blight of Ozumat, this last phase is a race against time before Neptulon or the raid dies due to the stacking DoT, making it very reminiscent of the end of the Lady Vashj fight, for those with long memories. From a healer’s perspective it’s pretty rough, and will test your triage skills!

Possibly Related Posts: