
Home
Subscribe:
Contact:
Subscribe to this blog by RSS Follow me on Twitter
Subscribe to this blog by RSS

Archive for June, 2010

Circle of Healing Podcast

Posted by Malevica on June - 30 - 2010

I have a few chunkier posts in the works, including looking at Heroic Sindragosa and levelling in the middle levels, but since they’re not done and there’s been a bit of a gap lately, here’s a quick comment on the new Circle of Healing Podcast.

Recently Dawn Moore (WoW.com’s healing priest columnist and Disc Priest), Matt Low (a.k.a Matticus, of World of Matticus, the sadly-neglected NoStockUI and WoW.com), and Kinaesthesia of the US guild Vodka released the first two editions of their new healing podcast. I had a listen through the episodes and wanted to give my thoughts.

If you prefer to make up your own mind before reading other people’s thoughts, you can find an introduction and download links at World of Matticus. Just remember that these are very early episodes.

The first thing to say is that it’s great to have another way to access information on healing. The podcast is quite accessible, and wisely tends to steer clear of trying to present complex technical information in an audio medium, while still giving a fairly in-depth discussion of the healing issues and topics. It’s also a good way to keep up to date with the big upcoming changes for healers and their implications, although it’s not aiming to be a news-focused show.

However it’s early days and it’s very much not a finished product yet, which unfortunately shows. The golden rule for content creation (blogs, podcasts, videos, anything like that) is to produce the first three, file them quietly away, and begin your public releases with the fourth one. The thing is that there will be technical issues, stylistic shifts and just a general development of personal interactions in the first few episodes, and in theory these will settle down by episode 4. You can always re-record and re-use the content later.

For example, in the first podcast Kinaesthesia had trouble being heard on the VoIP solution they were using for the podcast, something which the listener probably didn’t need to be made so acutely aware of.
The presenters also seemed a little uncertain about when to speak, wary of talking over each other, and the exchanges felt a little stilted. Some podcasts get over this by having a parallel text chat (inaudible to the microphones) running for cueing, but whatever means you choose, this is something you can best hammer out in the early episodes before you go public.

The other thing that bothered me a lot about the podcast was that the presenters, Matt in particular, seemed to be doing other things during the recording. At one point Matt had to have a question repeated because he wasn’t aware what he was responding to, sounding like he just wasn’t listening. Edit it cleverly if you like, but at least maintain the illusion that the presenters are paying attention to the discussion and each other.

I suppose this is partly a stylistic thing, and some people will undoubtedly enjoy the quirky, slightly haphazard, frequently tangential and very laid-back approach, it’s just not what I prefer to listen to.

The final caveat I have is that all three presenters are Priests, one Holy and two Discipline (although Matt plays both), with limited experience of other classes. Hopefully they will settle soon on whether they will just stick to Priests or incorporate other classes as regular guest presenters, otherwise I fear that they may struggle for credibility a bit.

Wow, that sounded pretty rough! It’s not all bad by any means.

By the second episode all the technical niggles seemed to have been ironed out and the discussion of the new Priest talent trees was quite interesting, with a more fluid and informative discussion taking place. The listeners’ questions section also promises to be quite valuable, once people are submitting questions for real.

Dawn, Matt and Jerome (Kinaesthesia) are people who are playing their healers at quite a high level, with a good understanding of the class, so it is a valuable resource, and definitely one to keep an eye on.

On the whole I expect the podcast to settle down from here, and the presenters to get into their stride, so I’d recommend keeping an eye out for future episodes. There’s great potential in a healing podcast, and the niggles I have are really more superficial than deal-breaking.

The website is still under development as I write this, but the links from World of Matticus will let you listen the first couple of episodes for yourself.
The podcast is also apparently on iTunes under the Video Games section of Games and Hobbies, or if you prefer regular RSS there’s a feed as well.

Oh, final point of feedback, please make the volume louder and better-normalised on the mp3. I found I had to turn it up very high to hear, and then someone’s laugh will be almost deafening. Small point, but being able to hear the podcast over traffic is handy!

Possibly Related Posts:

Categories: Opinion

Levelling a Healing Priest: 1-15

Posted by Malevica on June - 18 - 2010

It’s about this time in the WoW expansion cycle that my mind inevitably turns to alts. Why? I’m not sure. I think it’s the sense of progression I get from levelling up and acquiring gear, spells and power, as well as the lack of pressure and time limits: no one’s forcing me to conform to a timetable or level at a certain rate, and it’s quite liberating.


But which class?

I already have a Shaman, Druid, Paladin, 2 Priests and a Warlock (every family has a black sheep, after all).

The trouble is, I’m not a fan of pure DPS classes. I find the kill-it-quick-before-it-can-kill-you playstyle a bit of a challenge, even though I know that, objectively, DPS classes have an easier time levelling.

I’ve also never quite got the hang of melee DPS either. I find it hard to feel immersed in the action unless I have the camera zoomed in fairly close, and then I feel blinkered because I can’t see behind me.

Long story short: I decided to roll yet another Priest. And because that’s the sort of person I am, I’m levelling Holy (again).


Don’t you get bored?

The short answer is no! Each time I’ve picked a different race, across both factions, and have been effectively playing a different game each time.

When I was levelling Malevica, way back in mid-2007, the Burning Crusade had only been out about 8 months, and the Black Temple was new content. Levelling back then was a very different proposition from my second Priest, who was a child of Wrath, but who didn’t have any of those fancy heirlooms to help her level.

And this time around I’m not only in a full set of heirlooms, but I’m also able to take advantage of the changes to the “introductory experience” and the quest objectives tracker that came with Patch 3.3.0 in December 2009.
From the patch notes:

A number of changes have been made to World of Warcraft’s introductory experience, including updated character and class information at the character-selection screen, more robust tooltips with images, improved health and mana regeneration at lower levels, and adjustments to various classes designed to make it easier for players to get started. In addition, all-new quest-tracking features have been added to assist players in finding objectives, including new interface functionality in the quest log, the map (“M” key), and the Objectives pane.

So how are those changes working out?

Well, the updated character and class information is a small but useful improvement. It now puts class and race characteristics at the top of their respective boxes rather than below so you can glance across easily, and the class description lists primary stats (“Spell Power, Intellect and Spirit if healing”), which is helpful for a new player to know. Unfortunately for our Druidic and Shamanistic brethren and sistren (is that a word?) “their primary stats depend on their role”, which doesn’t help a new player much.

One little thing I do miss, and I have no idea when it disappeared, is the little button to generate a random name. I know, I know, I should spend hours coming up with a name that fits my character, but it’s much easier to pick a suitable-sounding name from a list than try and make something up.
Given the names I’m coming across in Elwynn Forest though, I suspect I’m largely alone in this.

Another big change is that all the mobs in the starting zones are now yellow, so they won’t attack you unless attacked and they won’t link. I don’t recall dying much in the starter zones before, but I suppose if you’re really new to this sort of thing, getting a bit more time to get to grips with the interface is of benefit.

The final change I want to talk about is the change to mana and health regeneration. Both of these have been massively boosted (outside combat) for the very low levels. From the PTR patch notes at the time:

Health and Mana Regeneration: These regeneration rates have been increased by up to 200% for low level characters. As a player’s level increases, the regeneration rates gradually reduce, returning to normal rates at level 15.

Great, so you don’t need to worry about eating and drinking along with all the other things that you need to get to grips with at low levels. But wow, did I ever get myself in trouble around level 12 when that gradual reduction started to bite. From regenning all my mana between mobs, I very quickly found myself with almost no mana regen at all, and it caught me out on more than one occasion, pulling with only a couple of Smites in the tank and then whacking things with my staff until they died.

I like the feature, but please, please signpost this better! If I spend 10 levels getting used to something, it’s rough to take it away without warning. And the slope could benefit from some flattening too, the transition from infinite mana to permanently running on fumes felt like only a level or two.


Talent choices

By level 15 I’ve amassed an almighty 6 talent points to spend. Looking at the talent trees, frankly I’m underwhelmed with Holy and Discipline. I know I’ll need to spend some points there sooner or later, because the higher talents are so delicious, but for now I want to boost my power.

The best place for the first 3 points is probably Spirit Tap . The first half of the tooltip is what we’re interested in with Spirit Tap. Doubling your spirit gives a big boost to your mana regeneration, helping you to recover for the next mob. The second part helps if you’re pulling multiple mobs, or pulling mobs in quick succession.
Improved Spirit Tap is quite a lot weaker, because it doesn’t boost your spirit much, mobs won’t live long enough to make a short period of increased regeneration worth it, and it relies on spell critical strikes. Your crit rating is likely to be pretty low, so you’ll not see much benefit from this one.

Other than that, your choice of points is pretty much free. I’d recommend sticking with the Holy tree for a while, until you can get to Divine Fury, but your choice from Tier 1 depends strongly on whether you’re going solo PvE/questing or going to be instancing your way to 80. For solo play, Holy Specialisation is probably the better choice, while a dungeoneer might prefer to boost their healing output with Improved Renew and Healing Focus.


Glyphs

At level 15 the first two of your glyph slots opens up: one major and one minor.

Major Glyphs at level 15:

Glyph of Fade Reduces your Fade cooldown by 9 seconds. Practically irrelevant at this point, and at most other points in the game too. Not recommended.
Glyph of Inner Fire Increases the armour bonus from Inner Fire by 50%. This one could be good for survivability and keeping your shield up longer, although killing faster is probably more desirable unless you’re dying a lot.
Glyph of Power Word: Shield Your Power Word: Shield also heals the target by 20% of the shield amount. Good to have in dungeons for a bit of freebie healing, but not game-breaking. Possibly a good choice for a dungeoning healer, less useful for a quester.
Glyph of Psychic Scream Increases the duration of Psychic Scream by 2 seconds, but increases its cooldown by 8 seconds. I tend to avoid using Psychic Scream most of the time because if I’m in trouble already the last thing I need is mobs running around bringing in friends. I’d leave this one for PvP, I think.
Glyph of Renew Reduces the duration of your Renew by 3 seconds, but increases the amount healed per tick by 25%. This means it’s a neutral change in total output but makes Renew higher throughput. Very handy in dungeons to help support a tank, but not worth the slot in solo play.
Glyph of Shadow Word: Pain The periodic damage ticks of your Shadow Word: Pain spell restore 1% of your base mana. Given that Shadow Word: Pain ticks 6 times, that brings its mana cost down to around the same as Smite. If you use SW:P a lot then this might be worth a look, but I think there are better options. Very much dependent on playstyle.
Glyph of Smite Your Smite spell inflicts an additional 20% damage against targets afflicted by Holy Fire. Although you don’t get Holy Fire until level 20, this one will be very powerful past that point.


Minor Glyphs at level 15:

Glyph of Fading Reduces the mana cost of your Fade spell by 30%. Since you will rarely use Fade, it seems unlikely that this glyph will give you much value.
Glyph of Fortitude Reduces the mana cost of your Power Word: Fortitude and Prayer of Fortitude spells by 50%. Does what it says on the tin.


For Minor glyphs there’s not much to be excited about. You’re probably more likely to case PW:F, so I’d recommend that one.

For Major glyphs you have a choice depending on your playstyle and where you think you’re weak. I’d recommend the Glyph of Smite for soloing, because although Holy Fire is a level 20 spell, your next Major glyph slot doesn’t open up until level 30. You can always use another glyph in the meantime.
If you prefer instancing, consider either the Glyph of Renew if you’re needing a boost on tanks or Glyph of Power Word: Shield if you’re finding yourself healing the non-tanks more often.


How’s that toolbox looking?

These first few levels actually give Priests quite a versatile toolkit already. We have a HoT, a direct heal, a shield, a DoT, two direct damage spells, a resurrection, two buffs (albeit one self-only), a dispel, a panic button (Psychic Scream) and the slightly out-of-place Fade.

Low levels are characterised by Smite spam, primarily, with Mind Blast thrown in if you can spare the mana. Shadow Word: Pain is probably too expensive to be worth using at very low levels, since it costs one and a half times as much as a Smite for about the same damage, and you probably won’t use the full duration anyway.
Once you get Power Word: Shield, this becomes the opener before every pull. It’s not cheap, but no pushback on spells means fights go so much more smoothly. Plus, often I found that a PW:S absorbed all the damage a mob could do to me before it died, especially once I got Inner Fire (armour affects the size of the hit before absorbs are taken into account, so you absorb more, smaller hits with IF up).

Fade is an anomaly here, slightly at odds with the simplification of the game at low levels. You get given it at level 8, but since it has zero effect in solo play, and you can’t enter dungeons until the early teens, and no one really manages aggro in Ragefire Chasm anyway, I’m puzzled that it’s not given to us a bit later, nearer level 20 or so when dungeons become a bigger part of the experience.

Anyway, let’s check up on our Priestly toolkit so far. New spells are in green so we can track the evolution of the Priest.

Spell Obtained at level Current Rank (level 15)
Lesser Heal 1 3
Power Word: Fortitude 2 2
Smite 1 3
Shadow Word: Pain 4 2
Power Word: Shield 6 2
Fade 8
Renew 8 2
Mind Blast 10 1
Resurrection 10 1
Inner Fire 12 1
Cure Disease 14
Psychic Scream 14 1


Any other tips?

Here goes:

  • Don’t worry too much about Shadow Word: Pain. It’s just not worth the mana at low levels.
  • When you get to around level 10, go buy yourself some Ice Cold Milk from an Innkeeper or drink vendor. You’ll be needing it soon.
  • If you can afford it, pick up a wand when you pass through a city. Enchanters make loads of Lesser Magic Wands and Greater Magic Wands as they skill up, so supply tends to be high. Wanding for the last few seconds of a fight saves you mana from casting a big spell on something almost dead, and gets you into the not-casting, higher regeneration period earlier, so you’ll have more mana for the next fight.
  • When you get to level 11 or 12 and you’re done with your faction’s area, consider skipping Westfall/Barrens/Silverpine/etc and instead heading off to either the Blood Elf or Draenei intermediate zone instead. Because they were introduced in The Burning Crusade, they benefited from much neater quest locations and flow, and tend to give more appropriate and useful rewards.
  • If you’re thinking of taking up a gathering profession, go to your Capital and pick the profession up early. Once you get to the level 12-20 zones you’ll find the starter nodes are more sparse and the next rank of nodes require skills of 50+
  •  

    Next time

    Level 15 opens up the random dungeon finder, so stay tuned for the fun and shenanigans!

Possibly Related Posts:

  • No Related Posts
Categories: Levelling

Teething Problems

Posted by Malevica on June - 17 - 2010

Apologies to people who found their feed readers suddenly full of old posts today.

To be honest I’m not entirely sure what happened there, but I’ve stopped fiddling with things in the Settings menu for now, so fingers crossed that’s all the blips!

Possibly Related Posts:

  • No Related Posts
Categories: Blog Stuff

And in with the new!

Posted by Malevica on June - 16 - 2010

Welcome to the new, improved, hopefully still functional Type “H” for Heals!

This is just a quick post to confirm you are indeed reading the right blog and subscribed to the right feed, so congratulations, and thanks again for reading.

Because I’ve redirected the old url to this one you will not need to update bookmarks, but you will need to update your RSS feed subscription if you use that.
The new urls are http://typehforheals.com for the home page, and http://typehforheals.com/feed for the RSS feed.

Pewter unknowingly spurred me on when I saw the new guild site she’s been working on (it looks awesome, by the way!).

Thanks for reading, and for bearing with me during the transition.

Possibly Related Posts:

  • No Related Posts
Categories: Blog Stuff

Healing Heroic Professor Putricide

Posted by Malevica on June - 15 - 2010

For the last couple of weeks my guild has been working on Heroic Professor Putricide, and I thought I would share some of the lessons we’ve learned over the nights.

I’ll assume that you’ve seen the normal mode of this fight, so if you haven’t then the mechanics might be unfamiliar.

Phase 1

The big differences between normal and heroic here is that the Volatile Ooze (green) and Gas Cloud (orange/brown) hurt more and move faster, and the addition of the Unbound Plague.

The Ooze and Cloud are easy enough to deal with, you just pull out the strategy you used initially, and possibly stopped bothering with once the buffs began ratcheting up:

  • When the green Volatile Ooze is spawning, we have all the melee DPS gather next to its spawn point, aiming to be knocked back to the table (all in the same direction is important, and towards the table is a good habit for transitions), and the ranged and healers all stand well away so the Ooze has a long way to run. The biggest problem people are those who don’t get in quickly enough and are therefore not knocked back. If you don’t think you’re going to make it, back out again rather than standing at 10 yards, your raid will thank you.
  • When the Gas Cloud is spawning, everyone should stay at range until it has got a target. If it’s not killed in time and is going to pick a different target, everyone should run away from it. A melee getting hit by it immediately has a fair chance of killing raiders, and is not recommended.

If you get your positioning sorted out, and people are quick on their feet, these shouldn’t pose many problems.
As a bonus tip, having a Holy Priest specced for Body and Soul is not essential but extremely handy to save a Gas Cloud target who finds themselves trapped or unable to escape.

From a healing perspective, the melee will be taking the brunt of the damage in this phase, along with the tank who will be taking 30-40k blows from the Professor. An Ooze exploding on a typical melee complement will be landing for around half their health each, a bit more if people are slow. This is not hugely dangerous unless they get an unfortunate hit again shortly afterwards, in which case you need to have words about positioning.

It should also be noted that the person with Volatile Ooze Adhesive or Gas Bloat will be taking 10-14k ticks, so they do need some focused healing.

The fight as a whole is extremely mobile, so healers can help themselves by assigning people to sectors of the room. You will need to move throughout the fight, but having somewhere to gravitate back to helps to ensure that everyone is in range of someone.

The extra wrinkle in Heroic mode, which begins in Phase 1 and continues to the end of the fight, is the Unbound Plague. This is an undispellable debuff placed on a random player every 60 seconds (although he seems to delay casting in at the start of each phase). The plague has a 60 second duration, but the damage done increases with every 1s tick, as illustrated in the table below, until it gets passed on to another person by running into them. That person keeps the duration the plague had when it was passed, but the damage starts low again.
(Edit: I’ve corrected an anomaly in the table at stack 14, which was due to an absorb being credited fully and artificially raising the number to 17338).

Tick Damage Increase
1 932
2 1164 1.25
3 1455 1.25
4 1819 1.25
5 2273 1.25
6 2842 1.25
7 3552 1.25
8 4441 1.25
9 5551 1.25
10 6938 1.25
11 8673 1.25
12 10840 1.25
13 13551 1.25
14 16938 1.25
15 21173 1.25
16 26466 1.25
17 33083 1.25
18 41354 1.25

The upshot of all this is that the plague needs to be passed off at around the 10-11 second mark. It’s theoretically possible to hold it for longer, but with latency, the risk of an extra tick, people running out of range, and all manner of other unforeseen problems, it’s best to err on the side of caution.

Vent/TS help a lot with this. When you get the plague, look around you for someone to pass it on to. Avoid people who’ve already had the plague, identified by a green haze around them (or the Plague Sickness debuff on Vuhdo/Grid), because Plague Sickness increases the damage the plague does to you by 250% per stack, and you gain a stack when the plague leaves you (60s duration). Once you’ve identified your target, tell them on Vent or whisper them (%t macros can be handy, think back to Lady Vashj), so they know not to run off at the wrong moment. We found it somewhat helpful to make /say macros with something like “I’m free” or “WTB plague” to let people nearby know you’re available to pass plague to.
Healers need to remember that the person with plague will need dedicated healing, preferably from more than one person, and that if a healer gets it they will not be able to heal themselves as effectively if they’re moving to pass it on, so be sure to cover for your fellow healers!

A refinement you can use is to look at the duration of the plague. If it has 10 or fewer seconds left you can keep it until it fades. This minimises the number of passes, and thus keeps more people without Plague Sickness. It helps if you announce your intention to keep it, so healers can keep a close eye on you and people know not to try and take the plague off you.

Finally on this phase, what to do if the plague gets into the melee? Well, the simplest thing to do is to just let it bounce around. It only does damage when it ticks, and it’s often passed on before it can tick. But this can’t carry on forever, because with high stacks a slow pass could mean a one-shot for your melee, so you do need to pass this off eventually.
The easiest way to pass it off is when the Volatile Ooze is exploding and the melee get knocked out to range. If you have the plague when you get knocked back, just pass it to a nearby ranged player. But please, make sure you actually have got rid of it before running back in.
If this isn’t convenient, have your spare tank(s) stand slightly further out from the melee group. When they get the plague they can quickly step away from the melee cluster and out of passing range, and then hand it off to a ranged player. Warriors with Intervene work well for this role.

Transition

Timing of the transitions is a huge deal in Heroic mode. Because Putricide will spawn 2 additional adds in this phase, one Volatile Ooze and one Gas Cloud, having another add up at the same time will probably lead to a wipe because they can’t all be slowed. Stop DPS fully at 82% (DoTs will tick him down to 81%), and be sure to burn him under once the previous add is dead, before he can spawn another one.

Where in Normal mode Putricide would stun the raid with Tear Gas, in Heroic he runs to the table and spawns a Volatile Ooze and a Gas Cloud simultaneously from their usual positions. What’s more, half of the raid will gain Ooze Variable, making them only able to attack (and according to the tooltip, only able to be targeted by) the Volatile Ooze, and the other half will gain Gas Variable, making them only able to attack (and be targeted by) the Gas Cloud.

Positioning is everything here.

Everyone with the Ooze Variable should gather up under the Volatile Ooze, standing on the table side of it so they will all be knocked in the same direction. Everyone with the Gas Variable should run away from the Gas Cloud’s spawn point, and stay away from the Ooze spawn point as well since sometimes they seem to target the “wrong” people.
The reason for this grouping is that you maximise your chances of having enough people gathered on the Ooze when it explodes, and you can DPS it while it is spawning and acquiring a target.

Bear in mind that the Variable debuffs seem to be random, so you can get more healers in one team compared to another. Healers can and should do some DPS here, as getting the adds down quickly is extremely important.

The Abomination should be able to apply three slows in this phase, one to the Ooze and two to the Gas Cloud is recommended. To do this the Abomination needs to leave a pool or two intact in order to suck them dry during the transition. They do not grow while the Professor is at his table, so this cannot be relied on for energy generation.

Phase 2

A bit of an anticlimax after the fun of Phase 1, there’s not much different here. The Unbound Plague continues (after a delay at the start before the first plague is introduced), the Ooze/Gas still spawn, and the Malleable Goo works the same as it does in Normal mode.

The only real difference is that there are three Malleable Goos on Heroic, rather than two on Normal. This makes it a bit trickier to avoid them, especially if several are launched in roughly the same direction, but if you’re attempting Heroic Putricide you should be able to cope.

Don’t worry though, things get more exciting at 35% when Phase 3 starts, initially with a transition like the one at 80%. Stop DPS at 37%, kill off the previous add and then burn him down to under 35% quickly.

Phase 3

Unlike the Phase 1 – Phase 2 transition, I’ve not given this a separate section. This is because it helps to think of Phase 3 as one long DPS burn phase, rather than a transition followed by a burn.

At 35% Putricide again runs to the table and again spawns one of each type of add, which should be handled as you did for the Phase 1/2 transition. Once he’s finished at the table he will become active and begin stacking Mutated Plague on his current tank every 10 seconds or so (later if he’s casting at the time).

Just like Normal mode the Malleable Goo and Choking Gas Bombs will continue, and the slime puddles will continue to grow, blocking your path. This burn phase will last longer on Heroic though, so you need to be more careful where you place the slime puddles. Being ahead of the boss is a big no-no. Also, because DPS is so crucial, it is vital for ranged and healers to stay at range so that you always have 8 or more, meaning Malleable Goo won’t target melee. If this happens the DPS loss is crippling.

The big damage source is the Mutated Plague mentioned earlier. This is applied to Putricide’s current tank every 10s, roughly, and deals raid-wide shadow damage dependent on the number of stacks, increasing faster than linearly with stacks so a 2-stack does more than twice the damage of a 1-stack.

To keep stacks as low as possible, tanks will be rotating every one or two stacks. We use a rotation which means our tanks get to 2 stacks initially, then take one more at a time after that, i.e. 1-2-1-2-1-2-1-2-3-3-3-3-4-4-4-4. The discussion that follows will assume this rotation, so if you use something different you may need to readjust the figures.

For healers, it’s vitally important to understand the damage profile here. Just watching the healthbars last night, once we got a couple of tanks on 3 stacks the bars just start to plummet and very quickly we were down half a raid.

I went through the logs and plotted out the damage profile, because it’s useful to see this. For reference, we’re wiping at around 90-100s, when 3 tanks have got 3 stacks on them. Times are from the first stack application on the first tank, which is pretty much immediately once he mutates. We use a 4-tank strategy. The 3-tank approach is frankly terrifying!
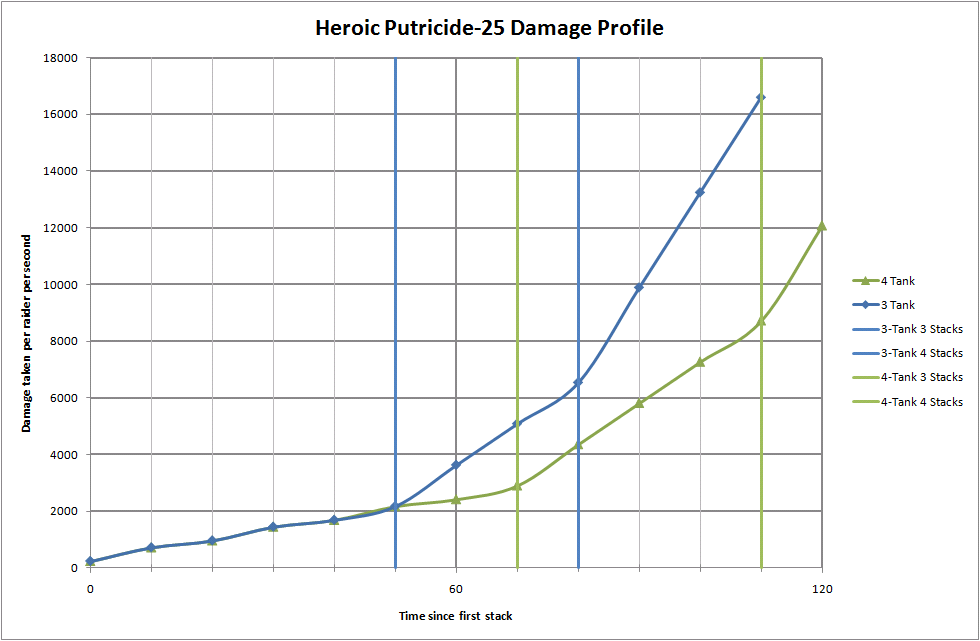
Heroic Putricide-25 Damage Profile

An illustration of the damage taken per player per second due to the Mutated Plague. This chart compares a 3-tank an 4-tank strategy.

At the point we’re wiping, each raider is taking an average of 6-7k damage per second (the ticks are every 3s, so there’s 4 ticks spread over a 3s window), so without heals we’re talking about 4-5 seconds time to live. At 70s (when the last of the 2-stacks is going on, before we hit the 3-stack regime) the TTL is over 10s. I’m assuming 30kHP, since that’s basically what I have in a raid, and I’m important!

Those numbers are pretty scary, especially when expressed in TTL terms, and when you look at how quickly the raid damage ramps up. The proportion of damage shifts dramatically towards the raid in the end of Phase 3, so healers need to be prepared, and assigned, to break off the tanks and start healing the raid. You’re only needing to buy maybe 10-15 seconds, but that’s crucial.
Healers need to be fully aware of the stacks on the tanks in order to know when to switch from tank-healing to raid-healing. Tanks can help out by saving their shiniest (damage-reducing) cooldowns for that point. Bonus healing isn’t as useful as a damage reduction when healing’s at a premium.

Things like Divine Sacrifice are amazing, but need to be saved for a very late in the fight. They’re needed when the 3-stacks start to go down (Paladins can use their judgement (see what I did there?) about the exact timing) to flatten the curve and buy a few more seconds. Your Paladins might be using them to save people from Goo, but people really need to be dodging that, not using cooldowns for it.

Also remember that Mutated Plague is shadow, so an Aura Mastery on Shadow Resistance Aura could be awesome too.

Saving this for last, because it’s often out of the healers’ control, but the best way of getting round the problem of wiping late in Phase 3 is simply to get it over quicker. Do it in 80 seconds and life’s easy; need 100 seconds and it’s a real struggle. The gradient of that curve turns into a pretty hard Enrage once there are 2-3 3-stacks active. Actually it’s easily arguable that dropping a healer might be a good way to go: it sounds counter-intuitive, but killing him in 90s compared to 100s lightens the healing demand by a full 20%, and might be enough.

One huge tip is to try blowing Bloodlust as soon as the adds are active in the transition, once debuffs are up. Here’s the logic:
Looking at Phase 3 as a single burn of adds plus boss, the logical thing is to use Bloodlust where you can do the most effective damage. In the transition, there are dangerous Oozes and Gas Clouds active which would be much better dead, and if they die early then you get uninterrupted, movement-free DPS time on the boss while he’s still at his table and in his initial tanking position before he throws out the Goo, or drops the bombs, or the slime puddles have grown too much, etc.

And healers can also help out with the DPS, especially early in the phase when healing’s light, by adding DPS. Pop Shadowfiends and Fire Elementals, lay DoTs or other damaging spells down when you have spare GCDs, it all helps.

Good luck!

Possibly Related Posts:

Categories: Advice and Strategy