Home
Subscribe:
Contact:
Subscribe to this blog by RSS Follow me on Twitter
Subscribe to this blog by RSS

Archive for May, 2010

"You Are Not a Tank Healing Spec"

Posted by Malevica on May - 27 - 2010

I came across the line in the title while dipping into the EJ WotLK Priest Healing Compendium recently, and it made me think about how we tend to try and pigeon-hole healers.

Why do we label healers?

Humans are fundamentally pattern-seeking creatures: it is our natural tendency to try and classify the world, to relate it to things we have experience of, and to reduce it to a set of simpler rules.
In WoW, when a raid leader is faced with 5-7 healers to assign, of up to five different specs, all with unique personalities and skills, their natural reaction is to fall back on these heuristics in an attempt to reach as nearly-optimal a solution as possible.

Because the assignment is based on these heuristics, the quality of the classification scheme will directly influence the quality of the resulting assignment.

Common classification schemes

I’m going to focus on two today. The first is the common “tank” and “raid” healer dichotomy, and the second is a modification which divides healers by their abilities rather than by role. I’ll also describe the ideal, which is what guilds should be aiming at.

“Tank healers” and “raid healers”

This is, for the most part, the prevailing paradigm in WoW today. Not in decent raiding guilds, I’m sure, but in my experience this is how the majority of players and raid leaders still think.

The trouble with this model is that it breaks down fairly quickly in the current game. Where does a Discipline Priest fit? What about a Resto Druid? Come to think of it, on many encounters a Shaman might be a weak ranged healer (Rotface heroic leaps to mind) but excel at bouncing Chain Heals through the melee, are they still a “raid healer”?

Typically Disc priests and Holy Paladins get dropped into the “tank healer” box, and everyone else into the “raid healer” box. And the boxes are fairly fixed across a raid, even though, as the Shaman example shows, this can change a lot depending on the fight.

In my experience the biggest weakness of this scheme is that it also tends to lead to over-simplified assignments. “X and Y on tanks, rest on raid” is very often inadequate, especially on challenging content, where healers don’t know each other well, or where healer capabilities are unknown.

Single-target vs multi-target healers

This is a slightly different way of categorising the healing population, but sticking with two groups again. I think this works a little better than the first scheme, because it allows the raid leader to match healers to the damage profile, rather than arbitrary roles.

For example, as a Discipline Priest I’m generally a single-target healer. I know that 25-mans tend to have Disc Priests on bubble-blanketing, but I’m still only handling one person at any one time. I can tank heal, if a single tank is taking sustained damage, but I can also very effectively heal up random secondary target damage (like Lana’thel’s Bloodbolts or Deathwhisper’s Shadowbolts) or rescue individuals who find themselves standing in fire.

It also allows Shaman to be used on tanks on fights where it’s appropriate, Marrowgar being a great example, and Blood Queen Lana’thel another decent example. When you have multiple tanks taking simultaneous damage, rotating Chain Heal across each tank in turn is a very effective tool; far more effective than trying to get a Disc Priest to heal three targets.
As another example, consider using a Shaman or two as part of your tank healing assignment on heroic Saurfang. They can keep a melee Mark up fairly well, while contributing significantly to the healing on the tanks. If you can even free up a Holy Paladin, that allows you to cover an additional Mark at range.

There are some weaknesses of this scheme still. In particular there’s a lot of variation in the “multi-target” group, ranging from Holy Paladins (Beacon of Light) through to Resto Druids, which is not accounted for. In practice, treating Holy Paladins as single-target healers tends to work best conceptually.

This scheme also requires a bit more thought on the part of the person doing the assignments, but can lead fairly naturally to more individualised healing assignments.

The ideal

Clearly, the ideal situation is for the raid leader, or the healing lead, to know the individual strengths, weaknesses, preferences, specialities and foibles of every healer in the raid team, and assign on that basis. There’s not much reliance on heuristics here, and the maximum information is being used to inform the decisions being taken.

As an example, I’ve talked before about healing Ulduar-10 as Disc with a Holy Paladin with few problems. We succeeded because we knew each other’s strengths and weaknesses and could adapt our tactics to each fight, despite the conventional wisdom that we had 2 “tank healers” in the raid.

But a PuG raid leader, or someone with new recruits in a guild, or simply someone who is less comfortable handling so much information, will need to simplify things to some extent.

Conclusions

You’ve probably figured out that I prefer to think about healers in the second way (when I’m not working with a guild group, where I’m a lot closer to the ideal). I prefer assigning healers based on their class’s abilities and strengths, in relation to the damage that will be taken.

This helps me understand how to relate to Holy Paladins. As a Disc Priest I’m often lumped in with Holy Paladins as “tank healer”, but the big difference is that Holy Paladins are dual-target healers, so on fights with more than one tank they will have a much easier time than me, and it’s noticeable in the raid (in the same way that Bone Storm is a very different proposition with and without a Disc Priest). Our single-target HPS is comparable, but they can double their overall HPS in a GCD, and they can sustain it over long periods of time, while mine is quite bursty.

Every healers is suited to different situations, and it’s much better all round if the person doing the assigning takes account of that.

And stop putting me on tanks, I really don’t like it.

Possibly Related Posts:

Downranking Power Word: Shield

Posted by Malevica on May - 11 - 2010

Last time around I talked about healing the Lich King as Discipline, and mentioned the idea of downranking Power Word: Shield to maximise mana returns from Rapture. At the time I noted a suggestion, picked up on PlusHeal, to downrank to Rank 12. I’ve since had the opportunity to do a test, and I want to present some results and numbers.

Numbers

First thing is to push some numbers through a spreadsheet to produce estimated output numbers for a range of ranks. From the spreadsheet I produced comparison tables, reproduced below, assuming 3600 spellpower to represent the amount I typically have when raid-buffed and 4000 spellpower to represent a peak case when, for example, the Ashen Verdict ring has procced.

These assume 4xT10 and the 15% version of Hellscream’s Warsong.

Average absorbs for ranks 11-14 of PW:S, at 3600 Spellpower

Average absorbs for ranks 11-14 of PW:S, at 4000 Spellpower

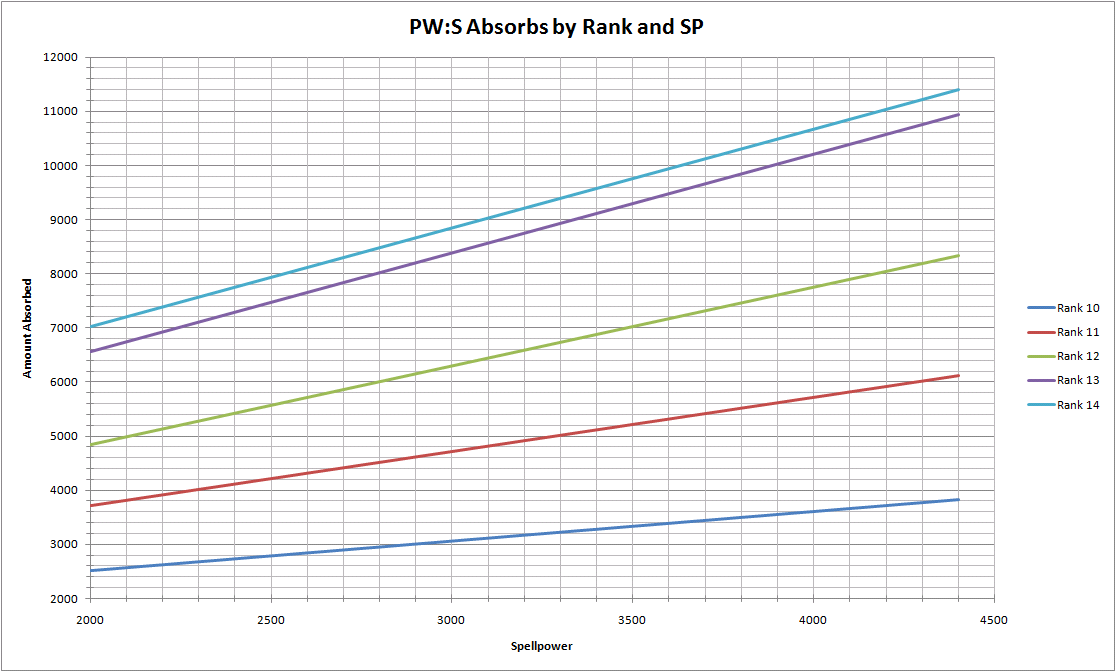
You can use the graph below (click for a larger, more readable version) to estimate the amount you’ll absorb with your typical raid spellpower. You should use your typical raiding spellpower, so pop open your character sheet during a raid fight if you don’t know it. (This saves me having to produce multiple charts to account for totems, buffs, procs and so on).

PW:S absorbs by spellpower and rank

Read across to your typical raiding spellpower (as shown in your character sheet during a fight) and then read up to see how much each rank of shield will absorb

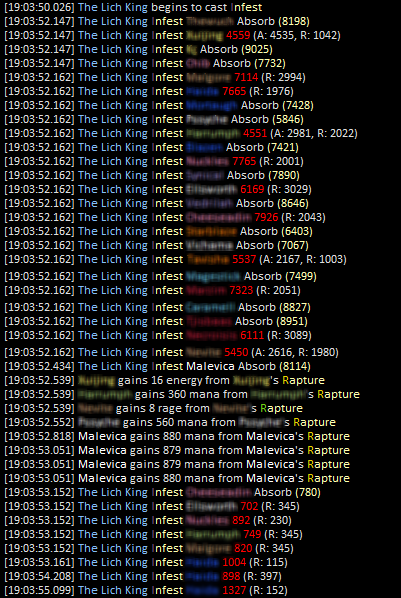
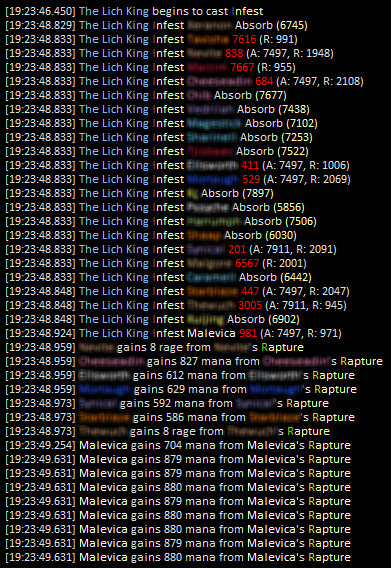
Then I went through raid logs to get some real data on absorbs. In the recent raid I used PW:S 12 as my primary rank, based on the PlusHeal suggestion. Here’s some WoL extracts: the first is with PW:S Rank 14, the second is with PW:S Rank 12. Note that when these logs were acquired the ICC buff was at 15%.

WoL extract showing absorbs and mana returned from Rapture, with Power Word: Shield Rank 14

WoL extract showing absorbs and mana returned from Rapture, with Power Word: Shield Rank 12

Results

I definitely made some gains using PW:S 12 over PW:S 14, and the mana situation improved subjectively, but the log shows that I could have gained yet more mana back.

In the first case I cast 18 shields at a cost of 11988 mana, and gained 3518 mana back.
In the second case I cast 20 shields at a cost of 13320 mana, and gained 7036 mana back (I have not included the extra Rapture proc from bubbling myself, in case you wonder about the maths. I think it’s better to compare without it).

Even in the better of the two cases I am only getting back around 53% of the mana I spent, and only 40% of the theoretical maximum of 17590 mana I could have got back from those 20 shields.

The problem is that my shields were too close in size to the size of the Infest hits for this trick to be totally effective. Both Infest and the shields varied in size between 7,000 and 8,000 so where Infest was low or the shield was high I didn’t get mana returns. The Ashen Verdict ring proc would easily be enough to rob me of an entire cycle’s Rapture returns.

Looking at the tables at the top, and given my current gear level of ilvl 264 across the board, plus the 277 reputation ring, I would conclude that I should drop further down to Power Word: Shield Rank 11 instead of Rank 12 to get better mana returns while still taking enough damage off the Infest to prevent it ticking on most people.
However, since I didn’t have mana issues with Rank 12, perhaps Rank 12 would be a suitable compromise between giving adequate mana returns and guaranteeing Infest won’t tick on people I’ve bubbled. It’s important to adapt your play to the rest of your raid, so if Infest is a problem for your raid it’s worth spending more mana on higher ranks.

Extra tip for VuhDo users

VuhDo, while being awesome in many regards, has a slight blind spot when it comes to spell ranks. Iza, the author, explains:

VuhDo is not using any spell ranks internally, which leaves it to wow client to choose the apropriate rank for the target’s level. Which should be 14 for rank 80 targets indeed.

Therefore if you want to use a lower rank of PW:S with VuhDo you’re going to need to use a macro instead, you can’t just type “Power Word: Shield(Rank 12)” into the box. So here’s a simple macro to use:

/cast [@mouseover] Power Word: Shield(Rank 11)

All you need to do is create the macro, being careful not to name it after the spell (also likely to confuse VuhDo) and then bind the macro to the keypress or mouseclick in VuhDo’s options.

Updates:

17th May – Added the chart, clarified the ICC and T10 bonuses being used, and tweaked some phrasing

Possibly Related Posts:

Disciplining the Lich King

Posted by Malevica on May - 7 - 2010

… Or: How I learned to love Power Word: Shield.

This post is a little overdue since we got our Lich King kills on 10 and 25 a few weeks ago, but better late than never, eh?

First there’s a bit of personal stuff about the kill itself, then I’ll talk phase by phase about how I approached healing this fight as a Discipline Priest.

The kill

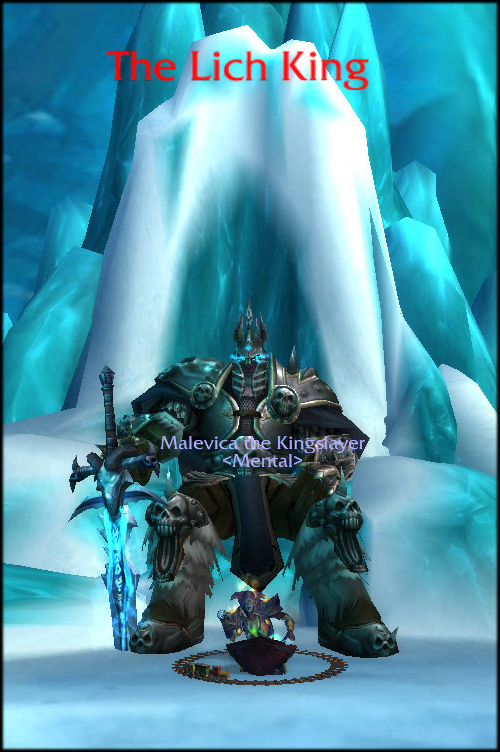
Malevica the Kingslayer sitting in front of the Lich King

Our 25-man kill came after around 100-120 tries. (I have WoL parses for 102, but I missed one night so some aren’t recorded.)

The feeling was incredible: we’d recently wiped at 11%, during which several people on Vent sounded like they were going to have heart attacks, so the tension as we saw ourselves getting closer and closer to 10% with most of the raid alive was palpable; the shouts over Vent when the RP started were deafening, and the whole experience was marred only by the tendency of my PC to crash WoW as soon as any video cutscene auto-loads (the same thing happened at the Wrathgate and after the build-up that got in /g I was miffed, to say the least). For those who care about the statistics, we were the 7th guild on the server to beat him on 25-normal.
We killed him on 10-man a couple of months ago, which helped us to understand some of the mechanics and feed that back to the 25-man, although I’ll say we had to be a lot tighter on the strategy and execution in 25-man.

Healing the fight as a Disc

Phase 1

Bubble, bubble, bubble, bubble, bubble, bubble, bubble, bubble, bubble, bubble, ProM, bubble, bubble, bubble, bubble… Ah, you get the idea.

Pretty much the best thing a Disc Priest can do here is control Infest, by keeping bubbles on the raid as much as humanly possible. The rest of the damage going out is focused on the three tanks, and Disc tank healing is quite time-intensive so it’s much better left to the other healers to cover it.

Infest deals around 8k damage to the whole raid and keeps ticking for 6k (initially, it rises over time) until the player’s health is over 90%, at which point the debuff is removed. A full PW:S can absorb this damage entirely, preventing the player’s health from dropping at all, so Infest will not be a problem for this player at all.

The refinement to this technique for a Disc Priest is maximising the mana returns through Rapture. Now I was under the impression that the Rapture trick had been “fixed” a couple of patches ago so that you were no longer able to gain multiple mana returns from multiple shields being removed simultaneously, but it seems this has been “unfixed” again.
I can manage the fight adequately without much Rapture optimisation simply by using my mana cooldowns judiciously and taking it easy in the first transition phase, so if you don’t nail it don’t panic. But if you can get it then so much the better.

So, how to maximise Rapture returns? There are two things to remember:

  1. You can only trigger Rapture every 12 seconds. This means that if you bubble a tank and the shield is removed you get one Rapture return and then nothing for 12 seconds, probably missing out on the next Infest cycle. So avoid bubbling tanks, or anyone else who is frequently taking damage (like that Whirlwinding warrior who grabs every round of adds).
  2. Rapture also only returns mana when ” your Power Word: Shield is completely absorbed or dispelled”. Even before the buff to PW:S absorbs, the vast majority of bubbles fully absorb the Infest and don’t return any mana.
    One option is to not reapply a partially-consumed shield, which would let it be removed the next time around, assuming it lasts long enough. The trouble is that this negate the point of bubbling in the first place, absorbing only a small portion of the Infest hit.
    The other option is to downrank. Usually downranking is counter-productive, since the lower ranks cost more than the top rank, but in this case getting Rapture gains more reliably outweighs the increased cost. I’ve not been in a LK raid since reading about this on PlusHeal so I’ve not got round to testing this out in detail, but the suggestion on PH is to drop to Rank 11 or 12.

Besides the mad bubble-spam, the other thing that’s very useful is to keep Prayer of Mending on cooldown. I tend to bounce it off one of the tanks and let it sit where it ends up.

Prayer of Mending is great for helping heal the tank(s), especially if you get it to bounce between the two add tanks, but it also helps a lot on Infest by helping to heal up a few people who missed out on bubbles or had low health for other reasons.

Phase 1.5

To be honest this phase isn’t ideal for a Disc priest, so I tend to use this as a bit of a mana break. I’ll throw heals at the tank if they need it, but I don’t get too involved with the raid healing because the Druids and Shaman are much better suited to it. Bubble-blanketing here is very mana-inefficient and you’ll need that mana going into Phase 2, so I’d stick to keeping a ProM bouncing and helping tank healers.

Also remember that Priests are among the higher DPS healers, so help out on the Frost Spheres if any are getting close. A well-timed Penance or Holy Fire could save the day here.

The other thing a Priest can do here is to Dispel the Soul Shriek off the tanks. A silenced tank is a less effective tank, and the raid needs all the threat lead they can get to kill off the Raging Spirits as quickly as possible.

There will be an Infest very early in Phase 2, but unfortunately Pain and Suffering renders pre-bubbling a bit useless. As soon as the Lich King starts casting Earthquake though you should be starting your bubble cycle, maybe avoiding people with high stacks of P&S.

Phase 2

Back to the bubbling, to keep Infest under control. You won’t be able to reach every player all of the time to keep them bubbled, so it will be a bit more hectic, but your default activity should be basically the same as Phase 1. There are other tricks you can employ though.

First, keep your eyes peeled for the person who will get Defile on them. Defile only grows when it damages someone, so if you can bubble them as they run out you might save one tick of expansion. It is worth talking to any Holy Priests in the raid though, in case they’re using Body and Soul instead to help the person run away more quickly.

Secondly, watch for the MT getting Soul Reaper on them. Since this hits for around 40k, boosting the tank’s effective health by 10k can easily be the difference between life and death if they have a health deficit at the time. Assuming you have a second tank taunting, wait until the taunt happens to prevent a mêlée swing from just removing the bubble again.

Thirdly, watch out for any of the MT healers being picked up by Val’kyr and be ready to switch to fill the gap immediately. Penance, a quick PW:S, a ProM or even a Pain Suppression can all be used to prop up a tank and support your fellow healers.

Phase 2.5

Another transition. As with Phase 1.5 I tend to slow down here and regenerate some mana.

Phase 3 – No more Infest!

The order of the day in Phase 3 is triage and reaction, with quite a strict priority.

The ultimate, top priority for this phase is Harvest Soul victims. One person will take 12-15k ticks every second, six in total (as shown in the log section below) and this person needs quick, focused healing, and failure on the part of the raid to keep this person alive could mean a wipe unless the tanks are very quick to notice and react to the resulting Enrage.
I usually default to PW:S first, then Penance as a follow-up, then take it from there.

WoL section, showing Harvest Soul damage on a player

The second priority for this phase is dealing with the risk of deaths from Vile Spirits exploding (Spirit Burst). The key here is to keep as many players as possible above 20k health at all times to keep them out of one-shot territory. At this stage of the expansion with Hellscream’s Warsong (or the Alliance equivalent) at 15%, most people will be approaching or above 30k HP, so you should be aiming to keep people above 70%.

Third priority is tanks again. Soul Reaper is still active in this phase, so watch out for tanks and use your PW:S to boost their EH as much as possible.

If you’re not engaged with any of the above, then I’d suggest falling back on keeping bubbles on the raid. People will get hit by exploding Vile Spirits and bubbles will help to prevent them getting into the insta-gib region in the first place.

A final note on what to do if you get Harvest Soul. The key is to heal Terenas Menethil as quickly as possible, since his DPS is in proportion to his current HP. First step is to get a PW:S on him to stabilise things, and then fall back on your high-throughput rotation. I might be out of date, but I tend to rely on PW:S > Penance > Greater Heal > FH until Penance is off cooldown again.
The other thing is to deal with the Soul Rip ability. This is the primary damaging ability the Spirit Warden will use on Terenas Menethis. Since Priests lack an interrupt, we should instead dispel the debuff off Terenas immediately to prevent this damage.

Possibly Related Posts:

A Long, Strange Trip Through the Battlegrounds

Posted by Malevica on May - 6 - 2010

In common with what seems like a large proportion of the WoW population, I took to the battlegrounds this past weekend to complete the final steps of the Long, Strange Trip meta-achievement, abandoned in disgust last year after failing to click the damn flag in WSG for the umpteenth time. This year was a refreshing change. Why? This time I had backup.

Before I get too far in, I need to say a huge thanks to my bodyguard in these battlegrounds. As last year proved, these achievements are a nightmare to attempt solo, so she helped so, so much.

My experience

When I tried this last year on my Priest, solo, I struggled. My problem is that I insist on healing in battlegrounds.
Normally this isn’t a problem: I don’t get the caps or killing blows but I do get to keep our flag carrier alive while he races up the tunnel, or hide behind the broken-down Fel Reaver and help our apparently-lone defender hold a flag. As long as someone does get the caps and kills then all’s well.

The trouble with the School of Hard Knocks achievement is that it requires me to take point:

  • Warsong Gulch – Return a flag. This requires me to be the quickest person to click on a dropped flag in order to get credit for returning it. As a healer I don’t stand much of a chance of actually killing a flag carrier, and I don’t get too excited about standing in melee range either, so I’m relying on other people killing the flag carrier and then me rushing in and spam-clicking to get credit. Last year I tried and failed at this for several battlegrounds in a row before this being the straw that broke the camel’s back. This time around I brought my friendly neighbourhood Feral Druid along and camped our flag with her. She did the killing and I did the clicking, and we got the achievement on our first battleground. We then continued our defence of the flag while our team capped a couple more times and we won the match. I even got Warsong Perfection as a tidy bonus.
  • Eye of the Storm – Capture a flag. This one requires that the enemy be killed or chased off from the flag spawn in the centre, me to be the fastest person to click the newly-spawned flag, and then me to survive carrying the flag all the way to one of our towers. Actually this turned out to be the easiest one, since a DPS + healer combination is very effective at holding the centre, and I was allowed to pick up the flag. Doing this as a healer last year was pretty tough, since I couldn’t clear off the flag on my own and no one on my team seemed especially keen to capture the flag. Once I’d got my achievement, we helped out and went on to win the battleground. 2/2 so far.
  • Arathi Basin – Assault a base. Note that defending a base doesn’t count, it has to be already enemy-controlled when you attack it. This is another one which does not favour a healer: if there’s any sort of defence of the flag I don’t stand much of a chance of clearing it out, and since the healer is often (should be always, but people aren’t as logical as they should be) taken out first my chances of being able to assault the base ahead of any others who are assisting me are slim. Once again, a DPS + healer combo was plenty to clear out the 1 or 2-person defence left at a node so I could go in and assault it. Oh, and we went on to win that battleground too. 3/3
  • Alterac Valley – Assault a tower. Same as Arathi Basin really. If there’s any sort of defence I will have great difficulty clearing it out in order to assault the base, and my inconvenient lack of Crusader Aura makes it tricky for me to win the race to the towers. Not a problem, bring a pocket DPS along who can do my killing for me, and it’s easy. We then went on to tank Vanndar and three adds and won that battleground as well. 4/4

Now I’m not saying that I couldn’t do these achievements solo, but I would require a lot of cooperation or an even larger quantity of good fortune. Warsong Gulch would require me to follow the enemy flag carrier like a terrier until I got lucky enough to be the one to click the flag. Alterac Valley and Arathi Basin would require me to find an undefended node to assault. Eye of the Storm would require the flag to be undefended or me to be the fastest clicker and no one to attack me while I channelled the flag pickup.

Playing DPS makes this a lot more possible. I doubt I could take down two or three defenders but I have a much better chance of killing that lone rogue hiding around the back of the Gold Mine as a DPS than as a healer. That said, having a pocket healer probably makes life a lot easier for a DPS player too, guaranteeing the win for them rather than making it 50-50 based on who gets the jump on whom.

It should be borne in mind that I suck at PvP and have functionally zero resilience. I even use the no-resilience version of the PvP trinket from Wintergrasp, which I picked up for some fight or other in T7 or T8, lost in the mists of time. But I share this with a large proportion of the WoW community, and I’d like to think I have a better grasp of my character than most.

Harmful to PvP?

Well, my non-scientific, anecdotal, totally unreliable evidence would say “absolutely not”. Seriously, my BG stats are somewhere below 20% wins, but this time I managed to score 4 wins from 4 games. However, a hasty generalisation is not proof, and I’m quite sure there were Alliance with Orphans out who would tell the opposite story.

But most of these objectives are, at least so it seems to a PvP newbie like me, helpful actions. OK, deliberately allowing the enemy to kill you or dropping the flag so they can return it is not a helpful action, but guarding the flag? Capturing enemy towers or nodes? These are (or should be) the point of the game. Let’s not get into the fact that people don’t even wait for towers before attacking Vanndar Stormpike these days, they just push an ICC-geared tank into the fray and heal the living daylights out of them. If we wipe, we lose. C’est la vie.
I’ll agree that the Eye of the Storm achievement might be a little counter-productive if attempted unintelligently (like I did last year). There’s not much point capturing the flag when we only hold one tower because our focus should be elsewhere, but if we have the towers under control then a cap speeds things up and buys us a headstart.

The reason this causes such problems for PvPers in battlegrounds is in two parts: people are generally doing this solo, and everyone is doing this at the same time.

PvP in general, as with everything else in this massively multiplayer game is much more productive and successful if we cooperate and work as a team. Having people in your battleground with a specific goal who may ignore even the rudimentary coordination of a random battleground is not exactly a recipe for success.

But, as my experience showed, these goals can be beneficial to the battleground as long as only a small number of people are doing them. 8 people camped in our flag room would suck, but two or three people highly motivated to defend the flag are a good thing. Likewise a few people dedicated to recapturing nodes is beneficial in AV or AB. The problems come when too many people want to do this at the same time, like Children’s Week. Now you have a minority of people floating around the zone, doing the jobs necessary to win, and a majority of people racing to cap nodes or kill the enemy flag carrier.

You can see the thought process behind creating an achievement like this: encourage PvE players to participate in PvP, and reward them for completing the objectives of the battleground. This is fine if you’re bringing a small number of players in at a time, but doesn’t work when the numbers get too high. You need a range of roles and flexible people in a battleground to be successful.

Improvements

I don’t have any problem with being required to take part in all aspects of the game in order to get an achievement like this which rewards long-term commitment and wide participation. I don’t even mind that some of the achievements are a little difficult to obtain. I mean, I didn’t get a mount for Loremaster or World Explorer, so this one should require a little more from me.

But can we address the problems of the massive influx of players that cause such problems for the battlegrounds every year?

There’s a temptation to suggest making the holiday last two week rather than one to spread things out, but I’m not sure this would help. Think back to Noblegarden: the eggs are massively overcamped for the first day or two, then it seems there’s no one around at all. People just seem to want to do them as early as possible, and since a lot of people have work or school there will be a concentration of people at the weekend. Beginning holidays midweek rather than at the weekend might spread the load a bit though.

It’s difficult to introduce an artificial limit to the rate at which you can complete the achievements without punishing those who have limited playtime. For example, you could give the Orphan Whistle a 1hr cooldown, but then you’re limiting people to very few attempts.

You could change the achievement to a sort of “assist” system, where healing the person who returned the flag, or damaging the enemy flag carrier, generally assisting in the returning of the flag was enough to give credit, this would speed up the gaining of the achievement and at least get the surge through the system more quickly. Or you could give credit simply for winning the battleground.

Advice

If you’re a healer having trouble with this achievement, or dreading taking it on, the best advice from me would be to find someone to work with. If you can get yourself into a guild or other premade group that would be ideal, but even finding a partner willing to support you will make all the difference.

I would also encourage people to stick with the battleground once you get your achievement done. There’s no reason to screw over your fellow players by bailing the second you get your credit, and even one player swapping over make a big difference, especially in the smaller battlegrounds.

Possibly Related Posts:

  • No Related Posts
Categories: Anecdotes